# 安卓手机安装谷歌服务
# 手动模式
首先必须了解 Google 套件正常运行是由三个基础构建而成:服务框架,账户管理程序,Play 服务。
一般大家用的都是商店为基础,那就再加个 商店 组成四件套。
安装四个谷歌软件,软件安装的顺序很关键,(顺序出错要么闪退要么卡死)。
软件的顺序错了的话,基本上是怎么折腾也不会有结果的。
- 安装 Google Service Framework (谷歌服务框架 GSF)。
- 安装 Google Account Manager (谷歌账户管理程序,貌似已经不需要了?2022-05-20)。
- 安装 Google Play Service (Google Play 服务又称 GMS)。
- 安装 商店 Google Play Store。
可以从此处www.apkmirror.com (opens new window)下载所需的 APK 及对应版本。
# 自动模式
使用谷歌安装器
# 运行安卓项目
Android Studio>sidebar>project 切换找不到 app moudle 和 project moudle
- app moudle
为什么找不到呢,估计是 IDE 抽风 先记录下:
- 剪切一下 settings.gradle 下的 include ':app',
- 然后 Sync Project with gradle files,
- 再然后,粘贴回去 include ':app',
- 再 build 一下就可以了。
- project moudle
- 去项目根目录找到.idea 文件夹
- 找到.idea 后删除
- 重启 AS 就可以了
- Android Studio > sidebar 控制显示隐藏:通过 view -> tool windows -> 控制
# 红米手机
- 进入工程模式:
*#*#6484#*#*,用于调试屏幕等。 - Google“安全码”在哪里获取?首先在手机中打开科学上网软件,运行 Google Play,依次点击右上角头像-“管理您的 Google 帐号”-“安全性”,点击“安全码(获取一次性验证码以验证您的身份)”。
# debug
查看 APP 的 SHA1、SHA256 和 MD5 值:
keytool -list -v -keystore C:/Users/uia68502/.android/debug.keystore -alias androiddebugkey password: androidAPP name 以
app/build.gradle中的applicationId为准,AndroidManifest.xml为辅。Error running second Activity: The activity must be exported or contain an intent-filter编译能成功,但是在虚拟机或真机上面调试时,弹出这个错误,后来查了一下,要在 AndroidManifest.xml 中,把每个窗口都加上一句:android:exported="true"
比如:
<activity android:name=".MainActivity"
    android:exported="true">
</activity>
<activity android:name=".TextView_Paomadeng"
    android:exported="true">
    <intent-filter>
        <action android:name="android.intent.action.MAIN" />

        <category android:name="android.intent.category.LAUNCHER" />
    </intent-filter>
</activity>
2
3
4
5
6
7
8
9
10
11
这样就可以调试成功了。
- MacOSX 修改 Android Studio 使用本地 gradle,
gradle-wrapper.properties: distributionUrl=file:/Users/eric/.gradle/wrapper/dists/gradle-5.6.4-all/ankdp27end7byghfw1q2sw75f/gradle-5.6.4-all.zip - MacOSX 通过命令行启动安卓模拟器,以使模拟器可以访问外网:
/Users/eric/Library/Android/sdk/emulator/emulator -avd Automotive_1080p_landscape_API_33 -selinux permissive -writable-system -dns-server 8.8.8.8 -http-proxy http://your-proxy.com,需要替换/Users/eric/Library/Android/sdk/emulator/emulator为自己机器上的路径,Automotive_1080p_landscape_API_33替换为自己模拟器的名称,至于proxy、dns,区别不大。
# ijkplayer 编译 so 库
ijkplayer 编译 so 库 (opens new window)
# adb 命令
# 如何通过 adb 把文件从手机上拉下来?
如果有多个模拟器或者手机连接着电脑,先通过
adb devices -l查看一下设备号,然后通过adb -s 设备号 pull /sdcard/AIUI/cfg/aiui.cfg aiui.cfg,即adb -s deviceId pull remote/path local/pathD:\>adb pull /sdcard/AIUI/cfg/aiui.cfg aiui.cfg使用
adb pull命令并不能直接使用通配符(如**)来批量复制文件。adb pull命令只支持指定单个文件或整个目录。复制整个文件夹到指定目录下:
adb -s 4a790be6 pull /storage/emulated/0/DCIM/Camera/ /Users/eric/phone如果您只想复制 MP4 文件,可以使用
adb shell和find命令结合pull来实现:- 使用 find 命令查找 MP4 文件:
adb -s 4a790be6 shell find /storage/emulated/0/DCIM/Camera/ -name "*.mp4" - 使用 pull 命令逐个复制文件:
adb -s 4a790be6 shell find /storage/emulated/0/DCIM/Camera/ -name "*.mp4" > mp4_files.txt,由于 adb pull 不支持直接批量操作,您可以将所有 MP4 文件路径输出到一个文本文件,然后使用脚本逐个复制。可以使用该命令创建一个文件并将路径保存 - 在 Mac 上读取该文件并逐个复制:
while read line; do adb -s 4a790be6 pull "$line" /Users/eric/phone; done < mp4_files.txt
- 使用 find 命令查找 MP4 文件:
# 调试命令
- 查看连接的设备:
adb devices - 网络连接设备:
adb connect ip地址 // 不用加引号,可加端口号,默认为5555,adb disconnect ... - 证书管理页面:
adb shell am start -n com.android.certinstaller/.CertInstallerMain - 安装路径下的证书到系统:
adb shell am start -n com.android.certinstaller/.CertInstallerMain -a android.intent.action.VIEW -t application/x-x509-ca-cert file:///sdcard/cacert.cer - 查看某个设备的根目录:
adb -s 192.168.200.205:5555 shell ls /,如果是数据线直连的设备,可以把ip:端口换为adb devices里面对应的设备 id - 给当前网络设置代理:
adb -s 192.168.200.205:5555 shell settings put global http_proxy 192.168.200.102:8888 - 移除代理:
adb shell settings delete global http_proxy,增加下面这一句,不然只删除了规则,但是代理没移除:adb shell settings put global http_proxy :0 - 录屏:
adb shell screenrecord /sdcard/aijia_record01.mp4(adb shell命令),下载到本地adb pull /sdcard/aijia_record.mp4 /Users/niuzilin/Desktop(此命令切记不是 adb shell) - 导出日志(包括ANR日志):
adb bugreport - 键入文本:给当前连接的手机文本输入框通过adb的方式键入文本
adb shell input text 123 - 获取系统安装应用列表:
adb shell pm list package - 查看在手机上应用安装到的路径:
adb shell pm path "your app package name" - 发送广播:
adb shell am broadcast -n com.didi.davinci.conservices/.BootReceiver -a "com.didi.davinci.chaoandhao" - 设置系统时间:
adb shell "su 0 toybox date 123123592016.59"// 2016年12月31日23点59分59s - 杀掉某个进程:
adb shell am force-stop com.didi.app后面是包名 - 杀掉某个进程:
adb shell am kill com.didi.app后面是包名 - 杀掉某个进程:
adb shell am kill 37456后面是进程pid号 - 杀掉某个进程:
adb shell kill -9 pid用命令kill -l可以查看linux下的所有信号,SIGKILL:9号信号,Kill signal(杀死进程信号,linux规定进程不可以忽略这个信号)。kill -9中,9代表的就是9号信号,带有强制执行的意思,它告诉进程:“无论你现在在做什么,立刻停止”。 - 杀掉某个进程:
killall -9 com.android.simple.demo,killall (kill processes by name)用于杀死进程,与 kill 不同的是killall 会杀死指定名字的所有进程。kill 命令杀死指定进程 PID,需要配合 ps 使用,而 killall 直接对进程对名字进行操作,更加方便。killall 是进程名敏感类型,所以后面跟着的进程名需要是全部的名称 - 杀掉某个进程:
pkill simple,pkill -u mark,danny--结束mark,danny用户的所有进程。pkill 命令和 killall 命令的用法相同,都是通过进程名杀死一类进程,除此之外,pkill 还有一个更重要的功能,即按照终端号来踢出用户登录。pkill是进程名不敏感类型,所以可以只输入一部分名称 - 清除某个进程的数据:
adb shell pm clear packageName - 查看后台进程信息:
ps // 查看全格式的全部进程 或者 ps -ef 或者 ps | gerp "didi" - 查看当前设备的所有用户:
adb shell pm list users - 进入系统设置页面:
adb shell am start com.android.settings/com.android.settings.Settings - 查看本机全部已安装应用:
adb shell pm list packages - 获取手机某个应用的安装包:
adb shell pm path packageName 然后 adb pull /app的path /想放到的地址 - 屏幕信息:
adb shell wm - 点击某个位置:
adb shell input tap 50 250x:50, y:250. 在屏幕上做划屏操作,前四个数为坐标点,后面是滑动的时间(单位毫秒) - 获取当前展示的Activity信息:
adb shell dumpsys activity top - 获取应用信息/应用版本:
adb shell dumpsys package com.tencent.mm | [grep] version - 安装应用:
adb install -t apk.apk或者在项目中的gradle.properties全局配置中设置:android.injected.testOnly=false - 切换root用户:
adb root、adb unroot、adb shell、su、su root、su shell - 强制安装apk:
adb install -f a.apk - 查看用户信息:
adb shell dumpsys user - 创建一个guest类型用户:
adb shell pm create-user --guest "guest" - 启动和切换用户:
adb shell am switch-user userId / adb shell am start-user userId - 删除用户:
adb shell pm remove-user userId如果是当前用户,先做一下switch-user - 卸载apk:
adb shell rm -rf /system/app/packagename.apk / adb shell rm -rf /product/app/packagename.apk - 重启:
adb root / adb remount / adb reboot
# Mac 连接小米手机真机调试
- 小米手机开启开发者选项:
- 打开设置:在您的小米手机上,找到并打开“设置”应用。
- 找到“我的设备”点击进入,然后滚动到“全部参数与信息”选项并点击进入。
- 连续点击“OS 版本号”,直到看到提示“您已处于开发者模式,无需进行此操作”。
- 返回设置:返回到设置主菜单,滚动到最下面,点击“更多设置”,在最下面您会看到“开发者选项”。
- 开启 USB 调试:
- 进入开发者选项
- 开启 USB 调试:在开发者选项中,找到“USB 调试”并开启它。系统可能会弹出警告,点击“确定”以确认。
- 如果想用无线调试也可以打开,并自行设置。
- 连接手机和电脑:
- 使用 USB 数据线:使用 USB 数据线将小米手机连接到 Mac 电脑。
- 选择 USB 连接模式:在手机上,您可能会看到一个提示,询问您选择 USB 连接模式。选择“传输文件(MTP)”或“USB 调试”模式。
- 安装 ADB 工具:使用 Homebrew 安装 ADB
- 验证连接:打开终端运行 ADB 命令 --
adb devices -l,查看输出的内容里有无设备号,如果有,则表示连接成功。 - 在 Android Studio 中运行项目时,选择连接设备即可。
# 安卓开发笔记
# 四大组件
- Activity(+ Fragment)、Service、Broadcast Receiver、Content Provider。都要在AndroidManifest.xml中注册才能使用。
- Activity必须要有name,如果声明了intent-filter,那么如果有action的话,就需要设置category。action的name可以是自定义的:app包名+大写的具体名称,以便使用隐式intent去启动这个Activity。主Activity的category name一般是
android.intent.category.LAUNCHER,还要设置DEFAULT。label现在可以不设置,它主要是在actionbar上显示name。
# Activity
安卓启动流程: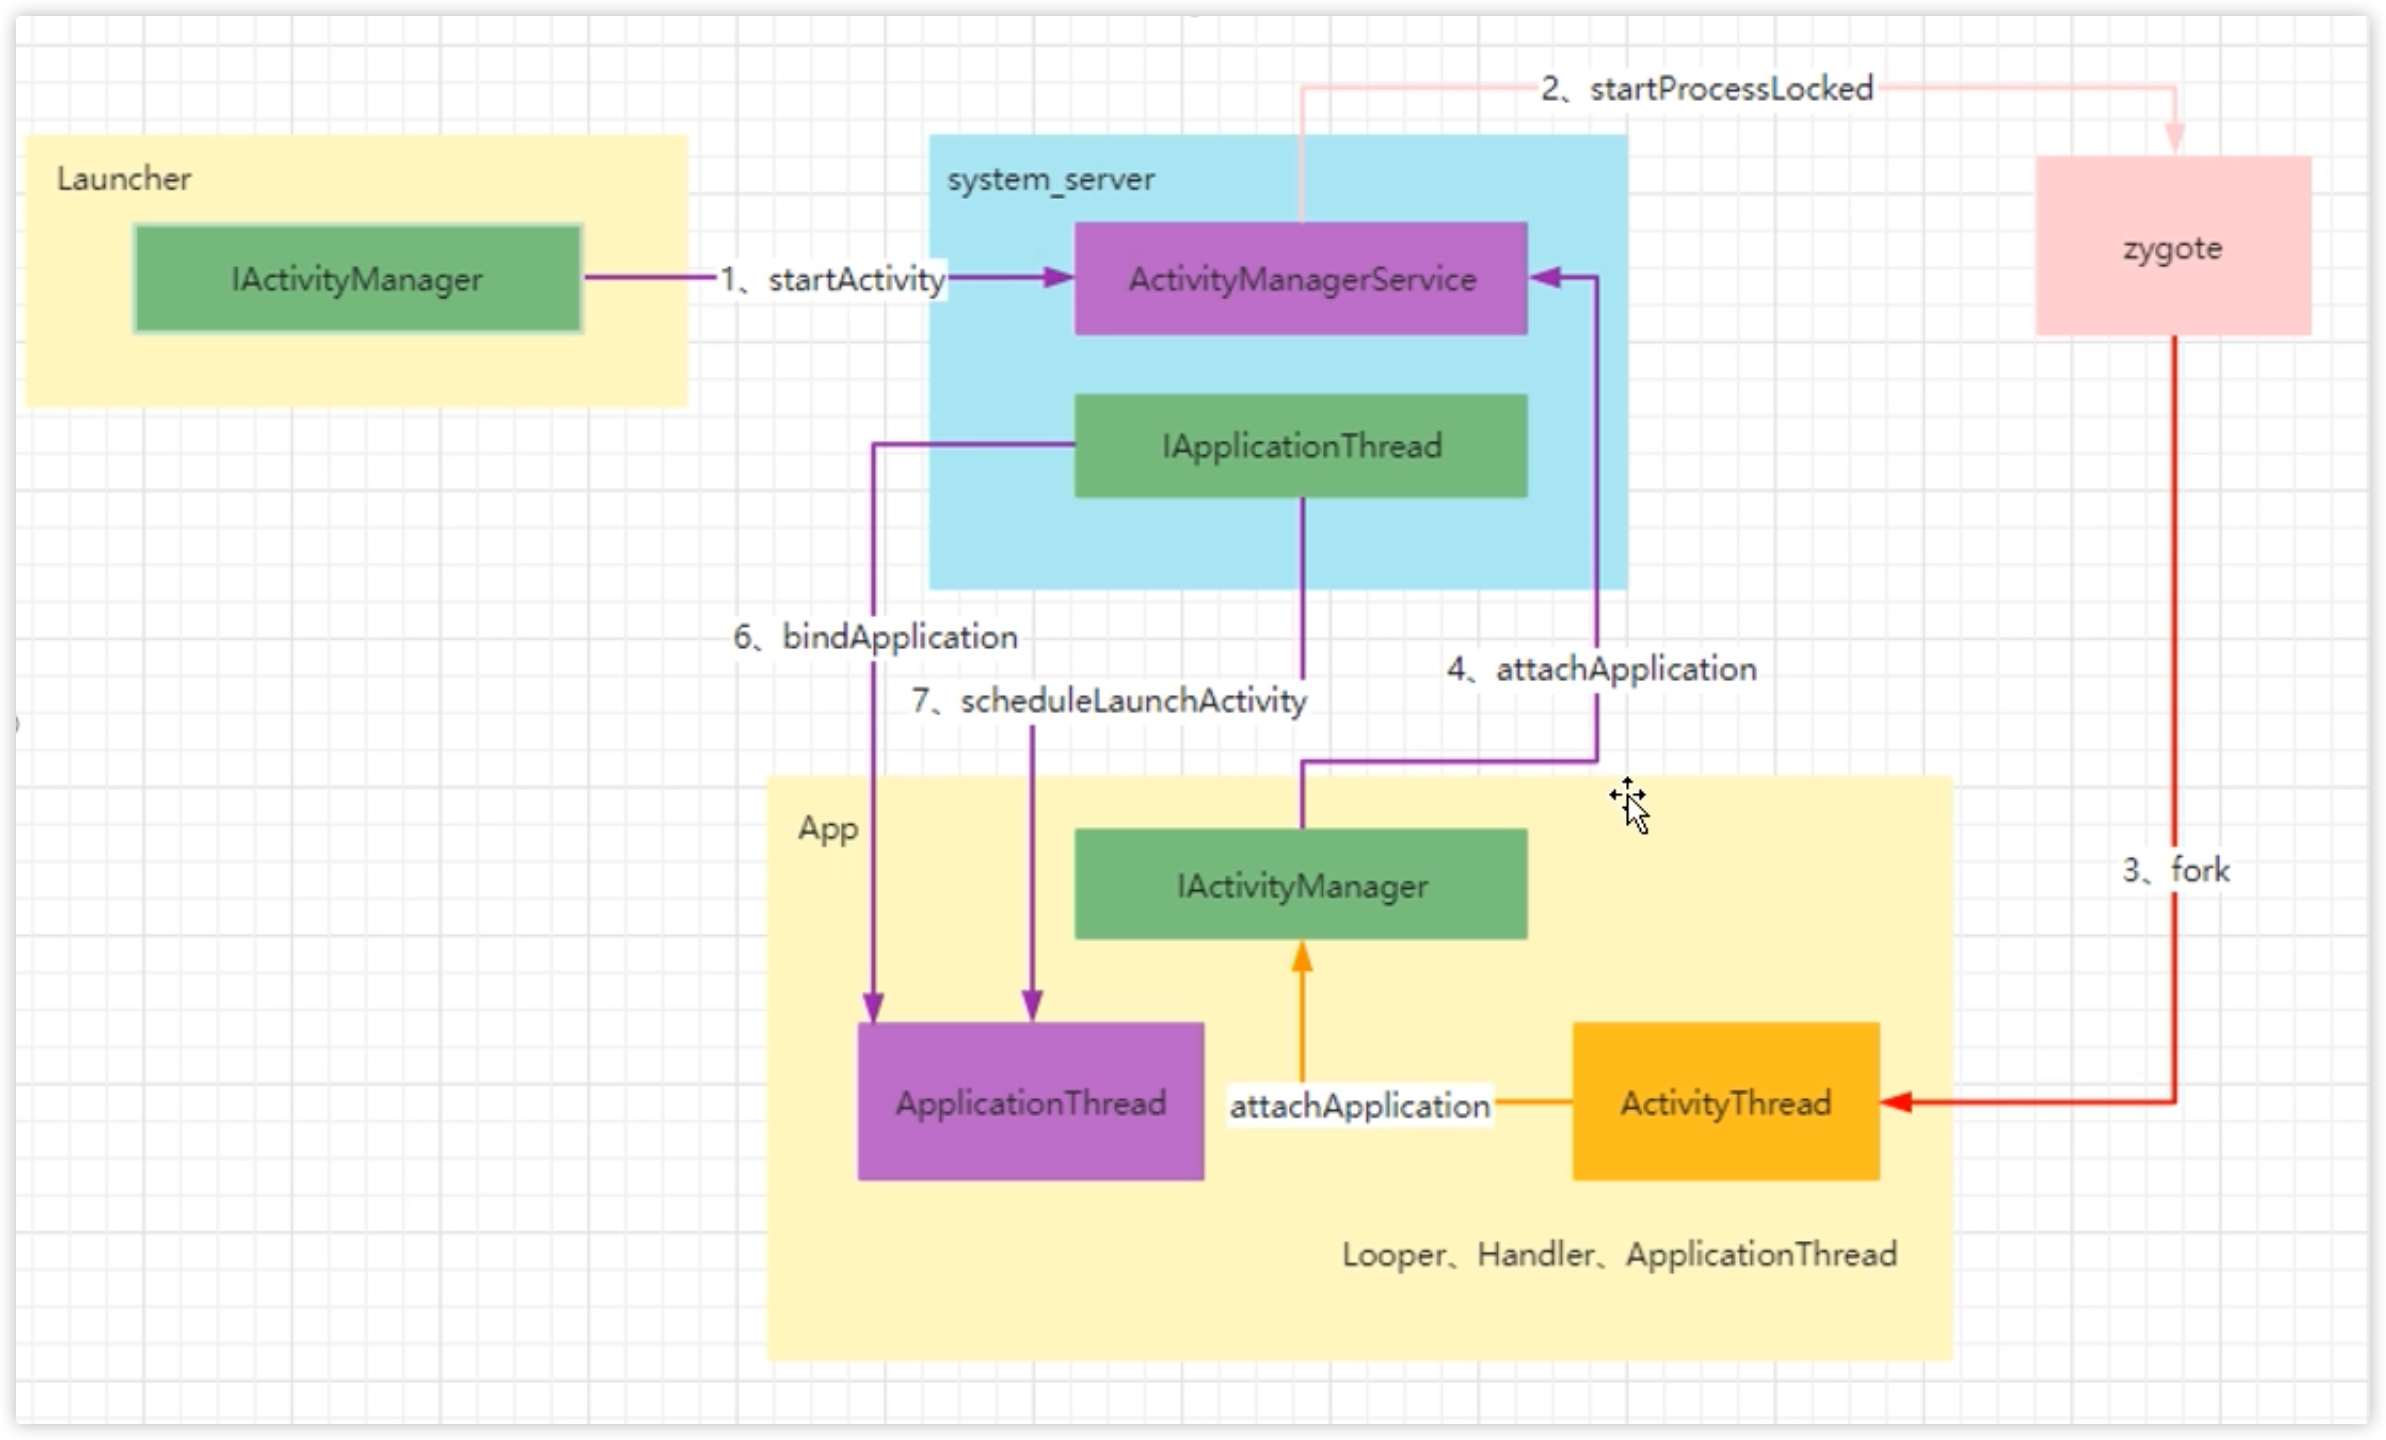
# Activity启动方式与数据传递
- 显示intent启动,通过包名来启动
// 常规跳转
// val intent = Intent(MainActivity.this, SecondActivity.class)
val intent = Intent(this, SecondActivity::class.java)
startActivity(intent)

// 携带参数跳转
val intent = Intent(this, SecondActivity::class.java)
intent.putExtra("name", "Eric")
intent.putExtra("age", 30)
startActivity(intent)

// SecondActivity中获取参数
val nameStr = intent.getStringExtra("name")
val ageNum = intent.getStringExtra("age", 0)

// 期待从目标页获取数据:startActivityForResult --> 比如启动相册获取图片,如下三步:
// 1. 从A到B
val intent = Intent(MainActivity.this, SecondActivity.class)
startActivityForResult(intent, 100)
// 2. 从B到A
val resultIntent = Intent()
resultIntent.putExtra("result_extra_string", "result_extra_string")
resultIntent.putExtra("result_extra_int", 888)
setResult(Activity.RESULT_OK, resultIntent)
finish()
// 3. 回到A接收处理数据
override fun onActivityResult(requestCode: Int, resultCode: Int, data: Intent?){
  super.onActivityResult(requestCode, resultCode, data)
  if(requestCode == 100 && resultCode == Activity.RESULT_OK && data != null){
    val resultStr = data.getStringExtra("result_extra_string")
    val resultInt = data.getIntExtra("result_extra_int", 0)
  }
}
2
3
4
5
6
7
8
9
10
11
12
13
14
15
16
17
18
19
20
21
22
23
24
25
26
27
28
29
30
31
32
33
- 隐式intent启动,通过注册Activity时,添加intent-filter+action+category来启动,其中一定要有:android.intent.category.DEFAULT这个category。
val intent = Intent()
intent.action = "com.ericyangxd.intent.action.SecondActivity"
intent.addCategory("com.ericyangxd.intent.action.SecondActivity")
intent.putExtra("extra_data", "extra_data")
intent.putExtra("extra_int_data", 100)
startActivity(intent)
// 接受返回数据的用法是一致的
startActivityForResult(intent, 1000)
2
3
4
5
6
7
8
# Fragment
Fragment不能单独使用,需要嵌套在Activity中使用,并且他有自己的生命周期,但是会受到宿主Activity的生命周期影响。一个Activity可以嵌套多个Fragment。使用Fragment把一个Activity划分成多个部分分别管理,方便后续迭代维护。
生命周期:
- 添加Fragment到Activity中 -> onAttach -> ...
- onInflate -> 只有在直接用标签在布局文件中定义时才会被调用。-> onAttach -> ...
- onAttach -> 当该Fragment被添加到Activity中时会回调,只会被回调一次
- onCreate -> 创建Fragment时回调
- onCreateView -> 每次创建、绘制该Fragment的View组件时回调,会将显示的View返回,所以需要return一个view
- onActivityCreated -> 当Fragment所在的Activity启动完成后回调
- onStart -> 启动Fragment时被回调
- onResume -> 恢复Fragment时被回调,onStart方法后一定回调onResume方法,onStart可见,onResume后才能交互
- 运行状态 -> 1当该Activity转到后台或者Fragment被删除/替换时;2当该Fragment被添加到Back栈时;-> onPause ...
- onPause -> 暂停Fragment时被回调
- 暂停状态
- onStop -> 停止Fragment时回调
- 停止状态
- onDestroyView -> 销毁该Fragment所包含的View组件时使用 -> 如果该Fragment从Back栈返回界面,则进入 -> onCreateView -> ...
- onDestroy -> 销毁Fragment时被回调
- onDetach :将该Fragment从Activity被删除/替换完成后回调该方法;onDestroy后一定会回调该方法。该方法只调用一次。
- 销毁状态
- 对于一个Activity里包含多个Fragment的情况,通过fragment.hide/show方法切换Fragment时,不会反复调用onResume和onPause方法,此时可以重写onHiddenChanged(hidden: Boolean)方法,该方法会在每次切换Fragment时触发回调。
# Activity中动态添加Fragment
- 先定义一个StudyFragment,需要继承自Fragment并绑定布局文件
class StudyFragment: Fragment(R.layout.fragment_study) {..} - 在Activity中,使用supportFragmentManager管理Fragment,添加到界面上
class MainActivity : AppCompatActivity(R.layout.activity_main) {
    override fun onCreate(savedInstanceState: Bundle?) {
        val studyFragment = StudyFragment()
        val ft = supportFragmentManager.beginTransaction() // 开启事务
        if(!fragment.isAdded) {
            ft.add(R.id.container, studyFragment) // 添加,当且仅当该Fragment没有被添加到Activity中时才添加
        }
        // ft可以对fragment进行的几种操作如下:
        ft.show(fragment)
        ft.hide(fragment)
        ft.remove(fragment)
        ft.replace(R.id.container, fragment) // 替换,并把之前添加的Fragment移除出去

        ft.commitAllowingStateLoss() // 提交事务,之后才能正常显示Fragment
        // supportFragmentManager.beginTransaction()
        //         .replace(R.id.container, AnotherFragment())
        //         .commit()
        // supportFragmentManager.startFragment(AnotherFragment::class.java)
    }
}
2
3
4
5
6
7
8
9
10
11
12
13
14
15
16
17
18
19
20
- 在布局文件中定义一个容器,用于放置Fragment,例:
<FrameLayout android:id="@+id/container" android:layout_width="match_parent" android:layout_height="match_parent" />
# Fragment间通信
- 通过Bundle传递数据
// 发送数据
val bundle = Bundle()
bundle.putString("key", "value")
fragment.setArguments(bundle)

// 接收数据
val bundle = fragment.arguments
val value = bundle.getString("key")
2
3
4
5
6
7
8
- 通过接口回调
// 定义接口
interface OnFragmentInteractionListener {
    fun onFragmentInteraction(uri: Uri)
}

// 在Fragment中实现接口
class StudyFragment : Fragment(), OnFragmentInteractionListener {
    override fun onFragmentInteraction(uri: Uri) {
        // 处理数据
    }
}

// 在Activity中实现接口
class MainActivity : AppCompatActivity(), OnFragmentInteractionListener {
    override fun onFragmentInteraction(uri: Uri) {
        // 处理数据
    }
}

// 在Fragment中调用接口
val listener = activity as OnFragmentInteractionListener
listener.onFragmentInteraction(uri)
2
3
4
5
6
7
8
9
10
11
12
13
14
15
16
17
18
19
20
21
22
- 通过EventBus
// 发送数据
EventBus.getDefault().post(Event("value"))

// 接收数据
@Subscribe(threadMode = ThreadMode.MAIN)
fun onEvent(event: Event) {
    // 处理数据
}
EventBus.getDefault().register(this)
2
3
4
5
6
7
8
9
- 通过LiveData
// 发送数据
val liveData = MutableLiveData<String>()
liveData.value = "value"

// 接收数据
liveData.observe(this, Observer { value ->
    // 处理数据
})
2
3
4
5
6
7
8
- 通过ViewModel
// 发送数据
val viewModel = ViewModelProvider(this).get(MyViewModel::class.java)
viewModel.setData("value")

// 接收数据
val viewModel = ViewModelProvider(this).get(MyViewModel::class.java)
viewModel.data.observe(this, Observer { value ->
    // 处理数据
})
2
3
4
5
6
7
8
9
- 通过SharedPreference
// 发送数据
val sharedPreferences = getSharedPreferences("MyPrefs", MODE_PRIVATE)
val editor = sharedPreferences.edit()
editor.putString("key", "value")
editor.apply()

// 接收数据
val sharedPreferences = getSharedPreferences("MyPrefs", MODE_PRIVATE)
val value = sharedPreferences.getString("key", "")
2
3
4
5
6
7
8
9
# 向Fragment传递数据并解析使用数据
- 在Activity中创建bundle对象、并填充数据赋值给目标StudyFragment的arguments字段
class MainActivity : AppCompatActivity(R.layout.activity_main) {
    override fun onCreate(savedInstanceState: Bundle?) {
        val studyFragment = StudyFragment()

        val bundle = Bundle()
        bundle.putInt("key_int", 100)
        bundle.putString("key_string", "key_string_value")
        studyFragment.arguments = bundle

        val ft = supportFragmentManager.beginTransaction() // 开启事务
        if(!fragment.isAdded) {
            ft.add(R.id.container, studyFragment) // 添加,当且仅当该Fragment没有被添加到Activity中时才添加
        }

        ft.commitAllowingStateLoss() // 提交事务,之后才能正常显示Fragment
    }
}
2
3
4
5
6
7
8
9
10
11
12
13
14
15
16
17
- 在StudyFragment中获取数据
class StudyFragment: Fragment(R.layout.fragment_study) {
  override fun onViewCreated(view: View, savedInstanceState: Bundle?) {
        super.onViewCreated(view, savedInstanceState)
        val intArg = arguments?.getInt("key_int")
        val stringArg = arguments?.getString("key_string")
        // println(..)
  }

}
2
3
4
5
6
7
8
9
# Fragment向Activity中传递数据
- 在StudyFragment中创建一个接口,并在Activity中实现该接口
// 定义接口
interface OnFragmentInteractionListener {
    fun onFragmentInteraction(uri: Uri)
}

// 在StudyFragment中实现接口
class StudyFragment : Fragment(), OnFragmentInteractionListener {
    override fun onFragmentInteraction(uri: Uri) {
        // 处理数据
    }
}

// 在Activity中实现接口
class MainActivity : AppCompatActivity(), OnFragmentInteractionListener {
    override fun onFragmentInteraction(uri: Uri) {
        // 处理数据
    }
}

// 在Fragment中调用接口
val listener = activity as OnFragmentInteractionListener
listener.onFragmentInteraction(uri)
2
3
4
5
6
7
8
9
10
11
12
13
14
15
16
17
18
19
20
21
22
- 在Activity中调用Fragment的方法
// 在Activity中找到Fragment实例
val studyFragment = supportFragmentManager.findFragmentById(R.id.fragment_container) as StudyFragment

// 调用Fragment的方法
studyFragment.someMethod()
2
3
4
5
# 通信机制
# Service
是Android提供的一种不需要和用户交互且需要长期运行任务的解决方案。Service是一个Android四大组件之一,它是一种可以在后台执行长时间运行操作而没有用户界面的应用组件。Service可以在后台运行,即使用户切换到其他应用,Service仍然可以继续运行。Service可以通过startService()方法启动,也可以通过bindService()方法绑定。Service的生命周期和Activity有些类似,也有onCreate()、onStartCommand()、onBind()、onUnbind()、onDestroy()等方法。启动后默认运行在主线程,如果需要在子线程中运行,需要自己创建子线程,如果应用程序进程被杀死,那么所有依赖该进程的Service服务也会停止运行。
# 启动方式
- 通过
startService()方法启动:在Activity中调用startService(Intent)方法启动Service - 通过
bindService()方法绑定:在Activity中调用bindService(Intent, ServiceConnection, int)方法绑定Service
# 生命周期
两种启动方式的生命周期有所不同:
- 通过
startService()方法启动:onCreate -> onStartCommand -> Service 运行 -> Service 被自己或调用者停止 -> onDestroy -> Service被关闭- 首次启动会创建一个Service实例,依次调用onCreate、onStartCommand方法进入运行状态
- 如果再次调用startService启动Service,将不会再调用onCreate创建新的Service对象,系统将直接复用之前创建的Service对象然后调用他的onStartCommand方法
- 所以,这样的Service与他的调用者无必然联系,即启动Service后,Service会一直运行,直到调用
stopSelf()或stopService()方法停止(回调onDestroy),即使调用者已经结束了自己的生命周期。生命周期跟应用程序的生命周期一样长!只要应用不被杀死就会一直运行。 - 无论启动了多少次Service,只需要调用一次stopService即可停掉Service
- 一般用于创建一个长时间持续运行的后台任务时才会使用,比如:socket、文件上传下载服务
- 通过
bindService()方法绑定:onCreate -> onBind -> 客户端绑定到Service -> 调用unbindService取消绑定 -> onUnbind -> onDestroy -> Service被关闭- 这种方式Service可以绑定多个客户端。
- bindService和unbindService要成对出现,不然会内存泄漏。
- 当有客户端绑定到Service时,Service会一直运行,直到所有客户端都取消绑定。
- 适用于运行一些和Activity生命周期相等的后台任务,比如:跨进程通信IPC。
- Android8.0及以上不允许后台启动Service服务。使用
Context.startForegroundService函数启动一个前台服务,但是应用必须在创建服务后的5秒内调用该服务的startForeground函数。
- 示例代码:
// TestService.kt // 不要忘了在AndroidManifest.xml中注册Service
class TestService : Service() {
    private var count = 0
    private var quit = false

    inner class MyBinder: Binder(){
      fun getCount(): Int {
          return count
      }
    }
    // 定义onBind方法所返回的对象
    private val binder: MyBinder = MyBinder()

    override fun onCreate() {
        super.onCreate()
        Log.d("TestService", "onCreate")
    }

    override fun onStartCommand(intent: Intent?, flags: Int, startId: Int): Int {
        Log.d("TestService", "onStartCommand")
        return START_STICKY
    }

    // bindService
    override fun onBind(intent: Intent?): IBinder? {
        return binder
    }

    override fun onDestroy() {
        super.onDestroy()
        Log.d("TestService", "onDestroy")
    }
}

// MainActivity.kt
class MainActivity : AppCompatActivity() {
    private var binder: TestService.MyBinder = null

    override fun onCreate(savedInstanceState: Bundle?) {
        super.onCreate(savedInstanceState)
        setContentView(R.layout.activity_main)

        // startService启动Service
        start_service_btn.setOnClickListener {
          val intent = Intent(this, TestService::class.java)
          startService(intent)
        }

        // stopService停止Service
        stop_service_btn.setOnClickListener {
          val intent = Intent(this, TestService::class.java)
          stopService(intent)
        }

        // bindService绑定Service
        val intent2 = Intent(this, TestService::class.java)
        bindService(intent2, serviceConnection, Context.BIND_AUTO_CREATE)
        println(binder?.getCount())
    }

    private val serviceConnection = object : ServiceConnection {
        override fun onServiceConnected(name: ComponentName?, service: IBinder?) {
            // 服务连接成功
          binder = service as TestService.MyBinder
        }

        override fun onServiceDisconnected(name: ComponentName?) {
            // 服务断开连接
        }
    }

    override fun onDestroy() {
        super.onDestroy()
        // unbindService解绑Service,防止内存泄漏
        unbindService(serviceConnection)
    }
}
2
3
4
5
6
7
8
9
10
11
12
13
14
15
16
17
18
19
20
21
22
23
24
25
26
27
28
29
30
31
32
33
34
35
36
37
38
39
40
41
42
43
44
45
46
47
48
49
50
51
52
53
54
55
56
57
58
59
60
61
62
63
64
65
66
67
68
69
70
71
72
73
74
75
76
77
- 解决Android8.0及以上不允许后台启动Service服务:
- 声明权限:
<uses-permission android:name="android.permission.FOREGROUND_SERVICE" /> - 服务启动兼容写法:
 if(Build.VERSION.SDK_INT >= 26){
     context.startForegroundService(intent)
 }else{
     context.startService(intent)
 }

 Handler().postDelayed(Runnable {
     startService(Intent(this@TestServiceActivity, TestService2::class.java))
 }, 3000)
1
2
3
4
5
6
7
8
9 - 声明权限:
- 系统认定的应用从前台切换到后台的时长是60秒。
# 与Activity通信
- 通过
startService()方法启动:在Service中通过Intent发送广播,Activity中通过BroadcastReceiver接收广播 - 通过
bindService()方法绑定:在Service中通过IBinder接口返回数据,Activity中通过ServiceConnection接口接收数据
// TestService.kt
class TestService : Service() {
    private val binder = object : ITestService.Stub() {
        override fun doSomething() {
            //

        }
    }
}
2
3
4
5
6
7
8
9
# Broadcast Receiver
广播接收者,是系统提供的一种通讯方式。通过广播接收者,我们可以接收系统或其他应用发送的广播消息。广播接收者是Android四大组件之一,它可以在后台接收系统的广播消息,即使应用程序退出,广播接收者仍然可以接收广播消息。广播接收者的生命周期很短,只有10秒左右,所以不适合做耗时操作。广播接收者可以通过<receiver>标签在AndroidManifest.xml中注册,也可以通过registerReceiver()方法动态注册。
# 标准广播
- 定义一个广播接收者
// 监听网络连接状态的变化,并toast提示
class TestBroadcastReceiver: BroadcastReceiver() {
    override fun onReceive(context: Context?, intent: Intent?) {
        if(intent?.action?.equals(ConnectivityManager.CONNECTIVITY_ACTION) == true){
            val connectivityManager: ConnectivityManager = context?.getSystemService(Context.CONNECTIVITY_SERVICE) as ConnectivityManager
            val info = connectivityManager.activeNetworkInfo
            if(info != null && info.isAvailable){
                val typeName = info.typeName
                Toast.makeText(context, "network changes: ${typeName}", Toast.LENGTH_LONG).show()
            }else{
                Toast.makeText(context, "network no changes", Toast.LENGTH_LONG).show()
            }
        }
    }
}
2
3
4
5
6
7
8
9
10
11
12
13
14
15
16
- 注册广播接收者
不要在收到广播之后进行任何耗时操作,因为在广播中是不允许开辟线程的,(广播默认运行在主线程),当onReceiver方法运行较长时间(超过10秒)还没有结束的话,那么程序会报错(ANR)。广播更多时候扮演的是一个打开其他组件的角色,比如:启动Service,Notification提示,Activity等。
- 运行时动态注册
class TestBroadcastReceiverActivity: AppCompatActivity(){
    private lateinit var myReceiver: TestBroadcastReceiver

    override fun onCreate(savedInstanceState: Bundle?) {
        super.onCreate(savedInstanceState)
        setContentView(R.layout.activity_test_broadcast_receiver)

        myReceiver = TestBroadcastReceiver()
        val intentFilter = IntentFilter()
        // intentFilter.addAction(Intent.ACTION_CONFIGURATION_CHANGED)
        intentFilter.addAction(ConnectivityManager.CONNECTIVITY_ACTION)
        registerReceiver(myReceiver, intentFilter)
    }

    override fun onDestroy() {
        super.onDestroy()
        unregisterReceiver(myReceiver) // 防止内存泄漏
    }
}
2
3
4
5
6
7
8
9
10
11
12
13
14
15
16
17
18
19
- 静态注册:需要在AndroidManifest.xml中注册广播。安卓8.0之后不推荐使用了,不好用!
<receiver android:name=".components.TestBroadcastReceiver"></receiver>
val intent = Intent()
intent.action = "com.example.myapp.TEST_BROADCAST_RECEVIER"
// 下面这行在安卓7.0及以下版本不是必须的,在安卓8.0或更高版本,则需要加上
// 第一个参数是接收广播类的包名,第二个参数是接受广播类的完整类名
intent.component = ComponentName("com.example.myapp", "com.example.myapp.components.TestBroadcastReceiver")
sendBroadcast(intent)
2
3
4
5
6
# 有序广播
不推荐使用了。一个接收者处理完之后下一个接收者才能继续处理。
# 全局发送广播
要写完整的广播接收类类名,包括包名,否则会报错。如果其他app也注册了这个广播,那么其他app也会收到这个广播。
sendBroadcast(Intent("com.example.myapp.TEST_BROADCAST_RECEVIER"))
# 应用内发送广播
可以理解为一种局部广播,发送者和接收者都属于一个app,不会被其他app接收到。相比于全局广播,局部广播更加安全,因为其他app无法接收到这个广播,也就无法获取到广播中的数据。
// 使用LocalBroadcastManager注册和发送广播
LocalBroadcastManager.getInstance(this).registerReceiver(myReceiver, intentFilter)

LocalBroadcastManager.getInstance(this).sendBroadcast(Intent("com.example.myapp.TEST_BROADCAST_RECEVIER"))

LocalBroadcastManager.getInstance(this).unregisterReceiver(myReceiver)
2
3
4
5
6
# Content Provider
内容提供者,是Android四大组件之一,它提供了一种统一的数据访问方式,允许一个应用程序访问另一个应用程序的数据。Content Provider可以实现数据共享,允许一个应用程序访问另一个应用程序的数据,也可以实现数据保护,只允许指定的应用程序访问数据。Content Provider可以通过<provider>标签在AndroidManifest.xml中注册,也可以通过ContentResolver类访问。
# 权限检查和动态申请
- 运行时动态申请权限,请求用户授权
// 检查是否已授权
ActivityCompat.checkSelfPermission(Manifest.permission.READ_CONTACTS) != PackageManager.PERMISSION_GRANTED
// 发起权限申请,弹出对话框
ActivityCompat.requestPermissions(this,
                                  arrayOf(android.Manifest.permission.ACCESS_FINE_LOCATION),
                                  PERMISSIONS_REQUEST_ACCESS_FINE_LOCATION)

// ContextCompat.checkSelfPermission(this.applicationContext, android.Manifest.permission.ACCESS_FINE_LOCATION)
//                                   ==
//                                   PackageManager.PERMISSION_GRANTED

// 检查用户是否已永久拒绝
ActivityCompa.shouldShowRequestPermissionRationale() // 如果已经永久拒绝,那么再调用ActivityCompat.requestPermissions也没有用,不会弹框,此时需要自己弹对话框,引导用户去开启授权
// 处理授权结果,重写
override fun onRequestPermissionsResult(requestCode: Int,
                                        permissions: Array<out String>,
                                        grantResults: IntArray){}
2
3
4
5
6
7
8
9
10
11
12
13
14
15
16
17
18
仍然需要在ANdroidManifest.xml中添加权限。
# 读取联系人
val resolver = contentResolver
val uri = Uri.parse("content://com.android.contacts/data/phones")
val cursor = resolver.query(uri, null, null, null, null) ?: return
while(cursor.moveToNext()){
   val cName = cursor.getString(cursor.getColumnIndex(ContactsContract.CommonDataKinds.Phone.DISPLAY_NAME))
   val cNumber = cursor.getString(cursor.getColumnIndex(ContactsContract.CommonDataKinds.Phone.NUMBER))
  //  println...
}
cursor.close()
2
3
4
5
6
7
8
9
# 新增联系人
<uses-permission android:name="android.permission.WRITE_CONTACTS" />
val resolver = contentResolver
val values = ContentValues()
val rawContactUri = resolver.insert(ContactsContract.RawContacts.CONTENT_URI, values)!!
val rawContactId = ContentUris.parseId(rawContactUri)
// 插入名称
values.clear()
values.put(ContactsContract.Data.RAW_CONTACT_ID, rawContactId)
values.put(ContactsContract.Data.MIMETYPE, ContactsContract.CommonDataKinds.StructuredName.CONTENT_ITEM_TYPE)
values.put(ContactsContract.CommonDataKinds.StructuredName.GIVEN_NAME, "Eric")
val result1 = resolver.insert(ContactsContract.Data.CONTENT_URI, values)
// 插入手机号
values.clear()
values.put(ContactsContract.Data.RAW_CONTACT_ID, rawContactId)
values.put(ContactsContract.Data.MIMETYPE, ContactsContract.CommonDataKinds.Phone.CONTENT_ITEM_TYPE)
values.put(ContactsContract.CommonDataKinds.Phone.NUMBER, "1234567890")
values.put(ContactsContract.CommonDataKinds.Phone.TYPE, ContactsContract.CommonDataKinds.Phone.TYPE_MOBILE)
val result2 = resolver.insert(ContactsContract.Data.CONTENT_URI, values)
// 插入邮箱
values.clear()
values.put(ContactsContract.Data.RAW_CONTACT_ID, rawContactId)
values.put(ContactsContract.Data.MIMETYPE, ContactsContract.CommonDataKinds.Email.CONTENT_ITEM_TYPE)
values.put(ContactsContract.CommonDataKinds.Email.ADDRESS, "eric@123.com")
values.put(ContactsContract.CommonDataKinds.Email.TYPE, ContactsContract.CommonDataKinds.Email.TYPE_WORK)
val result3 = resolver.insert(ContactsContract.Data.CONTENT_URI, values)
2
3
4
5
6
7
8
9
10
11
12
13
14
15
16
17
18
19
20
21
22
23
24
# 更新联系人
val phone = "1234567890"
val uri = Uri.parse("content://com.android.contacts/data/phones/filter/$phone")
val resolver = contentResolver
val cursor = resolver.query(uri, arrayOf(ContactsContract.Data.CONTACT_ID), null, null, null) ?: return null
if(cursor.moveToFirst()){
    val contractId = cursor.getString(cursor.getColumnIndex(ContactsContract.Data.CONTACT_ID))
    if(contractId == null){
        Toast.makeText(this, "联系人不存在,无法更新", Toast.LENGTH_LONG).show()
    }else{
      val values = ContentValues()
      // values.clear()
      values.put(ContactsContract.Data.MIMETYPE, ContactsContract.CommonDataKinds.StructuredName.CONTENT_ITEM_TYPE)
      values.put(ContactsContract.CommonDataKinds.StructuredName.GIVEN_NAME, "Eric Yang")
      val result = resolver.update(ContactsContract.Data.CONTENT_URI, values, "${ContactsContract.Data.CONTACT_ID}=?", arrayOf(contractId))
    }
    // return contractId
}
2
3
4
5
6
7
8
9
10
11
12
13
14
15
16
17
18
# 删除联系人
// 根据用户名删除,其他同理
val result = contentResolver.delete(ContactsContract.RawContacts.CONTENT_URI, CommonDataKinds.Phone.DISPLAY_NAME+"=?", arrayOf("Eric Yang"))
if(result > 0) {
    println("success")
} else {
    println("failed")
}
2
3
4
5
6
7
# 各个文件的作用简介
安卓项目工程目录结构及各个文件的简介:
local.properties:配置本地Android SDK的路径,供Gradle使用,例:sdk.dir=/Users/eric/Library/Android/sdksettings.gradle.kts:主要配置插件、库包等的仓库,例:maven("https://jitpack.io")gradle-wrapper.properties:配置Gradle等路径,例:distributionUrl=https\://services.gradle.org/distributions/gradle-8.7-bin.zipgradle.properties:- Global:可以配置一些代理设置,例:
systemProp.http.proxyHost=vpn.ericyangxd.com - Project:配置jvm等参数,例:
org.gradle.jvmargs=-Xmx2048m -Dfile.encoding=UTF-8
- Global:可以配置一些代理设置,例:
build.gradle.kts:- Module:配置plugins、compileSdk、buildFeatures、dependencies等等
- Project:可以配置一些全局的配置plugins等
proguard-rules.pro:配置一些打包时的混淆策略等libs.versions.toml:配置一些插件依赖的仓库名称版本等- ``:
- ``:
- ``:
# 主题及主题切换
使用主题Theme.Material3.Light.NoActionBar,之后可以通过创建文件夹drawable/drawable-night的形式来实现day/night的icon的适配。
# 常用图表绘制库
- MPAndroidChart
# ViewBinding
使用到了 Kotlin 委托,ActivityViewBindings就是一个 Kotlin 委托类,当获取 binding 的时候,去触发fun getValue(thisRef: A, property: KProperty<*>): T,而vbFactory: (View) -> T是我们从MainActivity传入的,实际就是在调用ActivityMainBinding::bind。
看似炫酷的被施了魔法的private val binding :ActivityMainBinding by viewbind()实现ViewBinding,其实就是用到了Kotlin委托,并在委托类的get()方法中,通过不反射 / 反射 的方式 调用ActivityMainBinding.java的 inflate或bind方法,然后,可以将setContentView()也在此处进行调用,这样,就不用再去写ViewBinding常规的那些代码了。
# 原生做法
android {
    buildFeatures {
        viewBinding true
    }
}
2
3
4
5
// 重点:lateinit延迟初始化/懒加载。ActivityMainBinding即xml的名称倒过来写再加个Binging后缀
private lateinit var binding: ActivityMainBinding

override fun onCreate(savedInstanceState: Bundle?) {
	super.onCreate(savedInstanceState)
  // 重点:inflate
	binding = ActivityMainBinding.inflate(layoutInflater)
  // 重点:binding.root
	setContentView(binding.root)

  // 之后即可直接使用组件id来操作组件
}
2
3
4
5
6
7
8
9
10
11
12
对于通过 include 方式引入的子布局 xml 中的组件,还要再单独 binding
// 先定义
private var _binding: FragmentWeatherBinding? = null
private val binding get() = _binding!!
private lateinit var rainChancePieChart: ColorfulRingProgressView

// 比如:需重写onCreateView方法,然后在父binding中通过findViewById找到子binding,之后才能使用子binding
override fun onCreateView(
    inflater: LayoutInflater,
    container: ViewGroup?,
    savedInstanceState: Bundle?
): View {
    _binding = FragmentWeatherBinding.inflate(inflater, container, false)

    val weatherInfoChartBinding = LayoutWeatherInfoChartBinding.bind(binding.root.findViewById(R.id.layout_weather_info_chart))
    rainChancePieChart = weatherInfoChartBinding.rainChancePieChart

    return binding.root
}

// 组件销毁时需要手动清空_binding
override fun onDestroyView() {
    super.onDestroyView()
    _binding = null
}
2
3
4
5
6
7
8
9
10
11
12
13
14
15
16
17
18
19
20
21
22
23
24
# 第三方库
com.github.kirich1409:viewbindingpropertydelegate-full:采用不反射的方式,性能上会比较好
// 重点:Fragment这里要传入布局ID
class ProfileFragment : Fragment(R.layout.profile) {

    // reflection API and ViewBinding.bind are used under the hood
    private val viewBinding: ProfileBinding by viewBinding()

    // reflection API and ViewBinding.inflate are used under the hood
    private val viewBinding: ProfileBinding by viewBinding(createMethod = CreateMethod.INFLATE)

    // no reflection API is used under the hood,在viewBinding()需要传参
    private val viewBinding by viewBinding(ProfileBinding::bind)
}
class ProfileActivity : AppCompatActivity(R.layout.profile) {

    // reflection API is used under the hood
    private val viewBinding: ProfileBinding by viewBinding(R.id.container)

    // no reflection API is used under the hood
    private val viewBinding by viewBinding(ProfileBinding::bind, R.id.container)
}
2
3
4
5
6
7
8
9
10
11
12
13
14
15
16
17
18
19
20
com.hi-dhl:binding
// ViewBinding
val binding: ActivityViewBindBinding by viewbind()

// DataBinding
val binding: ActivityDataBindBinding by databind(R.layout.activity_data_bind)
// or
val binding: ActivityDataBindBinding by databind()

init {
    with(binding) {
        result.setText("Use DataBinding and ViewBinding in Custom ViewGroup")
    }
}
2
3
4
5
6
7
8
9
10
11
12
13
com.github.DylanCaiCoding.ViewBindingKTX
class MainActivity : AppCompatActivity() {

  private val binding: ActivityMainBinding by binding()

  override fun onCreate(savedInstanceState: Bundle?) {
    super.onCreate(savedInstanceState)
    binding.tvHelloWorld.text = "Hello Android!"
  }
}
class HomeFragment : Fragment(R.layout.fragment_home) {

  private val binding: FragmentHomeBinding by binding()
  private val childBinding: LayoutChildBinding by binding(Method.INFLATE)

  override fun onViewCreated(view: View, savedInstanceState: Bundle?) {
    super.onViewCreated(view, savedInstanceState)
    binding.container.addView(childBinding.root)
  }
}
class FooAdapter : BaseQuickAdapter<Foo, BaseViewHolder>(R.layout.item_foo) {

  override fun convert(holder: BaseViewHolder, item: Foo) {
    holder.getBinding(ItemFooBinding::bind).apply {
      tvFoo.text = item.value
    }
  }
}
2
3
4
5
6
7
8
9
10
11
12
13
14
15
16
17
18
19
20
21
22
23
24
25
26
27
# okhttp 网络请求
okhttp是一个通用的高性能网络请求框架,支持同步和异步请求,支持缓存,支持重定向,支持GZIP压缩,支持HTTPS、配置自定义拦截器等。okhttp出现之前,可以使用系统自带的HttpClient、HttpURLConnection或者Volley、AsyncHttpClient等开源库进行网络请求。
- 同时支持HTTP1.0和HTTP2.0
- 同时支持同步与异步请求
- 同时具备HTTP与WebSocket功能
- 拥有自动维护的socket连接池,减少握手次数
- 拥有队列线程池,轻松写并发
- 拥有Interceptors拦截器,轻松处理请求与响应额外需求,如请求失败重试、响应内容重定向等
使用之前:
- 在AndroidManifest.xml中添加网络访问权限:
<uses-permission android:name="android.permission.INTERNET" /> - 在app/build.gradle中的dependencies中添加依赖:
com.squareup.okhttp3:okhttp:4.9.0、打印网络请求日志com.squareup.okhttp3:logging-interceptor:4.9.0 - 同步GET:一直等待http请求,直到返回响应,在这之间会阻塞线程,所以同步请求不能放在安卓主线程中,会报NetworkMainThreadException。
- 安卓8.0之后不能直接发起http请求,需要配置:在AndroidManifest.xml中添加
android:usesCleartextTraffic="true"
- 安卓8.0之后不能直接发起http请求,需要配置:在AndroidManifest.xml中添加
# 异步GET:在另外的工作线程中执行http请求,请求时不会阻塞当前的线程,所以可以在Android主线程中使用。
onFailure、onResponse的回调是在子线程中的,我们需要切换到主线程才能操作UI控件。
// 使用object声明的类可以直接当做实例来使用,不需要new了

object HiOkHttp {
    private val BASE_URL = "xxx"
    private val client: OkHttpClient

    init {
      val httpLoggingInterceptor = HttpLoggingInterceptor()
      httpLoggingInterceptor.setLevel(HttpLoggingInterceptor.Level.BODY) // 打印详细的请求body信息
      // 先创建一个OkHttpClient实例并设置基本的超时配置
      client = OkHttpClient.Builder()
                  .connectTimeout(10, TimeUnit.SECONDS)
                  .readTimeout(10, TimeUnit.SECONDS)
                  .writeTimeout(10, TimeUnit.SECONDS)
                  .addInterceptor(httpLoggingInterceptor) // okhttp拦截器
                  // .addInterceptor(LoggingInterceptor()) // 自定义的拦截器
                  .build()
    }

    // GET请求

    // 同步GET: 一直等待http请求,直到返回响应,在这之间会阻塞线程,所以同步请求不能放在安卓主线程中,会报NetworkMainThreadException
    // 要起一个子线程来执行。
    fun runGet(url: String, params: Any?){
      Thread(Runnable {
        // 0.根据需求处理参数或者请求url
        // 1.构造请求体
        val request: Request = Request.Builder()
                              .url(url)
                              .build()
        // 2.构造请求对象
        val call = client.newCall(request)
        // 3.发起同步请求
        val response = call.execute()
        // 4.处理响应
        val body = response.body?.string()
        println("get response: $body")
      }).start()
    }

    // 异步GET:
    fun runGetAsync(url: String, body: Any){
      // 1.构造请求体
      val request: Request = Request.Builder()
                              .url(url)
                              .build()
      // 2.构造请求对象
      val call = client.newCall(request)
      // 3.发起异步请求
      call.enqueue(object: Callback {
        override fun onFailure(call: Call, e: IOException) {
          println("onFailure: ${e.message}")
        }

        override fun onResponse(call: Call, response: Response) {
          val body = response.body?.toString()
          println("onResponse: $body")
        }
      })

    }

    // POST请求

    // 同步POST
    fun runPost(url: String, key: String, value: String){
      val body = new FormBody.Builder()
                  .add(key, value)
                  .build()
      val request = new Request.Builder()
                    .url(url)
                    .post(body)
                    .build()
      // client 还是上面那个统一的OkHttpClient实例对象
      val call = client.newCall(request)
      Thread(Runnable{
        val response = call.execute()
        val body = response.body?.string()
        println("onResponse: $body")
      }).start()
    }

    // 异步POST
    fun runPostAsync(url: String, key: String, value: String){
      val body = new FormBody.Builder()
                  .add(key, value)
                  .build()
      val request = new Request.Builder()
                    .url(url)
                    .post(body)
                    .build()
      // client 还是上面那个统一的OkHttpClient实例对象
      val call = client.newCall(request)
      call.enqueue(object: Callback {
        override fun onFailure(call: Call, e: IOException) {
          println("onFailure: ${e.message}")
        }

        override fun onResponse(call: Call, response: Response) {
          val body = response.body?.string()
          println("onResponse: $body")
        }
      })
    }

    // 异步表单文件上传
    fun runPostFile(url: String, file: Any){
      val file = File(Environment.getExternalStorageDirectory(), "test.jpg")
      if(!file.exists()){
        Toast.makeText(this, "File not exists!", Toast.LENGTH_SHORT).show()
        return
      }
      val multipartBody: RequestBody = MuiltipartBody.Builder()
                                      .setType(MuiltipartBody.FORM)
                                      .addFormDataPart("username", "Eric")
                                      // .addFormDataPart("file", "test.jpg", RequestBody.create(MediaType.parse("application/octet-stream"), file))
                                      .addFormDataPart("file", "test.jpg", RequestBody.create("application/octet-stream".toMediaType(), file))
                                      .build()
      val request: Request = Request.Builder()
                            .url(url)
                            .post(body)
                            .build()
      val call = client.newCall(request)
      call.enqueue(object: Callback {
        override fun onFailure(call: Call, e: IOException) {
          println("onFailure: ${e.message}")
        }

        override fun onResponse(call: Call, response: Response) {
          val body = response.body?.string()
          println("onResponse: $body")
        }
      })
    }

    // 异步提交字符串
    fun runPostStringAsync(url: String, params: Any?){
      val jsonObj = JSONObject()
      jsonObj.put("key1", "value1")
      jsonObj.put("key2", "value2")

      val body = RequestBody.create("application/json;charset=utf-8".toMediaType(), jsonObj.toString())
      // val body = RequestBody.create("text/plain;charset=utf-8".toMediaType(), params.toString())
      val request: Request = Request.Builder()
                            .url(url)
                            .post(body)
                            .build()
      val call = client.newCall(request)
      call.enqueue(object: Callback {
        override fun onFailure(call: Call, e: IOException) {
          println("onFailure: ${e.message}")
        }

        override fun onResponse(call: Call, response: Response) {
          val body = response.body?.string()
          println("onResponse: $body")
        }
      })
    }
}

// 调用GET,安卓8.0之后不能直接发起http请求,需要配置:在AndroidManifest.xml中添加`android:usesCleartextTraffic="true"`
HiOkHttp.runGet("https://baidu.map.com/xxx")
2
3
4
5
6
7
8
9
10
11
12
13
14
15
16
17
18
19
20
21
22
23
24
25
26
27
28
29
30
31
32
33
34
35
36
37
38
39
40
41
42
43
44
45
46
47
48
49
50
51
52
53
54
55
56
57
58
59
60
61
62
63
64
65
66
67
68
69
70
71
72
73
74
75
76
77
78
79
80
81
82
83
84
85
86
87
88
89
90
91
92
93
94
95
96
97
98
99
100
101
102
103
104
105
106
107
108
109
110
111
112
113
114
115
116
117
118
119
120
121
122
123
124
125
126
127
128
129
130
131
132
133
134
135
136
137
138
139
140
141
142
143
144
145
146
147
148
149
150
151
152
153
154
155
156
157
158
159
160
161
162
163
# LoggingInterceptor拦截器
class LoggingInterceptor: Interceptor{
    override fun intercept(chain: Interceptor.Chain): Response {
        val time_start = System.nanoTime()
        val request = chain.request()
        val response = chain.proceed(request)

        val buffer = Buffer()
        // request里可以设置缓存策略,是否使用https等等
        request.body?.writeTo(buffer)
        val requestBodyStr = buffer.readUtf8()

        println("Sending request: ${request.url} on ${chain.connection()} with params ${requestBodyStr.toString()}")

        val businessData = response.body?.string() ?: "response body is null"
        val mediaType = response.body?.contentType()
        // 构建自定义的响应体
        val newBody = ResponseBody.create(mediaType, businessData)
        val newResponse = response.newBuilder().body(newBody).build()

        val t1 = time_start
        val t2 = System.nanoTime()
        println("Received response from ${request.url} in ${(t2 - t1) / 1e6} ms")

        return newResponse
    }
}
2
3
4
5
6
7
8
9
10
11
12
13
14
15
16
17
18
19
20
21
22
23
24
25
26
# GSON数据解析
// 1. 添加依赖
// "com.google.code.gson:gson:2.8.6"
// 2. 创建数据类 data class可以不用赋初始值/默认值
// 例如:Account.kt
// 3. 解析数据
// 将JSON转换成对象
val json = "\"name\":\"json string...\""
val gson = Gson()
val jsonObj = gson.fromJson(json, Account::class.java)
println(jsonObj.name)

// 将对象转换成JSON
val myObj = new Account()
val myObjStr = gson.toJson(myObj)
println(myObjStr)

// 将集合转换成JSON
val accountList = ArrayList<Account>()
accountList.add(acc1)
accountList.add(acc2)
val josnStr = gson.toJson(accountList)
println(josnStr)

// 将JSON转换成集合
val josnListStr = "[{\"name\":\"json string...\"}]"
val accountList = gson.fromJson(josnListStr, object: TypeToken<List<Account>>(){}.getType())
println(accountList.size())
2
3
4
5
6
7
8
9
10
11
12
13
14
15
16
17
18
19
20
21
22
23
24
25
26
27
JsonToKotlin插件:JsonToKotlinClass github上。
# Retrofit 网络请求框架
Retrofit是一个注解驱动型上层网络请求框架,以OkHttp作为底层网络框架,对OkHttp进行了二次封装,结合 Gson 对 JSON 数据进行解析。使用注解简化请求!
com.squareup.retrofit2:retrofit:2.3.0com.squareup.retrofit2:converter-gson:2.3.0// JSON转换
注意,Retrofit的onResponse和onFailure是运行在主线程上的,可以直接操作UI,而OkHttp的是运行在子线程上的,不能直接操作UI。
3种注解:
- 用于标注网络请求方式的注解
- 用于标记网络请求参数的注解
- 用于标记网络请求和响应格式的注解
第一步:定义相应的数据类
// WeatherResponse
data class WeatherResponse(
    val status: Int,
    val result: WeatherResult,
    val message: String
)
// ...
2
3
4
5
6
7
第二步:定义一个Service
// WeatherApiService.kt  写个interface就行
interface WeatherApiService {
    @Headers({"User-Agent:android", "apikey:123431aa"}) // 通过不同的注解实现需要的功能
    // @GET("mock/3093cexxxx2404c/weather/mock?apipost_id=3093xxx4e") // 把参数通过Query注解放到入参那里获取
    @GET("mock/3093cexxxx2404c/weather/mock")
    fun getWeatherData(@Query("apipost_id") apipost_id: String): Call<WeatherResponse>
}
2
3
4
5
6
7
第三步:通过Retrofit来调用这个Service
private val retrofit = Retrofit.Builder()
    .baseUrl("https://mock.apipost.net/")
    .addConverterFactory(GsonConverterFactory.create())
    .build()

private fun fetchWeatherData() {

    private val weatherApiService: WeatherApiService =
        retrofit.create(WeatherApiService::class.java)
    private val call = weatherApiService.getWeatherData("3093xxx4e")

    call.enqueue(object : Callback<WeatherResponse> {
        override fun onResponse(call: Call<WeatherResponse>, response: Response<WeatherResponse>) {
            if (response.isSuccessful && response.body() != null) {
                val weatherResponse = response.body()
                // Handle the successful response here
                println(weatherData)
            } else {
                // Handle the error response here
            }
        }

        override fun onFailure(call: Call<WeatherResponse>, t: Throwable) {
            println("Request failed: ${t.message}")
        }
    })
}
2
3
4
5
6
7
8
9
10
11
12
13
14
15
16
17
18
19
20
21
22
23
24
25
26
27
常用的一下注解及用法:
@GET:GET请求,通过@Query和@QueryMap注解传递参数@POST:POST请求,通过@Body注解传递对象参数,也可以通过@Field、@FieldMap和@PartMap等传递参数@PUT:PUT请求,通过@Body注解传递对象参数@DELETE:DELETE请求,通过@Path注解传递参数@Header:设置请求头@Headers:设置多个请求头@Body:设置请求体@Field:设置表单字段@FieldMap:设置多个表单字段@Part:设置文件上传@PartMap:设置多个文件上传@Url:设置请求URL@Multipart:设置表单上传@FormUrlEncoded:设置表单提交(键值对提交)
# 自定义圆环"Chart"
<com.example.weather.fragment.weather.ColorfulRingProgressView
    android:id="@+id/rainChancePieChart"
    android:layout_width="70dp"
    android:layout_height="70dp"
    android:layout_gravity="center"
    app:bgColor="@color/ring_bg_color"
    app:fgColorEnd="@color/ring_color"
    app:fgColorStart="@color/ring_color"
    app:percent="15"
    app:startAngle="45"
    app:strokeWidth="4dp" />
2
3
4
5
6
7
8
9
10
11
package com.example.weather.fragment.weather

import android.animation.ObjectAnimator
import android.animation.TimeInterpolator
import android.animation.ValueAnimator
import android.content.Context
import android.graphics.Canvas
import android.graphics.LinearGradient
import android.graphics.Paint
import android.graphics.RectF
import android.graphics.Shader
import android.util.AttributeSet
import android.view.View
import android.view.animation.AccelerateDecelerateInterpolator
import com.example.weather.R

class ColorfulRingProgressView(private val mContext: Context, attrs: AttributeSet?) : View(
    mContext, attrs
) {
    private var mPercent = 75f
    private var mStrokeWidth = 0f
    private var mBgColor = -0x1e1e1f
    private var mStartAngle = 0f
    private var mFgColorStart = -0x1c00
    private var mFgColorEnd = -0xb800

    private var mShader: LinearGradient? = null
    private var mOval: RectF? = null
    private var mBgPaint: Paint? = null // 背景画笔
    private var mFgPaint: Paint? = null // 前景画笔

    private var animator: ObjectAnimator? = null

    init {
        val a =
            mContext.theme.obtainStyledAttributes(attrs, R.styleable.ColorfulRingProgressView, 0, 0)

        try {
            mBgColor = a.getColor(R.styleable.ColorfulRingProgressView_bgColor, -0x1e1e1f)
            mFgColorEnd = a.getColor(R.styleable.ColorfulRingProgressView_fgColorEnd, -0xb800)
            mFgColorStart = a.getColor(R.styleable.ColorfulRingProgressView_fgColorStart, -0x1c00)
            mPercent = a.getFloat(R.styleable.ColorfulRingProgressView_percent, 0f)
            mStartAngle = a.getFloat(R.styleable.ColorfulRingProgressView_startAngle, 0f) + 270
            mStrokeWidth = a.getDimensionPixelSize(
                R.styleable.ColorfulRingProgressView_strokeWidth, dp2px(21f)
            ).toFloat()
        } finally {
            a.recycle()
        }

        init()
    }

    private fun init() {
        // 此处为了展示一粗一细两个圆环的效果
        mBgPaint = Paint() // 初始化背景画笔
        mBgPaint!!.isAntiAlias = true
        mBgPaint!!.style = Paint.Style.STROKE
        mBgPaint!!.strokeWidth = mStrokeWidth // 背景圆环的宽度
        mBgPaint!!.color = mBgColor

        mFgPaint = Paint() // 初始化前景画笔
        mFgPaint!!.isAntiAlias = true
        mFgPaint!!.style = Paint.Style.STROKE
        mFgPaint!!.strokeWidth = mStrokeWidth + dp2px(4f) // 前景圆环的宽度,比背景宽4dp
        mFgPaint!!.strokeCap = Paint.Cap.SQUARE
    }

    private fun dp2px(dp: Float): Int {
        return (mContext.resources.displayMetrics.density * dp + 0.5f).toInt()
    }

    override fun onDraw(canvas: Canvas) {
        super.onDraw(canvas)

        canvas.drawArc(mOval!!, 0f, 360f, false, mBgPaint!!)
        // 绘制前景圆环
        mFgPaint!!.setShader(mShader) // 设置前景画笔的着色器
        canvas.drawArc(mOval!!, mStartAngle, mPercent * 3.6f, false, mFgPaint!!) // 绘制前景圆环
    }

    override fun onSizeChanged(w: Int, h: Int, oldw: Int, oldh: Int) {
        super.onSizeChanged(w, h, oldw, oldh)

        updateOval()

        mShader = LinearGradient(
            mOval!!.left,
            mOval!!.top,
            mOval!!.left,
            mOval!!.bottom,
            mFgColorStart,
            mFgColorEnd,
            Shader.TileMode.MIRROR
        )
    }

    var percent: Float
        get() = mPercent
        set(mPercent) {
            this.mPercent = mPercent
            refreshTheLayout()
        }

    var strokeWidth: Float
        get() = mStrokeWidth
        set(mStrokeWidth) {
            this.mStrokeWidth = mStrokeWidth
            mBgPaint!!.strokeWidth = mStrokeWidth // 设置背景圆环的宽度
            mFgPaint!!.strokeWidth = mStrokeWidth + dp2px(4f) // 设置前景圆环的宽度,比背景宽4dp
            updateOval()
            refreshTheLayout()
        }

    private fun updateOval() {
        val xp = paddingLeft + paddingRight
        val yp = paddingBottom + paddingTop
        mOval = RectF(
            paddingLeft + mStrokeWidth,
            paddingTop + mStrokeWidth,
            paddingLeft + (width - xp) - mStrokeWidth,
            paddingTop + (height - yp) - mStrokeWidth
        )
    }

    fun setStrokeWidthDp(dp: Float) {
        this.mStrokeWidth = dp2px(dp).toFloat()
        mBgPaint!!.strokeWidth = mStrokeWidth // 设置背景圆环的宽度
        mFgPaint!!.strokeWidth = mStrokeWidth + dp2px(4f) // 设置前景圆环的宽度,比背景宽4dp
        updateOval()
        refreshTheLayout()
    }

    fun refreshTheLayout() {
        invalidate()
        requestLayout()
    }

    var fgColorStart: Int
        get() = mFgColorStart
        set(mFgColorStart) {
            this.mFgColorStart = mFgColorStart
            mShader = LinearGradient(
                mOval!!.left,
                mOval!!.top,
                mOval!!.left,
                mOval!!.bottom,
                mFgColorStart,
                mFgColorEnd,
                Shader.TileMode.MIRROR
            )
            refreshTheLayout()
        }

    var fgColorEnd: Int
        get() = mFgColorEnd
        set(mFgColorEnd) {
            this.mFgColorEnd = mFgColorEnd
            mShader = LinearGradient(
                mOval!!.left,
                mOval!!.top,
                mOval!!.left,
                mOval!!.bottom,
                mFgColorStart,
                mFgColorEnd,
                Shader.TileMode.MIRROR
            )
            refreshTheLayout()
        }


    var startAngle: Float
        get() = mStartAngle
        set(mStartAngle) {
            this.mStartAngle = mStartAngle + 270
            refreshTheLayout()
        }

    @JvmOverloads
    fun animateIndeterminate(
        durationOneCircle: Int = 800,
        interpolator: TimeInterpolator? = AccelerateDecelerateInterpolator()
    ) {
        animator = ObjectAnimator.ofFloat(this, "startAngle", startAngle, startAngle + 360)
        interpolator?.let { animator?.interpolator = it }
        animator?.duration = durationOneCircle.toLong()
        animator?.repeatCount = ValueAnimator.INFINITE
        animator?.repeatMode = ValueAnimator.RESTART
        animator?.start()
    }

    fun stopAnimateIndeterminate() {
        if (animator != null) {
            animator!!.cancel()
            animator = null
        }
    }
}
2
3
4
5
6
7
8
9
10
11
12
13
14
15
16
17
18
19
20
21
22
23
24
25
26
27
28
29
30
31
32
33
34
35
36
37
38
39
40
41
42
43
44
45
46
47
48
49
50
51
52
53
54
55
56
57
58
59
60
61
62
63
64
65
66
67
68
69
70
71
72
73
74
75
76
77
78
79
80
81
82
83
84
85
86
87
88
89
90
91
92
93
94
95
96
97
98
99
100
101
102
103
104
105
106
107
108
109
110
111
112
113
114
115
116
117
118
119
120
121
122
123
124
125
126
127
128
129
130
131
132
133
134
135
136
137
138
139
140
141
142
143
144
145
146
147
148
149
150
151
152
153
154
155
156
157
158
159
160
161
162
163
164
165
166
167
168
169
170
171
172
173
174
175
176
177
178
179
180
181
182
183
184
185
186
187
188
189
190
191
192
193
194
195
196
197
198
# ORM 框架
ORM(Object-Relational Mapping,对象关系映射)是一种软件技术,用于在关系型数据库和面向对象编程语言之间建立映射关系。它的目标是将对象模型和关系数据库之间的数据转换和操作自动化。
ORM 框架的作用是简化开发人员处理数据库的过程。它将数据库表和记录映射到编程语言中的对象和属性上,提供了一种更直观、面向对象的方式来操作和访问数据。通过使用 ORM,开发人员可以使用面向对象的编程语言来进行数据库操作,而无需编写原始的 SQL 查询。
使用 ORM 框架可以简化数据库操作的编写和维护工作,提高开发效率和代码可读性。
几种常用的 ORM 框架
- Room:可以视作官方推荐的方案代表,也是 google 推出的方案,用的软件多,支持数据驱动,google 官方支持,支持 sql 语句,基于 sqlite
- GreenDao:第三方封装的基于 sqlite 的 orm 框架,大量的使用者,较为中庸,没有特别明显的短板与长处,缺少对于数据变化的动态监听,不支持数据驱动式 coding,缺少一些新特性。部分功能不支持 kotlin:在使用 kotlin 文件编写 entity 时无法构建成功,必须使用 Java 代码写 entity。
- Realm:可以支持跨平台,基于 MongoDB 非关系型数据库
- ObjectBox:操作速度更快,greenDao 同家出品的数据库框架,支持 liveData,也支持 Flow、协程,支持懒加载,基于 nosql,非关系型数据库
- SQLite:跨平台的原生数据库能力
读写速度 ● Realm,相比于其他插入大批量新数据慢一点,小批量插入差异不明显,大批量差异和 sqlite 类的慢 10%-20%左右;数据更新速度比 sqlite、greendao、room 等快一倍左右;删除和读取数据的操作速度快到无法比较,可能存在测试用例/缓存等问题导致数据不可信; ● ObjectBox,除了删除操作外,其他的耗时都优于基于 sqlite 的 orm 框架,读取操作慢于 realm; ● Room,在删除操作上优于其他 sqlite 框架,其他操作和 sqlite 的速度持平/稍慢于 sqlite; ● GreenDao,读取操作上优于其他 sqlite 框架(30%-60%),其他操作持平; ● Sqlite,更新操作稍快(10%-30%),其他持平
# 常用控件
要使用app这个命名空间,需要在最外层父节点设置xmlns:app="http://schemas.android.com/apk/res-auto"
# Button
SDK >= 28,使用MaterialButton,先引入依赖com.google.android.material:material:1.3.0,然后修改App的主题为android:theme="@style/Theme.MaterialComponents.**Light.NoActionBar"
<com.google.android.material.button.MaterialButton
    android:id="@+id/btnHelloWorld"
    android:layout_width="wrap_content"
    android:layout_height="wrap_content"
    app:cornerRadius="20dp"
    android:text="Hello World!"
    android:textColor="@color/white"
    app:strokeColor="@color/white"  // 描边
    app:strokeWidth="4dp"  // 描边
    app:icon="icon图片src"  // 图标
    app:iconTint="@color/red"  // 图标着色
    app:iconPadding="10dp"  // 图标和文本之间的间距
    app:iconGravity="end"  // 图标在文本的位置:textStart/start/end/textEnd/textTop/top
    android:textSize="24sp"
    android:layout_margin="16dp"
    app:backgroundTint="@color/colorAccent"  // 按钮背景色,不能使用android:background设置!
    android:onClick="onBtnClick()" // 点击事件
    style="@style/Widget.MaterialComponents.Button.UnelevatedButton" // 去掉按钮自带的阴影
    android:insetBottom="0dp"  // 删除按钮默认样式中的空隙间距,否则会导致按钮的长度宽度并不是我们自己设置的值
    android:insetTop="0dp"
/>

<!-- 底部导航栏可以通过 `MaterialButtonToggleGroup`来实现 -->
<com.google.android.material.button.MaterialButtonToggleGroup
    android:id="@+id/toggleGroup"
    android:layout_width="wrap_content"
    android:layout_height="wrap_content"
    app:singleSelection="true"
    app:selectionRequired="true"
    app:checkedButton="@id/btn1"
    app:layout_constraintBottom_toBottomOf="parent"
    app:layout_constraintStart_toStartOf="parent"
    app:layout_constraintEnd_toEndOf="parent"
    app:layout_constraintHorizontal_bias="0.5"
    app:layout_constraintVertical_bias="1.0">

    <com.google.android.material.button.MaterialButton
        android:id="@+id/btn1"
        android:layout_width="0"
        android:layout_height="wrap_content"
        android:layout_weight="1"
        android:text="Button 1" />

    <com.google.android.material.button.MaterialButton
        android:id="@+id/btn2"
        android:layout_width="0"
        android:layout_height="wrap_content"
        android:layout_weight="1"
        android:text="Button 2" />

    <com.google.android.material.button.MaterialButton
        android:id="@+id/btn3"
        android:layout_width="0"
        android:layout_height="wrap_content"
        android:layout_weight="1"
        android:text="Button 3" />
2
3
4
5
6
7
8
9
10
11
12
13
14
15
16
17
18
19
20
21
22
23
24
25
26
27
28
29
30
31
32
33
34
35
36
37
38
39
40
41
42
43
44
45
46
47
48
49
50
51
52
53
54
55
56
- 如果闪退,修改主题为:
android:theme="@style/Theme.MaterialComponents.**Light.NoActionBar"之类的 MaterialButtonToggleGroup:可以把多个Button聚合成一个组,实现单选多选等功能app:checkedButton:默认选中app:singleSelection:是否单选app:selectionRequired:设置为true后,强制至少选中一个
# TextView
<TextView
    android:id="@+id/tvHelloWorld"
    android:layout_width="wrap_content"
    android:layout_height="wrap_content"
    android:text="Hello World!"
    android:textSize="24sp"
    android:textColor="@color/black"
    android:layout_margin="16dp"
    android:gravity="center"
    android:background="@color/white"
    android:padding="8dp"
    android:textIsSelectable="true" // 复制其中的内容
    android:descendantFocusability="blocksDescendants"  // 拦截事件的消费,使得textView无法消费触摸的事件
    android:clickable="true" // 默认TextView不可点击,该属性设置为true后可以点击,获取焦点
    android:ellipsize="marquee" // 设置文字末尾截断省略号和位置,start、middle等
    android:marqueeRepeatLimit="marquee_forever"  // 不停循环
    android:focusable="true"  // 可获取焦点
    android:focusableInTouchMode="true"  // 可获取焦点
    android:singleLine="true" // 单行
    android:drawableLeft="icon图片src" // 在TextView左侧显示图片icon,同理:drawableRight、drawableTop、drawableDown
    android:drawableTint="#ffffff" // 设置icon的颜色
/>
2
3
4
5
6
7
8
9
10
11
12
13
14
15
16
17
18
19
20
21
22
23
- 输入框与输入法遮挡:在
AndroidManifest.xml对应的 Activity 里添加android:windowSoftInputMode="adjustPan"或是android:windowSoftInputMode="adjustResize"属性 adjustPan:整个界面向上平移,使输入框露出,它不会改变界面的布局;界面整体可用高度还是屏幕高度adjustResize:需要界面的高度是可变的,或者说 Activity 主窗口的尺寸是可以调整的,如果不能调整,则不会起作用。ellipsize+marqueeRepeatLimit+focusable+focusableInTouchMode+singleLine:设置文字跑马灯效果drawableRight:通过这种设置的icon会紧贴TextView的边框显示,如果想贴近text显示,则需要使用MaterialButton控件
# EditText
EditText 输入时被输入法挤压滚动到顶部:
// AndManifest.xml
android:windowSoftInputMode="adjustResize|stateHidden"
// xml layout viewGroup
android:fitsSystemWindows="true"
2
3
4
# RecyclerView
一直展示滚动条
android:scrollbarAlwaysDrawVerticalTrack="true"
android:scrollbars="vertical"
android:overScrollMode="always"
android:fadeScrollbars="false"
android:scrollbarFadeDuration="0"
2
3
4
5
# ImageView
#
# 布局
# ConstrainLayout 约束布局
通过辅助线来控制具体的位置,当然也可以设置边距啥的。
# 常用库
# Glide
图片加载
#
# 控件生命周期及函数
# 1. Activity
onCreate(Bundle savedInstanceState)
- 作用: 初始化Activity,通常在这里加载布局、初始化控件和数据。
- 常见操作:
- 设置布局 setContentView(R.layout.activity_main)
- 初始化控件 findViewById(R.id.button)
- 初始化数据
@Override
protected void onCreate(Bundle savedInstanceState) {
    super.onCreate(savedInstanceState);
    setContentView(R.layout.activity_main);
    Button myButton = findViewById(R.id.my_button);
    // 初始化操作
}
2
3
4
5
6
7
onStart()
- 作用: Activity即将变为可见状态。
- 常见操作:
- 开始动画
- 初始化资源(如Sensor)
@Override
protected void onStart() {
    super.onStart();
    // 开始动画或初始化资源
}
2
3
4
5
onResume()
- 作用: Activity即将与用户交互。
- 常见操作:
- 恢复暂停的任务(如游戏的刷新)
- 开始播放音乐
@Override
protected void onResume() {
    super.onResume();
    // 恢复暂停的任务
}
2
3
4
5
onPause()
- 作用: Activity即将失去焦点,但仍部分可见。
- 常见操作:
- 暂停动画或音乐
- 保存临时数据
@Override
protected void onPause() {
    super.onPause();
    // 暂停动画或音乐
}
2
3
4
5
onStop()
- 作用: Activity即将完全不可见。
- 常见操作:
- 释放不必要的资源
- 停止动画
@Override
protected void onStop() {
    super.onStop();
    // 释放不必要的资源
}
2
3
4
5
onDestroy()
- 作用: Activity即将被销毁。
- 常见操作:
- 释放所有资源
- 终止所有后台任务
@Override
protected void onDestroy() {
    super.onDestroy();
    // 释放所有资源
}
2
3
4
5
# 2. Fragment
onAttach(Context context)
- 作用: Fragment与Activity相关联。
- 常见操作:
- 获取Activity的引用
@Override
public void onAttach(Context context) {
    super.onAttach(context);
    // 获取Activity的引用
}
2
3
4
5
onCreate(Bundle savedInstanceState)
- 作用: 初始化Fragment,通常在这里加载布局、初始化控件和数据。
- 常见操作:
- 初始化数据
@Override
public void onCreate(Bundle savedInstanceState) {
    super.onCreate(savedInstanceState);
    // 初始化数据
}
2
3
4
5
onCreateView(LayoutInflater inflater, ViewGroup container, Bundle savedInstanceState)
- 作用: 为Fragment创建视图层次结构。
- 常见操作:
- 装载布局文件
- 初始化控件
@Override
public View onCreateView(LayoutInflater inflater, ViewGroup container, Bundle savedInstanceState) {
    View view = inflater.inflate(R.layout.fragment_layout, container, false);
    Button myButton = view.findViewById(R.id.my_button);
    // 初始化控件
    return view;
}
2
3
4
5
6
7
onActivityCreated(Bundle savedInstanceState)
- 作用: Fragment所在的Activity已经完成onCreate()。
- 常见操作:
- 设置与Activity相关的操作
@Override
public void onActivityCreated(Bundle savedInstanceState) {
    super.onActivityCreated(savedInstanceState);
    // 设置与Activity相关的操作
}
2
3
4
5
onStart()
- 作用: Fragment即将变为可见状态。
- 常见操作:
- 开始动画或初始化资源
@Override
public void onStart() {
    super.onStart();
    // 开始动画或初始化资源
}
2
3
4
5
onResume()
- 作用: Fragment即将与用户交互。
- 常见操作:
- 恢复暂停的任务
@Override
public void onResume() {
    super.onResume();
    // 恢复暂停的任务
}
2
3
4
5
onPause()
- 作用: Fragment即将失去焦点,但仍部分可见。
- 常见操作:
- 暂停动画或音乐
@Override
public void onPause() {
    super.onPause();
    // 暂停动画或音乐
}
2
3
4
5
onStop()
- 作用: Fragment即将完全不可见。
- 常见操作:
- 释放不必要的资源
@Override
public void onStop() {
    super.onStop();
    // 释放不必要的资源
}
2
3
4
5
onDestroyView()
- 作用: Fragment的视图即将销毁。
- 常见操作:
- 清理视图相关的资源
@Override
public void onDestroyView() {
    super.onDestroyView();
    // 清理视图相关的资源
}
2
3
4
5
onDestroy()
- 作用: Fragment即将被销毁。
- 常见操作:
- 释放所有资源
@Override
public void onDestroy() {
    super.onDestroy();
    // 释放所有资源
}
2
3
4
5
onDetach()
- 作用: Fragment与Activity解除关联。
- 常见操作:
- 清理一些相关联的资源
@Override
public void onDetach() {
    super.onDetach();
    // 清理一些相关联的资源
}
2
3
4
5
# 3. View
onAttachedToWindow()
- 作用: 当View附加到Window时调用。
- 常见操作:
- 开始动画或初始化资源
@Override
protected void onAttachedToWindow() {
    super.onAttachedToWindow();
    // 开始动画或初始化资源
}
2
3
4
5
onDetachedFromWindow()
- 作用: 当View从Window分离时调用。
- 常见操作:
- 释放资源或停止动画
@Override
protected void onDetachedFromWindow() {
    super.onDetachedFromWindow();
    // 释放资源或停止动画
}
2
3
4
5
onSizeChanged(int w, int h, int oldw, int oldh)
- 作用: 当View的大小发生变化时调用。
- 常见操作:
- 处理尺寸变化后的操作
@Override
protected void onSizeChanged(int w, int h, int oldw, int oldh) {
    super.onSizeChanged(w, h, oldw, oldh);
    // 处理尺寸变化后的操作
}
2
3
4
5
onDraw(Canvas canvas)
- 作用: 绘制View的内容。
- 常见操作:
- 自定义绘制逻辑
@Override
protected void onDraw(Canvas canvas) {
    super.onDraw(canvas);
    // 自定义绘制逻辑
}
2
3
4
5
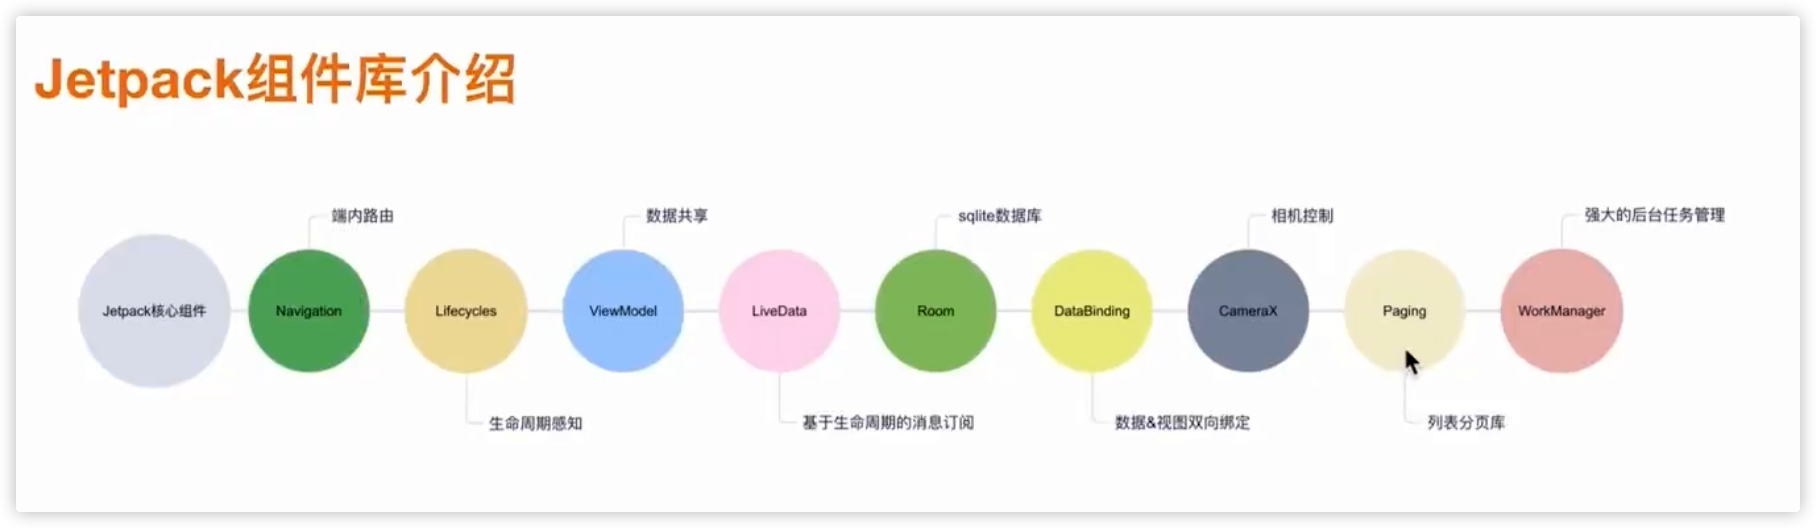
# Jetpack组件库