# Python 学习笔记
# Zen of Python
>>>import this
The Zen of Python, by Tim Peters
Beautiful is better than ugly.
Explicit is better than implicit.
Simple is better than complex.
Complex is better than complicated.
Flat is better than nested.
Sparse is better than dense.
Readability counts.
Special cases aren't special enough to break the rules.
Although practicality beats purity.
Errors should never pass silently.
Unless explicitly silenced.
In the face of ambiguity, refuse the temptation to guess.
There should be one-- and preferably only one --obvious way to do it.
Although that way may not be obvious at first unless you're Dutch.
Now is better than never.
Although never is often better than *right* now.
If the implementation is hard to explain, it's a bad idea.
If the implementation is easy to explain, it may be a good idea.
Namespaces are one honking great idea -- let's do more of those!
2
3
4
5
6
7
8
9
10
11
12
13
14
15
16
17
18
19
20
21
# api
enumerate()方法用于遍历list/array:for i,num in enumerate(list/array)in同 js 的inrange(start,end):前闭后开if/else/elif- 数组范围:
[start=0:end=length-1]:前闭后开,可以是负数 - class 定义类,可以继承
- 通过
keys()/values()读取字典中的键/值,类似 js 的map csv.DictReader(infile):可以把文件内容读取成字典,字典可以转化为 listcsv.DictWriter(infile):把内容写入文件,writer.writeHeader/writer.writeRow用于写入标题 header 和行内容- 与:
and,或:or,非:not - list/array:
append()拼接一条数据 with:用于文件流,可以自动关闭文件的读取,as:给读取的文件内容赋一个变量名称len(list/array):获取长度socres=[int(num) for num in list[2:]]:列表生成式,获取 list 第 2 个及之后的数字(从第 0 开始数),转换成 int 类型并生成一个新数组赋值给 scores,float('1.23')转换成浮点数sorted(list):列表升序排序;sum(list):列表求和;round(list,2):四舍五入保留 2 位小数;'xx'.join(list):列表拼接;max/min(list):列表最大/最小值;list.count(2):list 中含有几个 2;avg(list):列表求均值;- 列表之间可以通过
+拼接为一个列表 random.choice([])raise:抛出异常;try/except:捕获异常;finally:无论是否有异常都执行;assert:断言,用于测试;with:用于文件流,可以自动关闭文件的读取,as:给读取的文件内容赋一个变量名称;@property:装饰器,用于定义 getter 和 setter;@classmethod:装饰器,用于定义类方法;@staticmethod:装饰器,用于定义静态方法;- 继承:
class Phone:
    times = 3

    def print_n(self):
        for _ in range(Phone.times):
            print("meow")

    # __init__类似构造函数,self代表当前对象,可以给对象赋值
    def __init__(self, os, types, is_waterproof = True): # 默认参数
        self.os = os
        self.types = types
        self.is_waterproof = is_waterproof
        self._balance = 0

    # 类方法
    @classmethod
    def from_dict(cls, dict):
        return cls(dict['os'], dict['types'], dict['is_waterproof'])

    # 静态方法
    @staticmethod
    def say_hello():
        print("Hello")
        return

    # 静态属性
    @staticmethod
    def version():
        return "1.0"

    # 实例方法
    def is_ios(self):
        return self.os == 'ios'

    def say_name(self):
        print(self.os)
        return

    def show_types(self):
        print(self.types)
        return

    # 在class中,一种比较好的在类方法之间共用公共属性的方法就是使用计算属性
    @property
    def balance(self):
        return self._balance

    def deposit(self, n):
        self._balance += n

    def withdraw(self, n):
        self._balance -= n

    # 装饰器  getter
    @property
    def calcPro(self): # 计算属性
        return f"OS = {self._os}, types = {self._types}"

    # setter 可以加_来区分私有属性
    @calcPro.setter
    def calcPro(self, value):
        self._os, self._types = value.split(',')
        return

p1 = Phone("android", 13, True)
print(p1.calcPro)
p2 = Phone("ios", 15, True)
p3 = Phone.from_dict({'os': 'android', 'types': 18, 'is_waterproof': False})
# 继承
class Shanzhaiji(Phone):
    def __init__(self, os, types, is_waterproof, brand, price):
        super().__init__(os, types, is_waterproof)
        # self.os = os
        # self.types = types
        # self.is_waterproof = is_waterproof
        self.brand = brand
        self.price = price
        # print(self.brand, self.price)

    def print_brand(self):
        print(self.brand)
        return

    def print_price(self):
        print(self.price)
        return


szj = Shanzhaiji('saiban', 18, True, 'xiaomi', 999)

print(szj.brand)
print(szj.print_brand())
print(szj.print_price())
print(szj.is_ios())

# 对于global的属性,函数中只能读取,不能直接修改,需要通过global声明
global_var = 10

def test(x, y):
    '''
    多行注释示例:这是一个测试函数
    :param x: number
    :param y: number
    :return: None
    '''
    global global_var
    global_var = 20
    print(global_var)

test()
print(global_var)

def square(n):
    return n*n

def test_square():
    try:
        assert square(3) == 9
    except AssertionError:
        print("3 squared was not 9")

if __name__ == "__main__":
    test_square()
2
3
4
5
6
7
8
9
10
11
12
13
14
15
16
17
18
19
20
21
22
23
24
25
26
27
28
29
30
31
32
33
34
35
36
37
38
39
40
41
42
43
44
45
46
47
48
49
50
51
52
53
54
55
56
57
58
59
60
61
62
63
64
65
66
67
68
69
70
71
72
73
74
75
76
77
78
79
80
81
82
83
84
85
86
87
88
89
90
91
92
93
94
95
96
97
98
99
100
101
102
103
104
105
106
107
108
109
110
111
112
113
114
115
116
117
118
119
120
121
122
123
if __name__ == "__main__": xxx: 用于判断当前的模块是被直接运行还是被导入到其他模块中。如果模块被直接运行,则__name__变量的值会被设置为"__main__"。如果模块是被导入的,__name__的值将是模块的名字。使得模块既可以被执行也可以被导入而不触发主执行代码,增加了代码的可重用性。- 类型提示:
number: int = input("Number: "),def meow(n: int) -> None: xxx - 多行注释:
""" xxx """单双不限 argparse库:在命令行直接执行.py文件时,可以通过argparse库来传递参数,parser = argparse.ArgumentParser(description=xxx),parser.add_argument("xxx", default=xx, type=int, help="xxx"),args = parser.parse_args(),args.xxx获取参数值unpacking即把 list 或 dict 解包成一个个元素:test(*my_list),test(**my_dict)*args:可变参数,接收任意多个参数,返回一个 tuple;**kwargs:关键字参数,接收任意多个参数,返回一个 dictlambda:匿名函数,lambda x: x+1,lambda x,y: x+yprint(*my_list):打印 list 中的每个元素,不用遍历map(func, list):对 list 中的每个元素执行 func 函数,返回一个新的 listlist comprehension:列表生成式,[x for x in range(10)],[x for x in range(10) if x % 2 == 0],[x+y for x in range(10) for y in range(10)]dictionary comprehension:字典生成式,{x: x+1 for x in range(10)}set comprehension:集合生成式,{x for x in range(10)}enumerate(list):遍历 list,返回一个 tuple,第一个元素是 index,第二个元素是 list 中的元素generators:生成器,[x for x in range(10)]是一个 list,(x for x in range(10))是一个生成器,可以通过next()方法来获取下一个元素,也可以通过for循环来遍历,yield关键字用于生成器函数中,用于返回一个值,但是不会终止函数的执行,而是暂停函数的执行,下次调用next()方法时,会从上次暂停的位置继续执行iterators:迭代器,iter(list)可以获取到一个迭代器,通过next()方法获取下一个元素,也可以通过for循环来遍历,yield关键字用于生成器函数中,用于返回一个值,但是不会终止函数的执行,而是暂停函数的执行,下次调用next()方法时,会从上次暂停的位置继续执行,itertools可以帮助我们快速生成迭代器。itertools:迭代工具库,from itertools import count, cycle, repeat, accumulate, chain, compress, dropwhile, filterfalse, groupby, islice, permutations, product, takewhile, tee, zip_longest
# 读写文件
Python2 默认使用 ASCII 编码读取文件,所以如果是中文会有可能出现乱码,参考下面添加编码格式声明即可;Python3 默认使用 utf-8 格式,一般会正常显示中文。
- 为了处理英文字符,产生了 ASCII 码。
- 为了处理中文字符,产生了 GB2312。
- 为了处理各国字符,产生了 Unicode。
- 为了提高 Unicode 存储和传输性能,产生了 UTF-8,它是 Unicode 的一种实现形式。
- with:修改文件时,可以自动关闭文件
- 通过 with 以自定义 class 的形式访问文件时,自定义 class 中需要有
__enter__()和__exit__()方法,__enter__()方法在 with 语句开始时执行,__exit__()方法在 with 语句结束时执行。
#!/usr/bin/python
# -*- coding: utf-8 -*-
# open()可以接受三个参数:文件路径;以什么模式打开文件mode:r,w,a;文件编码格式encoding="utf8";
invoice = open('./invoice.txt').read().split()
lists = open('./lists.txt', mode='w', econding='utf8').read().split()

lists.write('123543\n')
lists.close()

# or
with open('./invoice.txt', 'a') as file:
  data = file.readLines()
  print(data)
2
3
4
5
6
7
8
9
10
11
12
13
- Python 为我们提供的两个转换编码的方法 decode()与 encode()。
- decode()方法将其他编码字符转化为 Unicode 编码字符。
- encode()方法将 Unicode 编码字符转化为其他编码字符。
- chardet 模块可以检测字符串编码,没有该模块的可以用
pip install chardet安装。使用:chardet.detect(变量)
- Python2 的对于字符编码的转换要以 unicode 作为“中间人”进行转化。
- 知道自己系统的字符编码(Linux 默认 utf-8,Windows 默认 GB2312),对症下药。
# File I/O
file = open("filePath+fileName, "mode读写格式", "econding文件格式"): 获取到字符串或者 bufferwith open('./invoice.txt', 'a') as file: xxxlines = file.readLines()line.rstrip().split(",").join("-").xxxa,b,c = line.rstrip().split(","): 赋值解析sorted(list, key='xx', reverse=false)和list.sort(): 不同!writer = csv.DictWriter(file)writer.writerow({"name":name,"age":age}):通过 csv 库,写入文件
# 连接数据库
安装pip install mysql-connector-python库。示例如下:
import mysql.connector

connection=mysql.connector.connect(host='localhost',port='3306',user='root',passwd='11111111',database='qq')

cursor=connection.cursor()

# cursor.execute("CREATE DATABASE `qq`;")
# cursor.execute("DROP DATABASE `qq`;")

# cursor.execute("SHOW DATABASES;")

# records=cursor.fetchall()

# for r in records:
#   print(r)

# cursor.execute("USE `qq`;")
# cursor.execute("DROP TABLE IF EXISTS `qq_test`;")

# cursor.execute("CREATE TABLE `qq_test`(`name` VARCHAR(20) PRIMARY KEY, `age` INT, `gender` VARCHAR(1));")

# cursor.execute("INSERT INTO `qq_test` VALUES('Eric',30,'M');")
# cursor.execute("INSERT INTO `qq_test` VALUES('John',20,'M');")
# cursor.execute("INSERT INTO `qq_test` VALUES('Mary',26,'F');")

cursor.execute("SELECT * FROM `qq_test`;")
records=cursor.fetchall()

for r in records:
  print(r)

cursor.close()

# 插入删除等操作需要下面这一步才能生效
connection.commit()

connection.close()
2
3
4
5
6
7
8
9
10
11
12
13
14
15
16
17
18
19
20
21
22
23
24
25
26
27
28
29
30
31
32
33
34
35
36
37
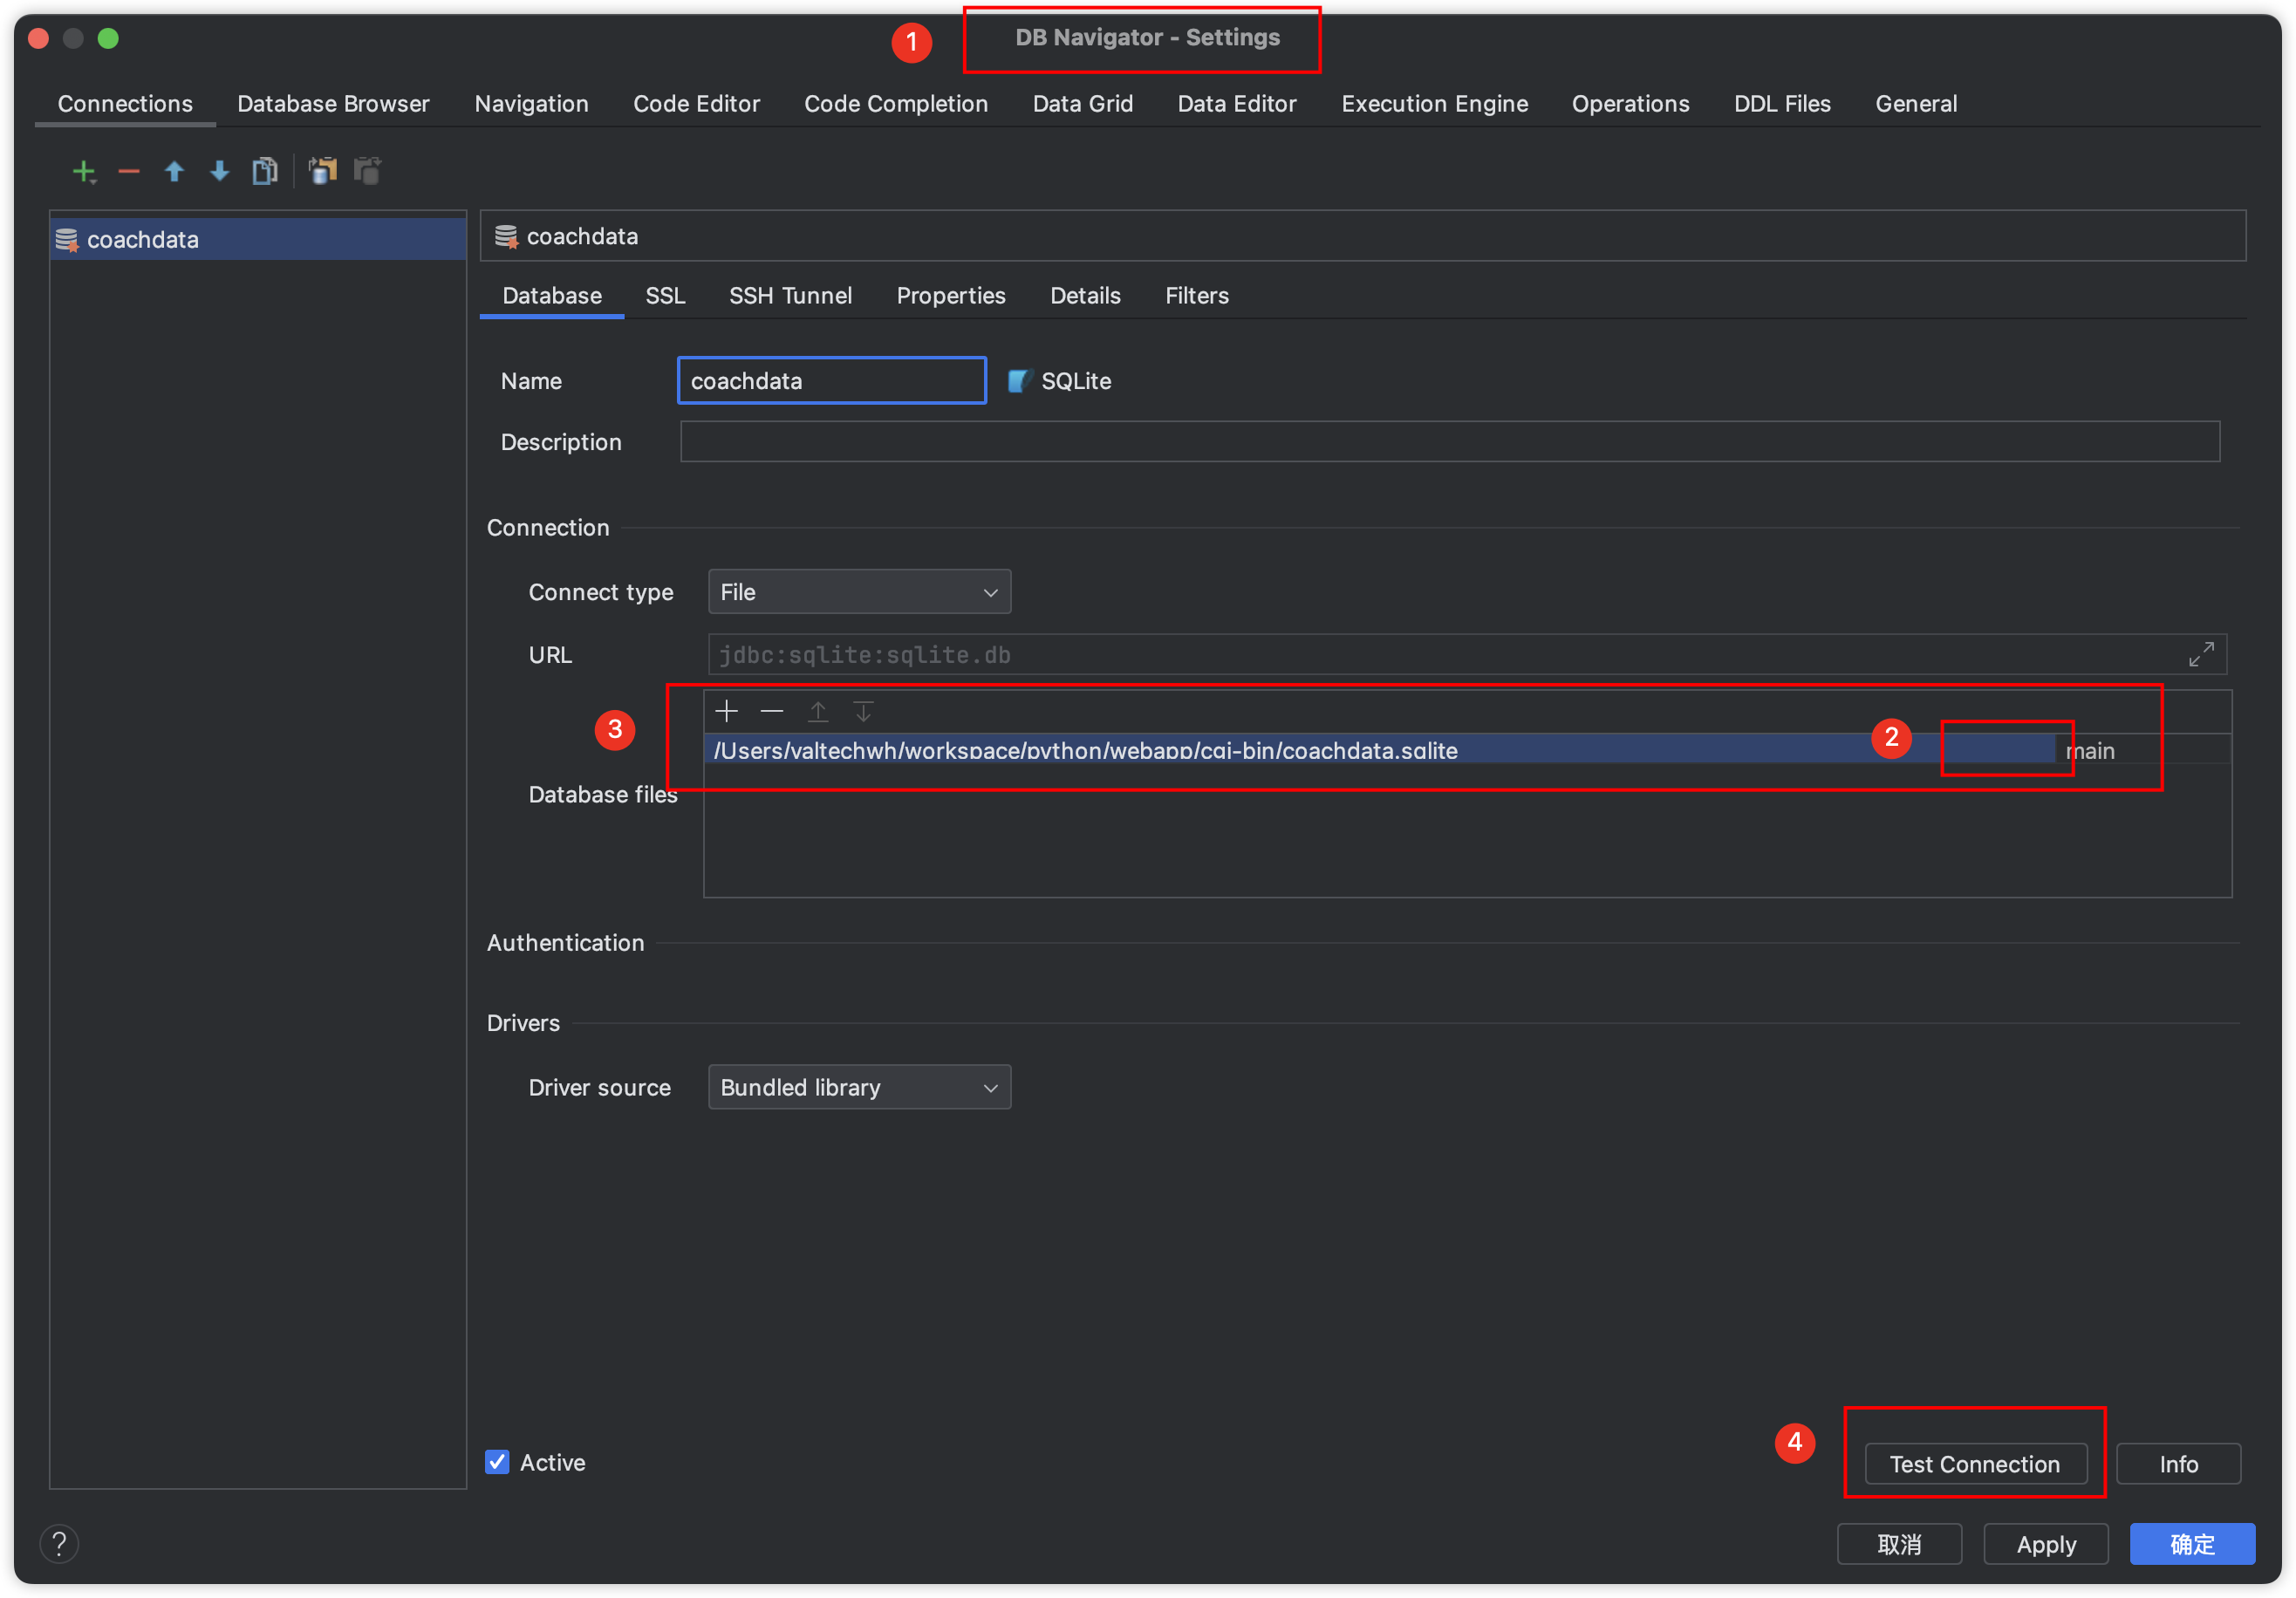
# sqlite
如图,在 PyCharm 中安装DB Navigator插件之后,可以通过图中步骤链接已创建的 sqlite 数据库,Python3 默认自带 sqlite3,不必特殊声明直接 import 就行,然后就可以跟 Java 开发时链接 MySQL 一样,可以可视化操作 DB 了。
import sqlite3

# 连接到SQLite数据库
conn = sqlite3.connect('your_database.db')

# 创建一个游标对象
cursor = conn.cursor()

# 执行SQL语句
cursor.execute('SELECT * FROM your_table')
conn.commit()
# 获取查询结果
result = cursor.fetchall()

# 关闭游标和连接
cursor.close()
conn.close()
2
3
4
5
6
7
8
9
10
11
12
13
14
15
16
17
# 常见模块及用途用法
# random
# mmap
# sys
# json
# os
# time
# datetime
# hashlib
# base64
import base64

with open("path/to/your/image.jpg", "rb") as image_file:
    encoded_string = base64.b64encode(image_file.read())
    print(encoded_string.decode('utf-8'))
2
3
4
5
# subprocess
# threading
# multiprocessing
# queue
# logging
# argparse
# traceback
# functools
# itertools
# math
# decimal
# statistics
# urllib
# pyttsx3
# pyaudio
# pillow
# requests
在爬虫中发送网络请求
import requests

# 找一些免费的代理ip
proxies = [
  {'http':'xxx'},
  {'http':'xxx'},
  {'http':'xxx'},
  ...
]

def main():
  headers = {"User-Agent":"xxx", ...} # cookie等也可以加进来
  res = requests.get(url, headers = headers, proxies = proxies[0])
  print(res.status_code)
  print(res.content.toString())
  print(res.content.decode())
2
3
4
5
6
7
8
9
10
11
12
13
14
15
16
# selenium
自动化爬虫工具,本质是个浏览器,占用资源多。同类还有 PhantomJs。
可以执行 js 代码!-- driver.execute_script( "window.scrollTo( 0, document.body.scrollHeight);"),这样就可以模拟网页滚动,进而可以爬取到一些懒加载的内容。这种适用于整个页面可以滚动的情况。对于页面中有部分区域可以滚动的情况参考下面:iframe 或者某个 content 区域滚动的情况:
from selenium.webdriver import ActionChains
from selenium.webdriver.common.by import By
from selenium.webdriver.common.actions.wheel_input import ScrollOrigin

iframe = driver.find_element(By.TAG_NAME, 'iframe')
scroll_origin = ScrollOrigin.from_element(iframe)
ActionChains(driver).scroll_from_origin(scroll_origin, 0 , 200).perform()

# 或者
from selenium.webdriver import ActionChains, Keys
ActionChains(driver).send_keys(Keys.PAGE_DOWN).perform()
2
3
4
5
6
7
8
9
10
11
from selenium import webdriver

config = {
  "USERNAME": "user_name",
  "PASSWORD": "password"
}
loginUrl = "xxx"

def main():
  driver = webdriver.Chrome("./chromedriver")
  driver.get(loginUrl)
  assert 'SpringServe' in driver.title
  elem = driver.find_element_by_name("user[email]")
  elem.clear()
  elem.send_keys(config["USERNAME"])
  elem.send_keys(config["PASSWORD"])
  elem = driver.find_element_by_name("user[password]")
  elem.clear()
  elem.send_keys(config["PASSWORD"])
  elem.send_keys(Keys.RETURN)
  time.sleep(5)
  print(driver.page_source)
  driver.quit()
2
3
4
5
6
7
8
9
10
11
12
13
14
15
16
17
18
19
20
21
22
23
# urllib2
解析一个网页的 url,获取该网页的字符串。
# time
from time import sleep

sleep(1)
2
3
# re
正则匹配字符串。正则的规则基本都是相同的。
import urllib2, re

name = input("Please enter the name: ").strip()
matches = re.search(r"^(.*), (.*)$", name)
if matches:
    last, first = matches.groups()
    name = f"{first} {last}"
url = input("Please enter the URL: ").strip()
username = re.sub(r"^https://x.com/u/", "", url)
html = urllib2.urlopen("https://www.163.com").read()
title = re.findall(r'<title>(.*?)</title>', html)[0]

unicode_title = title.decode('gb2312')
utf8_title = unicode_title.encode('utf-8')

print(utf8_title)
2
3
4
5
6
7
8
9
10
11
12
13
14
15
16
# csv
用于读写 Excel 表格文件。
import csv

with open('myExcel.csv') as infile:
  # 读取并转换为list
  data = list(csv.DictReader(infile))
  for row in data:
    print('original', row['name'], row['city'], row['addr'])
    if row['city'][0] == '台':
      row['city'] = '臺' + row['city'][1:]
    if 'F' in row['addr']:
      row['addr'] = row['addr'].replace('F', '楼')
    print('updated', row['name'], row['city'], row['addr'])

with open('myExcel_new.csv', 'w', newline = '') as outfile:
  writer = csv.DictWriter(outfile, fieldnames = data[0].keys())
  writer.writeHeader()
  for e in data:
    writer.writerow(e)
    writer.writerow({'name': 'Eric', 'city': 'Shanghai', 'addr': 'Pudong'})
2
3
4
5
6
7
8
9
10
11
12
13
14
15
16
17
18
19
# collections
工具函数库?from collections import Counter
- Counter 计数器:统计一个 list 中某个值出现的次数:相当于生成了一个 js 的 map 或者 obj。可以手动修改。
cnt=Counter([1,2,3,4,4,4,5])
# cnt => Counter({1:1, 2:1, 3:1, 4:3, 5:1})
print(cnt[4])  # 3
# 出现次数最高的前一个的
print(cnt.most_common(1)) #  4

counts=Counter([e['name'] for e in results]) # 统计results中各个name出现的次数
2
3
4
5
6
7
# matplotlib
画图工具库。
# 安装先:pip install matplotlib
import  matplotlib.pyplot as plt
data=[['Tom',10,98,93,89,70,100,99],['Som',10,48,93,89,60,90,99],['Pom',10,88,93,89,77,100,89]]
captions=['name','a','b','c','d','e','f','g']

for stu in data:
  name = stu[0]
  scores=stu[1:]
  plt.clf() # 设定全新图表
  plt.plot(scores,marker='o',label='my score') # 画几条线就写几个,但是需要区分label,还可设定color,linewidth等
  # plt.plot(avg_scores,marker='x',label='avg score') # 画几条线就写几个,但是需要区分label
  plt.title(name) # 图标的名称
  plt.xticks(range(len(scores)),captions[1:]) # x轴有几项,及对应的text
  plt.xlabel('Items') # x轴名称
  plt.ylabel('Scores') # y轴名称
  plt.ylim(0,120) # y轴范围
  plt.tight_layout() # 控制图表不要超出文档contain
  plt.savefig(name+'.png') # 保存图片名+格式
  plt.show()
2
3
4
5
6
7
8
9
10
11
12
13
14
15
16
17
18
19
# pickle
Python 中一个用于序列化和反序列化对象结构的模块。序列化(又称为持久化或扁平化)过程是指将一个 Python 对象结构转换为一个字节流,以便将其保存到一个文件或数据库中,或通过网络传输到另一个远程机器。
import pickle

with open('example.pkl', 'wb') as f:
    pickle.dump(obj, f)
with open('example.pkl', 'rb') as f:
    obj = pickle.load(f)
2
3
4
5
6
# flask
# pyinstaller
把 Python 代码打包成 exe 可执行文件:pyinstaller -F ./example.py,注意要先配置好环境变量。
# BeautifulSoup
# pandas
用法:先构造一个 DataFrame 类型的数据,然后对 DataFrame 进行各种操作,比如筛选、排序、分组、聚合等。然后可以生成 Excel 文件。
import pandas as pd

info = {
  'name':["Eric","jack","Lily"], #// 每一列column
  'gender':["M","M","F"],
  'age':[32,44,18]
}

data = pd.DataFrame(info)
print(data) # 类似excel的表格
data.to_excel("./users.xlsx", index=False) # 生成Excel文件
2
3
4
5
6
7
8
9
10
11
爬取完整数据包括详情页电影简介:
import requests
from bs4 import BeautifulSoup as bs4
import pandas as pd

headers = {
  "Referer":"https://ssr1.scrape.center/",
  "User-Agent":"Mozilla/5.0 (Macintosh; Intel Mac OS X 10_15_7) AppleWebKit/537.36 (KHTML, like Gecko) Chrome/131.0.0.0 Safari/537.36",
}

movie_info = {
  "电影名称":[],
  "电影类型":[],
  "拍摄国家":[],
  "上映时间":[],
  "电影时长":[],
  "电影评分":[],
  "电影详情":[],
}

# 下载电影海报图片
# url = "https://p1.meituan.net/movie/6bea9af4524dfbd0b668eaa7e187c3df767253.jpg@464w_644h_1e_1c"
# response = requests.get(url, headers = headers)
# with open("./bwbj.jpg", "wb") as img:
#   img.write(response.content)


for page in range(1, 11):
  url = f"https://ssr1.scrape.center/page/{page}"
  response = requests.get(url, headers= headers)
  soup = bs4(response.text, "html.parser")
  results = soup.find_all(name="div", class_="p-h el-col el-col-24 el-col-xs-9 el-col-sm-13 el-col-md-16")

  for i in range(len(results)):
    name =results[i].h2.text
    movie_info["电影名称"].append(name)

    # 电影类型
    btns = results[i].find_all(name = "button", class_="el-button category el-button--primary el-button--mini")
    movie_type = ""
    for btn in btns:
      movie_type+=btn.span.text + ","
    movie_info["电影类型"].append(movie_type)

    #电影时长和国家
    infos = results[i].find_all(name="div", class_="m-v-sm info")

    span_list = infos[0].find_all(name="span")
    movie_info["拍摄国家"].append(span_list[0].text)
    movie_info["电影时长"].append(span_list[2].text)

    # 处理空值
    span_list = infos[1].find_all(name="span")
    if len(span_list)>0:
      movie_info["上映时间"].append(span_list[0].text)
    else:
      movie_info["上映时间"].append('')

    # 电影评分
    score = soup.find_all(name="p", class_="score m-t-md m-b-n-sm")
    movie_info["电影评分"].append(score[0].text.strip())

    headers = {
      "Referer":f"https://ssr1.scrape.center/page/{i}",
      "User-Agent":"Mozilla/5.0 (Macintosh; Intel Mac OS X 10_15_7) AppleWebKit/537.36 (KHTML, like Gecko) Chrome/131.0.0.0 Safari/537.36",
    }

    # 获取detail path,拼接url
    path = results[i].a['href']
    url = f"https://ssr1.scrape.center{path}"  # 获取电影的详情简介

    response = requests.get(url, headers= headers)
    soup = bs4(response.text, "html.parser")
    detail = soup.find_all(name="div", class_ ="drama")
    movie_info["电影详情"].append(detail[0].p.text.strip())


data = pd.DataFrame(movie_info)
print(data) # 类似excel的表格
data.to_excel("./users.xlsx", index=False) # 生成Excel文件:index=False不带序号
2
3
4
5
6
7
8
9
10
11
12
13
14
15
16
17
18
19
20
21
22
23
24
25
26
27
28
29
30
31
32
33
34
35
36
37
38
39
40
41
42
43
44
45
46
47
48
49
50
51
52
53
54
55
56
57
58
59
60
61
62
63
64
65
66
67
68
69
70
71
72
73
74
75
76
77
78
79
# 爬取歌曲
from hashlib import md5
import time
import requests
from bs4 import BeautifulSoup as bs4
import pandas as pd
headers = {
"Referer": "https://music.91q.com/player",
"Cookie": "cuid=04e787df-23bf-3c5e-ad6e-2e56e6287ee7",
"User-Agent": "Mozilla/5.0 (Macintosh; Intel Mac OS X 10_15_7) AppleWebKit/537.36 (KHTML, like Gecko) Chrome/131.0.0.0 Safari/537.36",
}
keyword = "胡彦斌"
# 从js代码里找出来的
secret = "0b50b02fd0d73a9c4c8c3a781c30845f"
appid = "16073360"
base_url = "https://music.91q.com"
response = requests.get(base_url + "/search?word=" + keyword, headers=headers)
# response = requests.get("https://music.163.com/search/m/?s=" + keyword, headers=headers)
# 生成sign值,然后使用https://music.91q.com/v1/song/tracklink接口获取xcode,再根据xcode去取真实的歌曲链接
def createSign(appid, TSID, timestamp):
# 要按顺序
r = "TSID=" + TSID + "&appid=" + appid + "×tamp=" + timestamp + secret
return md5(r.encode("utf8")).hexdigest()[:32]
soup = bs4(response.content, "html.parser")
content_box = soup.find_all(name="div", class_="content")
song_box = content_box[0].find_all(name="div", class_="song-box")
song_lists = song_box[0].find_all(name="li", class_="pr t clearfix")
# print(song_lists)
for song in song_lists:
# print(song.a.text)
# print(song.a["href"])
TSID = song.a["href"].split("/")[-1]
timestamp = str(int(time.time()))
sign = createSign(appid, TSID, timestamp)
# response = requests.get(
# f"https://music.91q.com/v1/song/tracklink?sign={sign}&appid={appid}&TSID={TSID}×tamp={timestamp}"
# )
params = {"appid": appid, "TSID": TSID, "sign": sign, "timestamp": timestamp}
response = requests.get("https://music.91q.com/v1/song/tracklink", params=params)
# print("response = ", response.json())
res = response.json()
if "path" in res["data"]:
# print("path =", res["data"]["path"])
song_data = requests.get(res["data"]["path"])
song_name = res["data"]["title"]
singer_name = ""
for artist in res["data"]["artist"]:
singer_name += artist["name"] + "_"
if singer_name.endswith("_"):
singer_name = singer_name.rstrip("_")
format = res["data"]["format"]
# 以接口返回的名称和格式下载到指定位置
with open(f"./music/{singer_name}+{song_name}.{format}", "wb") as f:
f.write(song_data.content)
# 调试打印
# print(song.a.text, base_url + song.a.get("href"), TSID)
# singer_box = song.find_all(name="div", class_="artist ellipsis")
# # print(singer_box)
# for s in singer_box:
# singers = s.find_all(name="a", class_="")
# for singer in singers:
# print(singer.text, base_url + singer.get("href"))
# https://music.91q.com/v1/song/tracklink?sign=9fc7a2117bc61378cc8aa8a9ca3f7eeb&appid=16073360&TSID=T10040899625×tamp=1736756072 -> xcode
# https://audio04.dmhmusic.com/71_53_T10063954909_128_4_1_0_sdk-cpm/cn/0513/M00/4E/DF/ChAKCGTcw3-ACpZdADn8_Hqw3gU267.mp3?xcode=82bd65c3447c741ef1d0282ef79f0054812e9aa
# print(createSign("16073360", "T10040899625", "1736756072"))
# response = {'state': True, 'errno': 22000, 'errmsg': '', 'elapsed_time': '0.0401', 'ip': '10.16.15.13', 'data': {'artist': [{'artistCode': 'A10839310', 'gender': '男', 'name': 'GAI周延', 'artistType': 2, 'artistTypeName': '合作艺人', 'pic': 'https://img01.dmhmusic.com/0210/M00/6A/1F/ChR461tND86AIBLBAABCx4m6QbU921.jpg', 'region': '', 'isFavorite': 0}, {'artistCode': 'A10047763', 'birthday': '1983-07-04', 'gender': '男', 'name': '胡彦斌', 'artistType': 38, 'artistTypeName': '歌手', 'pic': 'https://img01.dmhmusic.com/0206/M00/70/D4/ChR461tM60iAT3VfAAGBbG1ut2Q893.jpg', 'region': '', 'isFavorite': 0}], 'cpId': 23, 'pic': 'https://img01.dmhmusic.com/0513/M00/3D/FD/ChAKCGTUszaABSROACx1Sz8vQtE589.jpg', 'title': '敬自己不为谁', 'duration': 237, 'assetId': 'T10063954909', 'genre': '流行', 'albumTitle': '是一场烟火', 'id': 'T10063954909', 'lang': '中文', 'afReplayGain': 0, 'albumAssetCode': 'P10004125797', 'releaseDate': '2023-08-18T00:00:00.000Z', 'isrc': 'CNZ882300956', 'sort': 8, 'meanVolume': 0, 'maxVolume': 0, 'lyric': 'https://static-qianqian.taihe.com/0513/M00/E2/43/ChAKFGTd8EmAT3orAAAKsmIJv34275.txt', 'TSID': 'T10063954909', 'allRate': ['64', '320', '3000', '128'], 'pushTime': '2023-08-18T00:00:00+08:00', 'downTime': '2037-01-01T00:00:00+08:00', 'bizList': ['sdk_cpm'], 'bits': 16, 'path': 'https://audio04.dmhmusic.com/71_53_T10063954909_128_4_1_0_sdk-cpm/cn/0513/M00/4E/DF/ChAKCGTcw3-ACpZdADn8_Hqw3gU267.mp3?xcode=f1a9feafdf1618fbf1d0defe33afd3642c61d89', 'size': 3800316, 'rate': 128, 'hashcode': '9b48e9c4322f1973eedadd002f3eaf78c00549d9', 'format': 'mp3', 'filemd5': '6af68f3d7f15acf6641391c9368f6210', 'expireTime': 1736762114, 'isFavorite': 0, 'isVip': 0, 'isPaid': 0}}
# 敬自己不为谁 https://music.91q.com/song/T10063954909 T10063954909
# GAI周延 https://music.91q.com/artist/A10839310
# 胡彦斌 https://music.91q.com/artist/A10047763
# # 9fc7a2117bc61378cc8aa8a9ca3f7eeb
2
3
4
5
6
7
8
9
10
11
12
13
14
15
16
17
18
19
20
21
22
23
24
25
26
27
28
29
30
31
32
33
34
35
36
37
38
39
40
41
42
43
44
45
46
47
48
49
50
51
52
53
54
55
56
57
58
59
60
61
62
63
64
65
66
67
68
69
70
71
72
73
74
75
76
77
78
79
80
81
82
83
84
85
86
# 下载视频
from selenium import webdriver
from selenium.webdriver.common.by import By
from selenium.webdriver.support.ui import WebDriverWait
from selenium.webdriver.support import expected_conditions as EC
HEADERS = {
    "user-agent": "Mozilla/5.0 (Macintosh; Intel Mac OS X 10_14_6) AppleWebKit/537.36 (KHTML, like Gecko) Chrome/77.0.3865.90 Safari/537.36",
    "accept": "text/html,application/xhtml+xml,application/xml;q=0.9,image/webp,image/apng,*/*;q=0.8,application/signed-exchange;v=b3",
    "referer": "https://passport.weibo.com/visitor/visitor?entry=miniblog&a=enter&url=https%3A%2F%2Fweibo.com%2Ftv%2Fv%2FI9cdSBVBP&domain=.weibo.com&ua=php-sso_sdk_client-0.6.28&_rand=1569807841.8018"
}
def parse_weibo_video(url):
    option = webdriver.ChromeOptions()
    option.add_argument('headless')
    driver = webdriver.Chrome(executable_path="/path/to/chromedriver", chrome_options=option)
    driver.get(url)
    try:
      # 这里的参数 url 就是微博视频的网页的链接,比如说 https://www.weibo.com/tv/v/In7Oce2uO ,代码中使用 Chrome 无头浏览器来模拟正常用户浏览页面时的加载过程。下面这句代码是获取视频链接的核心
        element = WebDriverWait(driver, 60).until(
            EC.presence_of_element_located((By.TAG_NAME, "video"))
        )
        user = WebDriverWait(driver, 60).until(
            EC.presence_of_element_located((By.XPATH, "//div[@class='player_info']//div[@class='clearfix']/a/span"))
        )
        return element.get_property("src"), user.text
    finally:
        driver.quit()
2
3
4
5
6
7
8
9
10
11
12
13
14
15
16
17
18
19
20
21
22
23
24
25
# 编码格式
Python 默认使用了 ASCII ,而中文并不包含在 ASCII 码范围内,要改成 UTF-8。就是在 Python 文件的开头加入这一行:# -*- coding:utf-8 -*-
# builtins
- 内置函数:
print(__builtins__) isinstance(obj, type):判断 obj 是否是 type 类型,返回布尔值dir(obj):查看对象的所有属性和方法with:用于 open 文件时,不再需要手动 close 文件from string import Template:内置的轻量级模板字符串工具- CGI 模块:通用网关接口,允许 web 服务器运行一个服务器端程序
cgi.FieldStorage():访问发给 web 请求中的数据,如 form 中的数据,通过 key-value 的形式取值http.server:顾名思义glob模块用于查找符合特定规则的文件路径名,for filename in glob.glob('*.txt'):会查找到当前目录下所有扩展名为.txt的文件,glob.iglob('*.txt'):返回的是一个迭代器,适用于处理大量的文件,因为它不会一次性加载所有结果到内存中。glob 模块非常适合于需要文件名匹配的脚本和程序。它简单易用,但不具备递归查找目录的能力,对于复杂的文件查找需求,可能需要使用 os 模块的功能或是第三方库如scandir。
# http demo
from http.server import HTTPServer, CGIHTTPRequestHandler

port = 8080

httpd = HTTPServer(('127.0.0.1', port), CGIHTTPRequestHandler)
print("Starting simple_httpd on port: " + str(httpd.server_port))
httpd.serve_forever()

# 只需在同层级目录下准备一个index.html即可通过浏览器访问
2
3
4
5
6
7
8
9
# log 日志打印
# web 开发
# 1. 使用 cgitb 模块:这是一个用于Web应用程序的CGI脚本的调试工具,它可以在浏览器中显示详细的错误报告。
import cgitb
cgitb.enable()

# 2. 打印到浏览器:
print(yate.start_response())
print("Debug info: {}".format(repr(athletes)))

# 3. 写入日志文件,注意路径
with open('/tmp/debug.log', 'a') as debug_log:
    print(str(athletes), file=debug_log)
    print(str(form_data), file=debug_log)

# 4. 使用Python的 logging 模块
import logging
logging.basicConfig(filename='/tmp/debug.log', level=logging.DEBUG)
logging.debug(athletes)
logging.debug(form_data)

# 5. 使用断点:如果你在一个支持CGI调试的IDE(如PyCharm)中工作,你可以设置断点来暂停执行并检查变量的状态。
2
3
4
5
6
7
8
9
10
11
12
13
14
15
16
17
18
19
20
# Unit Test
pip3 install pytest: 库assert: 断言pytest my_funs.py: 直接写测试用例,不需要额外单独执行with pytest.raises(TypeError): xxx: 输入参数类型错误的测试用例- 直接创建
test目录并在下面创建__init__.py空文件即可,可以一次性执行该目录下的所有测试文件
# 爬虫
# 基本概念
访问网站获取网页数据,解析网页数据,提取有用信息,存储数据,为消费者提供数据接口。
# Scrape
# 源
pip install abc -i https://pypi.org/simple
# 练习示例
# 爬取 Scrape 的电影信息页
url = "https:// ssr1.scrape.center/"
- 首先要打开这个网址
- 查看网页的接口请求,找到具体的接口请求,找到具体的接口地址,例如:
https://ssr1.scrape.center/api/movie?start=0&limit=10 - 使用
requests库发送请求,获取网页数据 - 发送请求时可以模拟真实的请求头,比如添加 User-Agent 信息等
- 解析网页数据,提取有用信息
- 存储数据
# 爬取10个电影信息
import requests
from bs4 import BeautifulSoup as bs4

headers = {
  "Referer":"https://ssr1.scrape.center/",
  "User-Agent":"Mozilla/5.0 (Macintosh; Intel Mac OS X 10_15_7) AppleWebKit/537.36 (KHTML, like Gecko) Chrome/131.0.0.0 Safari/537.36",
}

url1 = "https://p1.meituan.net/movie/6bea9af4524dfbd0b668eaa7e187c3df767253.jpg@464w_644h_1e_1c"

# response = requests.get(url1, headers = headers)
# with open("./bwbj.jpg", "wb") as img:
#   img.write(response.content)

url = "https://ssr1.scrape.center/"

response = requests.get(url, headers= headers)

soup = bs4(response.text, "html.parser")

results = soup.find_all(name="div", class_="p-h el-col el-col-24 el-col-xs-9 el-col-sm-13 el-col-md-16")

for result in results:
  name =result.h2.text
  print(f"电影名:{result.h2.text}") # 获取第一个电影的名称

  btns = result.find_all(name = "button", class_="el-button category el-button--primary el-button--mini")
  for btn in btns:
    print(btn.span.text)

  infos = result.find_all(name="div", class_="m-v-sm info")

  for info in infos:
    spans = info.find_all(name="span")
    for span in spans:
      if(span.text != ' / ' ):
        print(span.text)

  score = soup.find_all(name="p", class_="score m-t-md m-b-n-sm")
  print(score[0].text.strip())
  print("++++++++++++++分割线++++++++++++++")
2
3
4
5
6
7
8
9
10
11
12
13
14
15
16
17
18
19
20
21
22
23
24
25
26
27
28
29
30
31
32
33
34
35
36
37
38
39
40
41
42
43
分页:
# ...
for page in range(1,11):
  url = f"https://ssr1.scrape.center/page/{page}"
  response = requests.get(url, headers= headers)
  soup = bs4(response.text, "html.parser")
  results = soup.find_all(name="div", class_="p-h el-col el-col-24 el-col-xs-9 el-col-sm-13 el-col-md-16")

  for result in results:
    name =result.h2.text
    print(f"电影名:{result.h2.text}") # 获取第一个电影的名称

    btns = result.find_all(name = "button", class_="el-button category el-button--primary el-button--mini")
    for btn in btns:
      print(btn.span.text)

    infos = result.find_all(name="div", class_="m-v-sm info")

    for info in infos:
      spans = info.find_all(name="span")
      for span in spans:
        if(span.text != ' / ' ):
          print(span.text)

    score = soup.find_all(name="p", class_="score m-t-md m-b-n-sm")
    print(score[0].text.strip())
    print("++++++++++++++分割线++++++++++++++")
2
3
4
5
6
7
8
9
10
11
12
13
14
15
16
17
18
19
20
21
22
23
24
25
26
请求详情页面:
2
# 面向对象编程
# 类-class
raise ValueError('Invalid value for radius'):抛出异常__init__():构造函数,在创建对象时自动调用,用于初始化对象属性__str__():类似于 Java 中的 toString(),用于打印对象时显示的内容__repr__():类似于 Java 中的 toString(),用于打印对象时显示的内容__eq__():类似于 Java 中的 equals(),用于判断两个对象是否相等__lt__():类似于 Java 中的 compareTo(),用于判断两个对象的大小__add__():类似于 Java 中的 +,用于两个对象相加__len__():类似于 Java 中的 length(),用于获取对象的长度__getitem__():类似于 Java 中的 get(),用于获取对象的某个属性或方法的值__setitem__():类似于 Java 中的 set(),用于设置对象的某个属性或方法的值__delitem__():类似于 Java 中的 remove(),用于删除对象的某个属性或方法的值__getattr__():类似于 Java 中的 getAttribute(),用于获取对象的某个属性或方法的值,如果不存在,则会调用__getattribute__()__setattr__():类似于 Java 中的 setAttribute(),用于设置对象的某个属性或方法的值,如果不存在,则会调用__setattr__()__delattr__():类似于 Java 中的 removeAttribute(),用于删除对象的某个属性或方法的值,如果不存在,则会调用__delattr__()__call__():类似于 Java 中的 invoke(),用于调用对象的某个方法__enter__():类似于 Java 中的 try-with-resources,用于在 with 语句中进入上下文管理器__exit__():类似于 Java 中的 try-with-resources,用于在 with 语句中退出上下文管理器__getattribute__():类似于 Java 中的 getAttribute(),用于获取对象的某个属性或方法的值,如果不存在,则会调用__getattr__(),如果存在,则会调用__getattribute__(),如果想要避免无限递归,可以使用super().__getattribute__(name)来获取属性或方法的值__dir__():类似于 Java 中的 getMethods() 和 getFields(),用于获取对象的所有属性和方法__iter__():类似于 Java 中的 iterator(),用于获取对象的迭代器__next__():类似于 Java 中的 next(),用于获取对象的下一个值__reversed__():类似于 Java 中的 reverse(),用于获取对象的逆序迭代器__bool__():类似于 Java 中的 booleanValue(),用于获取对象的布尔值
2
3
4