# Angular 企业实战开发
# 1. 概述
Angular 是一个使用 HTML、CSS、TypeScript 构建客户端应用的框架,用来构建单页应用程序。
Angular 是一个重量级的框架,内部集成了大量开箱即用的功能模块。
Angular 为大型应用开发而设计,提供了干净且松耦合的代码组织方式,使应用程序整洁更易于维护。
Angular (opens new window) Angular 中文 (opens new window) Angular CLI (opens new window)
# 2. 架构预览
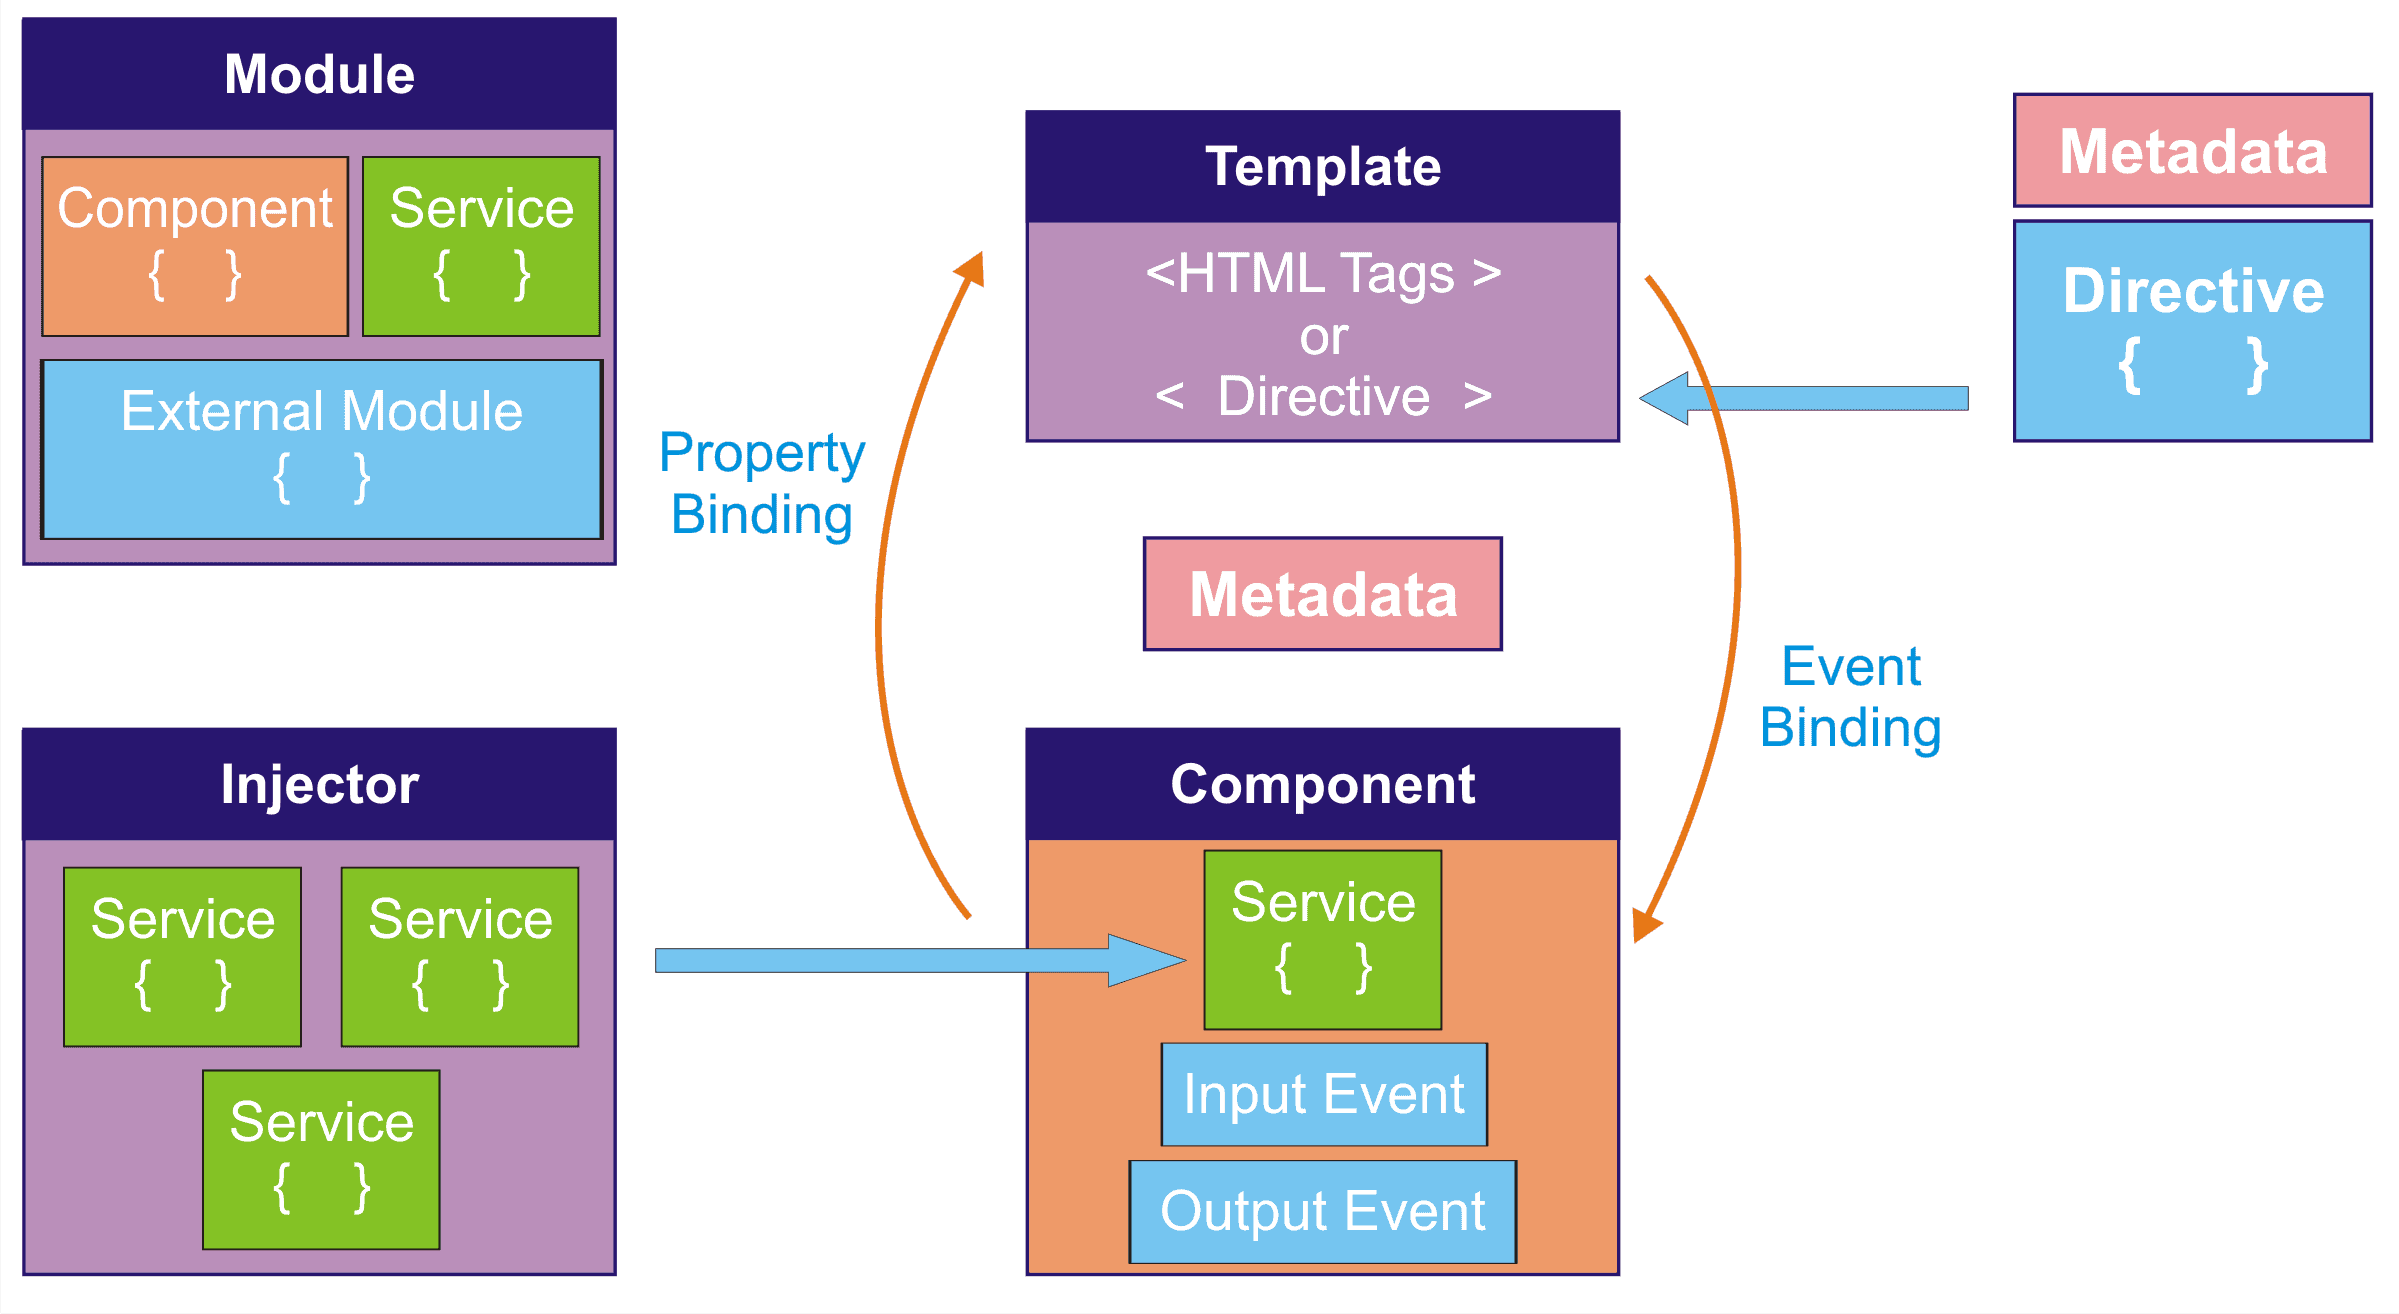
# 2.1 模块
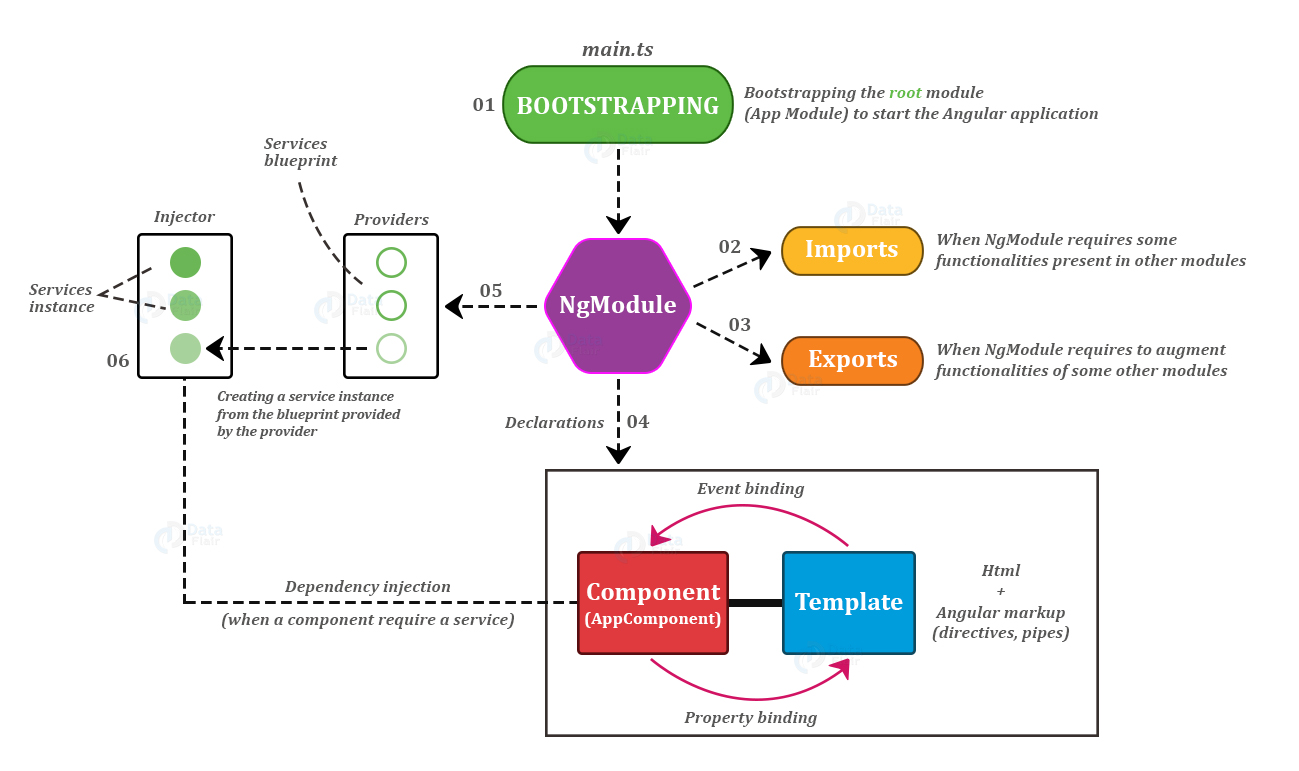
Angular 应用是由一个个模块组成的,此模块指的不是 ESModule,而是 NgModule 即 Angular 模块。
NgModule 是一组相关功能的集合,专注于某个应用领域,可以将组件和一组相关代码关联起来,是应用组织代码结构的一种方式。
在 Angular 应用中至少要有一个根模块,用于启动应用程序。
NgModule 可以从其它 NgModule 中导入功能,前提是目标 NgModule 导出了该功能。
NgModule 是由 NgModule 装饰器函数装饰的类。
import { BrowserModule } from "@angular/platform-browser";
import { NgModule } from "@angular/core";

@NgModule({
  imports: [BrowserModule],
})
export class AppModule {}
2
3
4
5
6
7
# 2.2 组件
组件用来描述用户界面,它由三部分组成,组件类、组件模板、组件样式,它们可以被集成在组件类文件中,也可以是三个不同的文件。
组件类用来编写和组件直接相关的界面逻辑,在组件类中要关联该组件的组件模板和组件样式。
组件模板用来编写组件的 HTML 结构,通过数据绑定标记将应用中数据和 DOM 进行关联。
组件样式用来编写组件的组件的外观,组件样式可以采用 CSS、LESS、SCSS、Stylus。
在 Angular 应用中至少要有一个根组件,用于应用程序的启动。
组件类是由 Component 装饰器函数装饰的类。
import { Component } from "@angular/core";

@Component({
  selector: "app-root",
  templateUrl: "./app.component.html",
  styleUrls: ["./app.component.css"],
})
export class AppComponent {
  title = "angular-test";
}
2
3
4
5
6
7
8
9
10
NgModule 为组件提供了编译的上下文环境。
import { NgModule } from "@angular/core";
import { AppComponent } from "./app.component";

@NgModule({
  declarations: [AppComponent],
  bootstrap: [AppComponent],
})
export class AppModule {}
2
3
4
5
6
7
8
# 2.3 服务
服务用于放置和特定组件无关并希望跨组件共享的数据或逻辑。
服务出现的目的在于解耦组件类中的代码,是组件类中的代码干净整洁。
服务是由 Injectable 装饰器装饰的类。
import { Injectable } from "@angular/core";

@Injectable({})
export class AppService {}
2
3
4
在使用服务时不需要在组件类中通过 new 的方式创建服务实例对象获取服务中提供的方法,以下写法错误,切记切记!!!
import { AppService } from "./AppService"

export class AppComponent {
  let appService = new AppService()
}
2
3
4
5
服务的实例对象由 Angular 框架中内置的依赖注入系统创建和维护。服务是依赖需要被注入到组件中。
在组件中需要通过 constructor 构造函数的参数来获取服务的实例对象。
涉及参数就需要考虑参数的顺序问题,因为在 Angular 应用中会有很多服务,一个组件又不可能会使用到所有服务,如果组件要使用到最后一个服务实例对象,难道要将前面的所有参数都写上吗 ? 这显然不合理。
在组件中获取服务实例对象要结合 TypeScript 类型,写法如下。
import { AppService } from "./AppService"

export class AppComponent {
  constructor (
  	private appService: AppService
  ) {}
}
2
3
4
5
6
7
Angular 会根据你指定的服务的类型来传递你想要使用的服务实例对象,这样就解决了参数的顺序问题。
在 Angular 中服务被设计为单例模式,这也正是为什么服务可以被用来在组件之间共享数据和逻辑的原因。
# 3. 快速开始
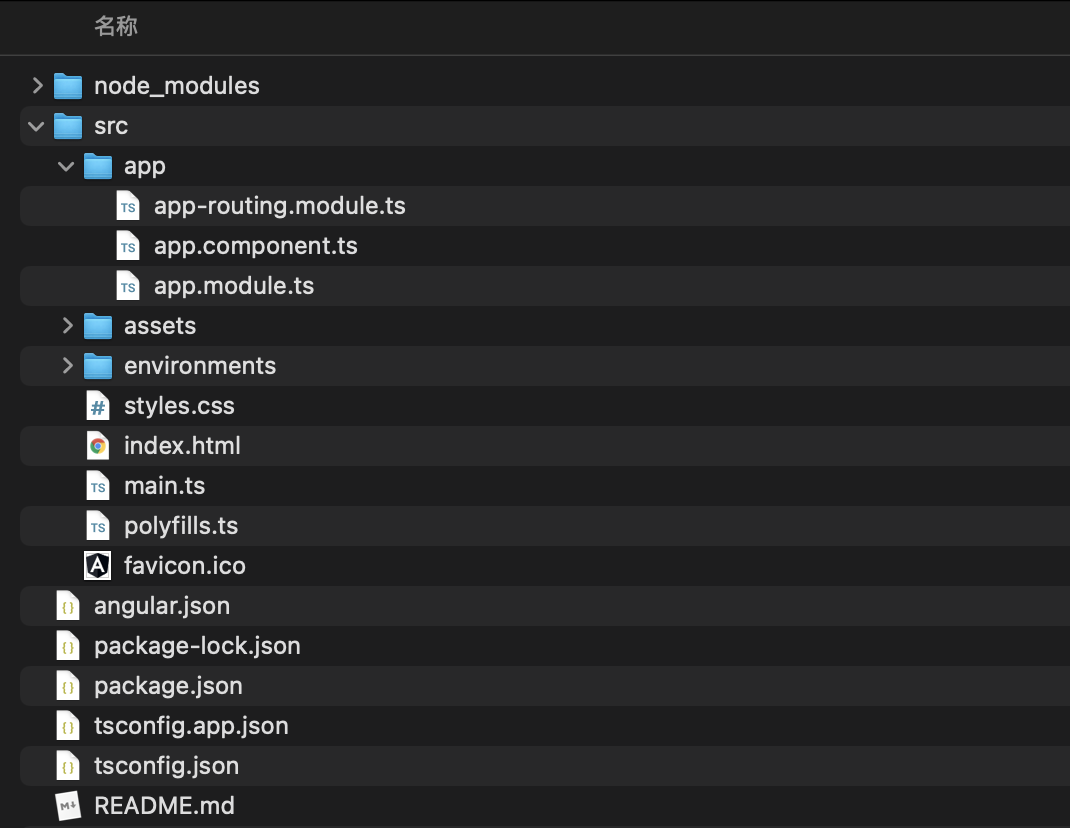
# 3.1 创建应用
安装 angular-cli:
npm install @angular/cli -g创建应用:
ng new angular-test --minimal --inlineTemplate false- --skipGit=true
- --minimal=true
- --skip-install
- --style=css
- --routing=false
- --inlineTemplate
- --inlineStyle
- --prefix
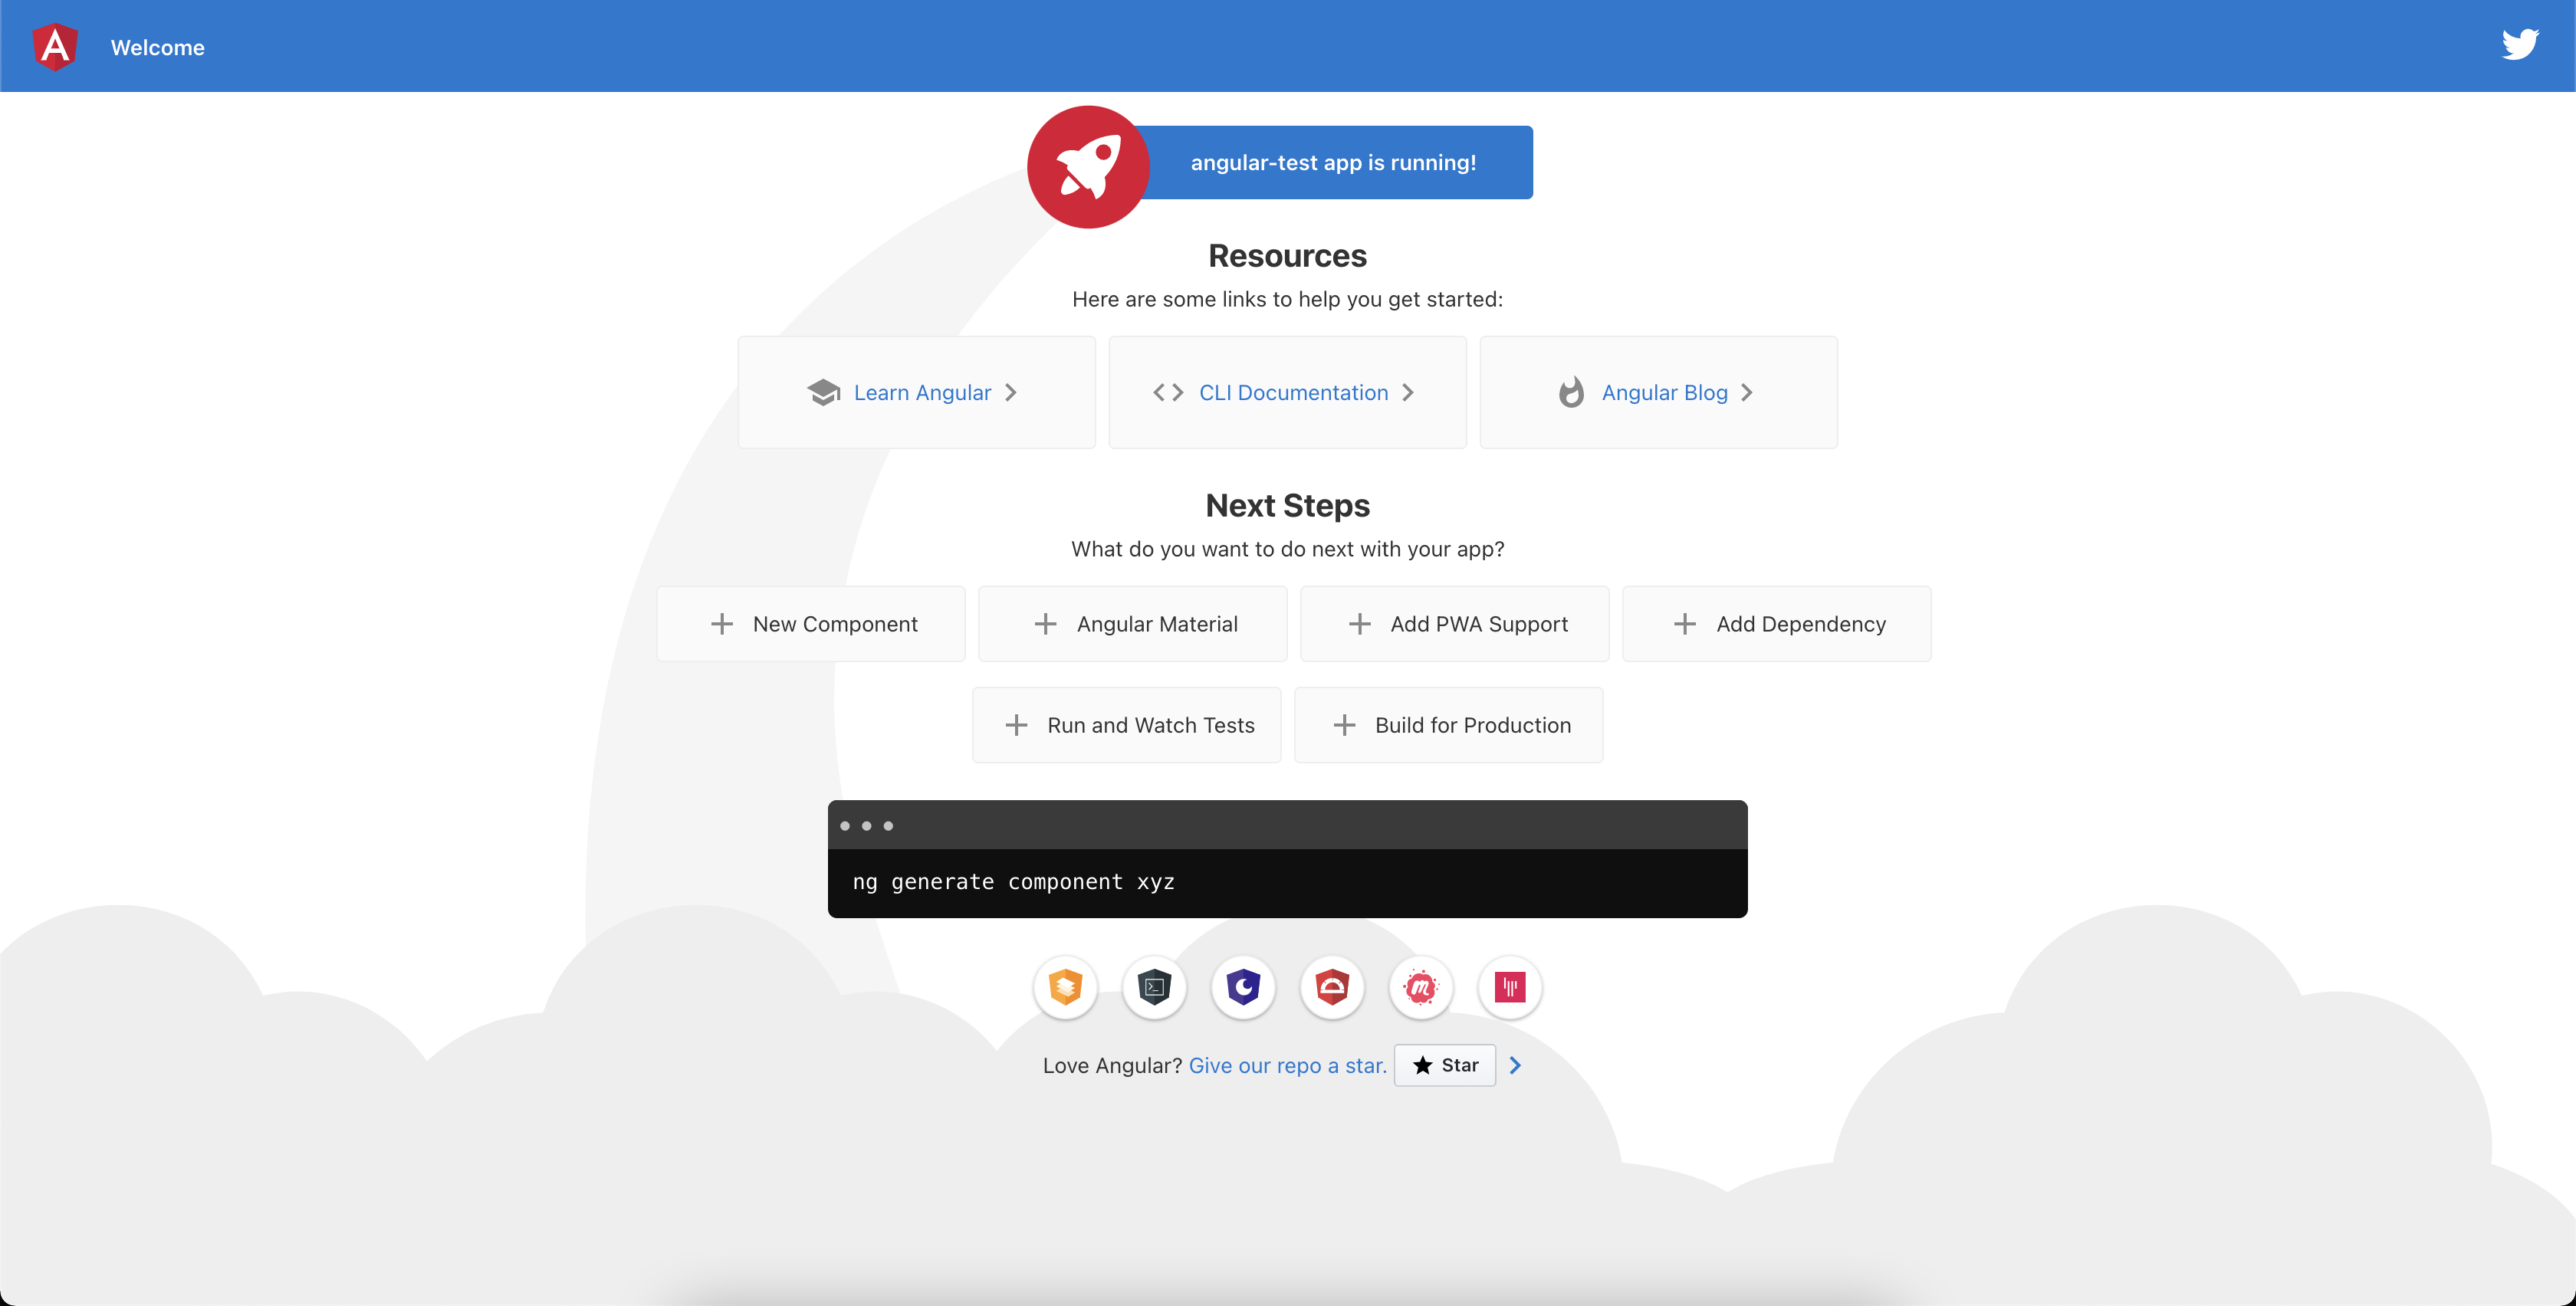
运行应用:
ng serve- --open=true 应用构建完成后在浏览器中运行
- --hmr=true 开启热更新
- hmrWarning=false 禁用热更新警告
- --port 更改应用运行端口
访问应用:
localhost:4200
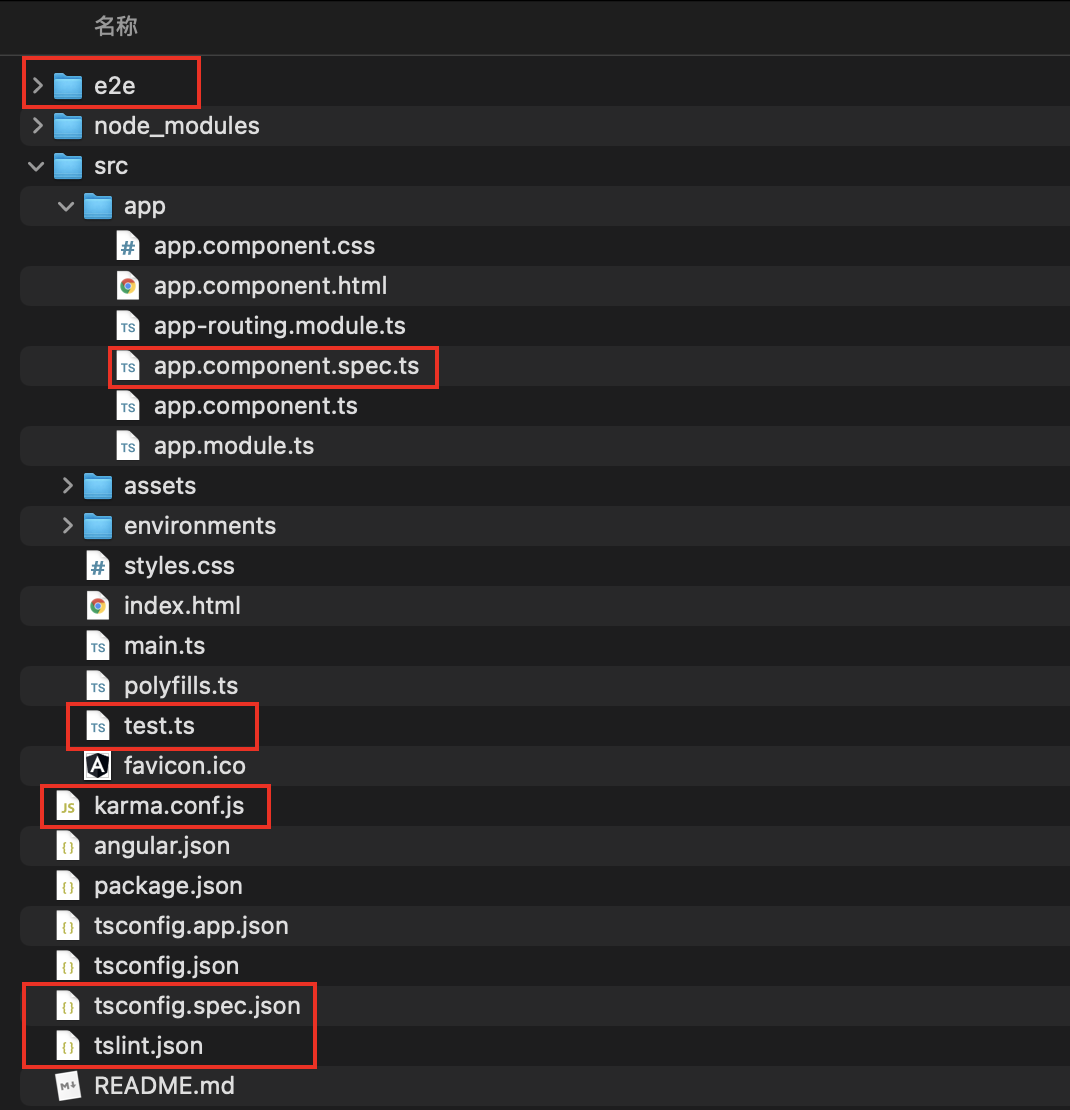
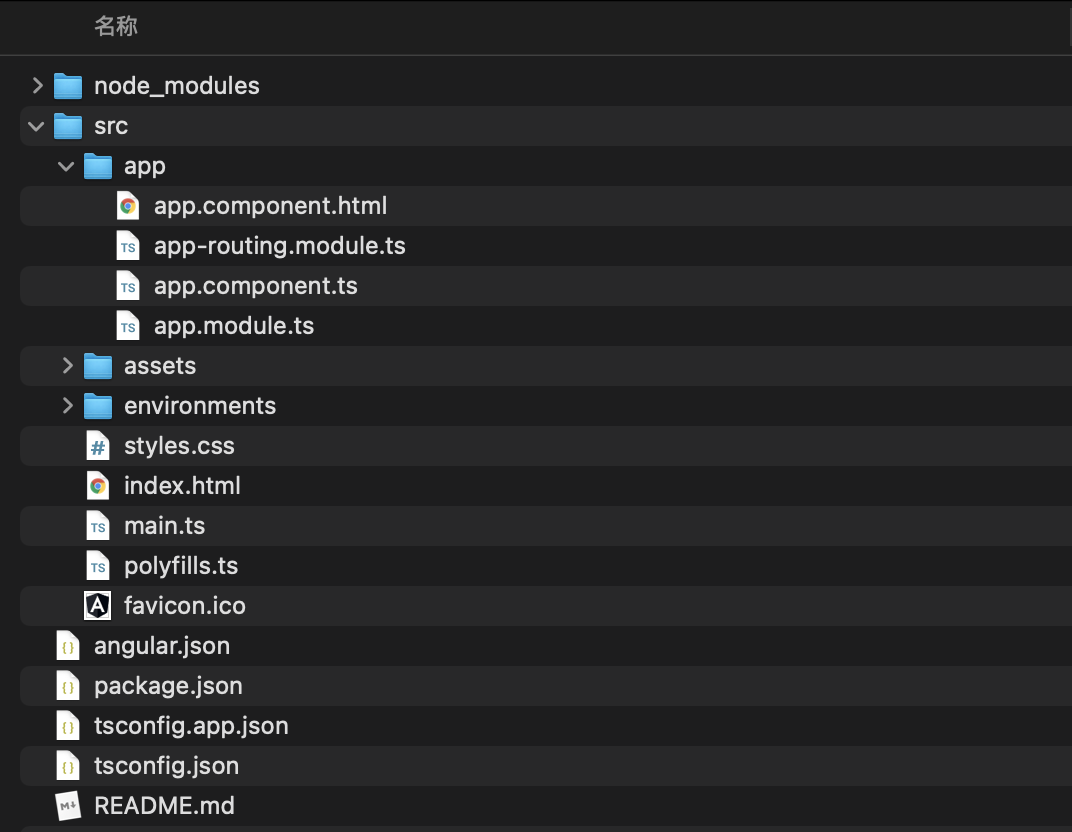
# 3.2 默认代码解析
# 3.2.1 main.ts
// enableProdMode 方法调用后将会开启生产模式
import { enableProdMode } from "@angular/core";
// Angular 应用程序的启动在不同的平台上是不一样的
// 在浏览器中启动时需要用到 platformBrowserDynamic 方法, 该方法返回平台实例对象
import { platformBrowserDynamic } from "@angular/platform-browser-dynamic";
// 引入根模块 用于启动应用程序
import { AppModule } from "./app/app.module";
// 引入环境变量对象 { production: false }
import { environment } from "./environments/environment";
// 如果当前为生产环境
if (environment.production) {
// 开启生产模式
enableProdMode();
}
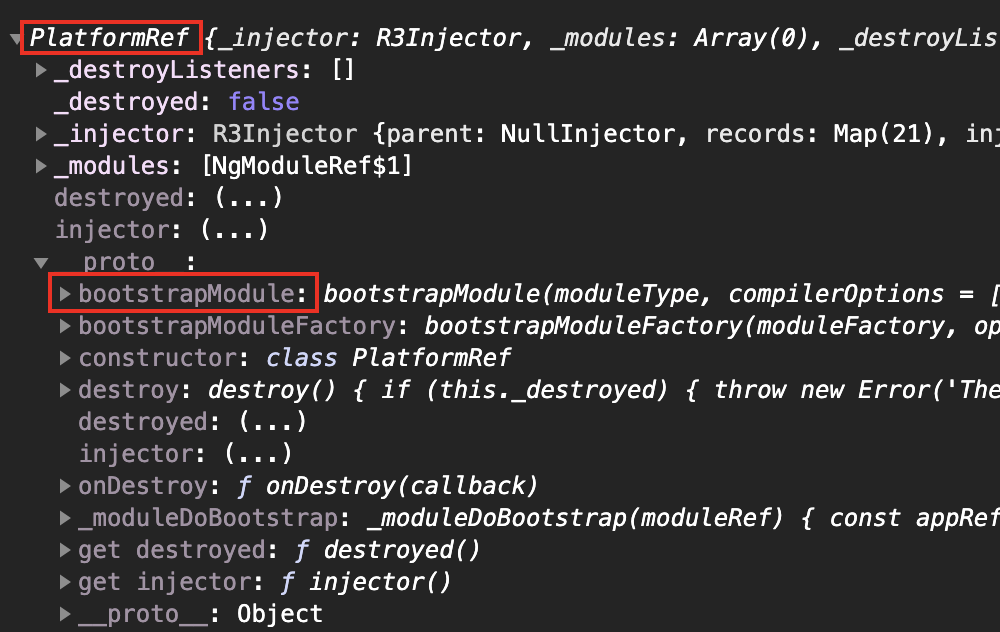
// 启动应用程序
platformBrowserDynamic()
.bootstrapModule(AppModule)
.catch((err) => console.error(err));
2
3
4
5
6
7
8
9
10
11
12
13
14
15
16
17
18
19
# 3.2.2 environment.ts
// 在执行 `ng build --prod` 时, environment.prod.ts 文件会替换 environment.ts 文件
// 该项配置可以在 angular.json 文件中找到, projects -> angular-test -> architect -> configurations -> production -> fileReplacements

export const environment = {
  production: false,
};
2
3
4
5
6
# 3.2.3 environment.prod.ts
export const environment = {
  production: true,
};
2
3
# 3.2.4 app.module.ts
// BrowserModule 提供了启动和运行浏览器应用所必需的服务
// CommonModule 提供各种服务和指令, 例如 ngIf 和 ngFor, 与平台无关
// BrowserModule 导入了 CommonModule, 又重新导出了 CommonModule, 使其所有指令都可用于导入 BrowserModule 的任何模块
import { BrowserModule } from "@angular/platform-browser";
// NgModule: Angular 模块装饰器
import { NgModule } from "@angular/core";
// 根组件
import { AppComponent } from "./app.component";
// 调用 NgModule 装饰器, 告诉 Angular 当前类表示的是 Angular 模块
@NgModule({
  // 声明当前模块拥有哪些组件
  declarations: [AppComponent],
  // 声明当前模块依赖了哪些其他模块
  imports: [BrowserModule],
  // 声明服务的作用域, 数组中接收服务类, 表示该服务只能在当前模块的组件中使用
  providers: [],
  // 可引导组件, Angular 会在引导过程中把它加载到 DOM 中
  bootstrap: [AppComponent],
})
export class AppModule {}
2
3
4
5
6
7
8
9
10
11
12
13
14
15
16
17
18
19
20
# 3.2.5 app.component.ts
import { Component } from "@angular/core";

@Component({
  // 指定组件的使用方式, 当前为标记形式
  // app-home   =>  <app-home></app-home>
  // [app-home] =>  <div app-home></div>
  // .app-home  =>  <div class="app-home"></div>
  selector: "app-root",
  // 关联组件模板文件
  // templateUrl:'组件模板文件路径'
  // template:`组件模板字符串`
  templateUrl: "./app.component.html",
  // 关联组件样式文件
  // styleUrls : ['组件样式文件路径']
  // styles : [`组件样式`]
  styleUrls: ["./app.component.css"],
})
export class AppComponent {}
2
3
4
5
6
7
8
9
10
11
12
13
14
15
16
17
18
# 3.2.6 index.html
<!DOCTYPE html>
<html lang="en">
  <head>
    <meta charset="utf-8" />
    <title>AngularTest</title>
    <base href="/" />
    <meta name="viewport" content="width=device-width, initial-scale=1" />
    <link rel="icon" type="image/x-icon" href="favicon.ico" />
  </head>
  <body>
    <app-root></app-root>
  </body>
</html>
2
3
4
5
6
7
8
9
10
11
12
13
# 3.3 共享模块
共享模块当中放置的是 Angular 应用中模块级别的需要共享的组件或逻辑。
创建共享模块:
ng g m shared创建共享组件:
ng g c shared/components/Layout在共享模块中导出共享组件
@NgModule({
  declarations: [LayoutComponent],
  exports: [LayoutComponent],
})
export class SharedModule {}
2
3
4
5
- 在根模块中导入共享模块
@NgModule({
  declarations: [AppComponent],
  imports: [SharedModule],
  bootstrap: [AppComponent],
})
export class AppModule {}
2
3
4
5
6
- 在根组件中使用 Layout 组件
@Component({
  selector: "app-root",
  template: `
    <div>App works</div>
    <app-layout></app-layout>
  `,
  styles: [],
})
export class AppComponent {}
2
3
4
5
6
7
8
9
# 4. 组件模板
# 4.1 数据绑定
数据绑定就是将组件类中的数据显示在组件模板中,当组件类中的数据发生变化时会自动被同步到组件模板中(数据驱动 DOM )。
在 Angular 中使用差值表达式进行数据绑定,即 大胡子语法。
<h2>{{message}}</h2>
<h2>{{getInfo()}}</h2>
<h2>{{a == b ? '相等': '不等'}}</h2>
<h2>{{'Hello Angular'}}</h2>
<p [innerHTML]="htmlSnippet"></p>
<!-- 对数据中的代码进行转义 -->
2
3
4
5
6
# 4.2 属性绑定
# 4.2.1 普通属性
属性绑定分为两种情况,绑定 DOM 对象属性和绑定 HTML 标记属性。
- 使用 [属性名称] 为元素绑定 DOM 对象属性。
<img [src]="imgUrl" />
- 使用 [attr.属性名称] 为元素绑定 HTML 标记属性
<td [attr.colspan]="colSpan"></td>
在大多数情况下,DOM 对象属性和 HTML 标记属性是对应的关系,所以使用第一种情况。但是某些属性只有 HTML 标记存在,DOM 对象中不存在,此时需要使用第二种情况,比如 colspan 属性,在 DOM 对象中就没有,或者自定义 HTML 属性也需要使用第二种情况。
# 4.2.2 class 属性
<button class="btn btn-primary" [class.active]="isActive">按钮</button>
<div [ngClass]="{'active': true, 'error': true}"></div>
2
# 4.2.3 style 属性
<button [style.backgroundColor]="isActive ? 'blue': 'red'">按钮</button>
<button [ngStyle]="{'backgroundColor': 'red'}">按钮</button>
2
# 4.3 事件绑定
<button (click)="onSave($event)">按钮</button>
<!-- 当按下回车键抬起的时候执行函数 -->
<input type="text" (keyup.enter)="onKeyUp()" />
2
3
export class AppComponent {
  title = "test";
  onSave(event: Event) {
    // this 指向组件类的实例对象
    this.title; // "test"
  }
}
2
3
4
5
6
7
# 4.4 获取原生 DOM 对象
# 4.4.0 操作 DOM
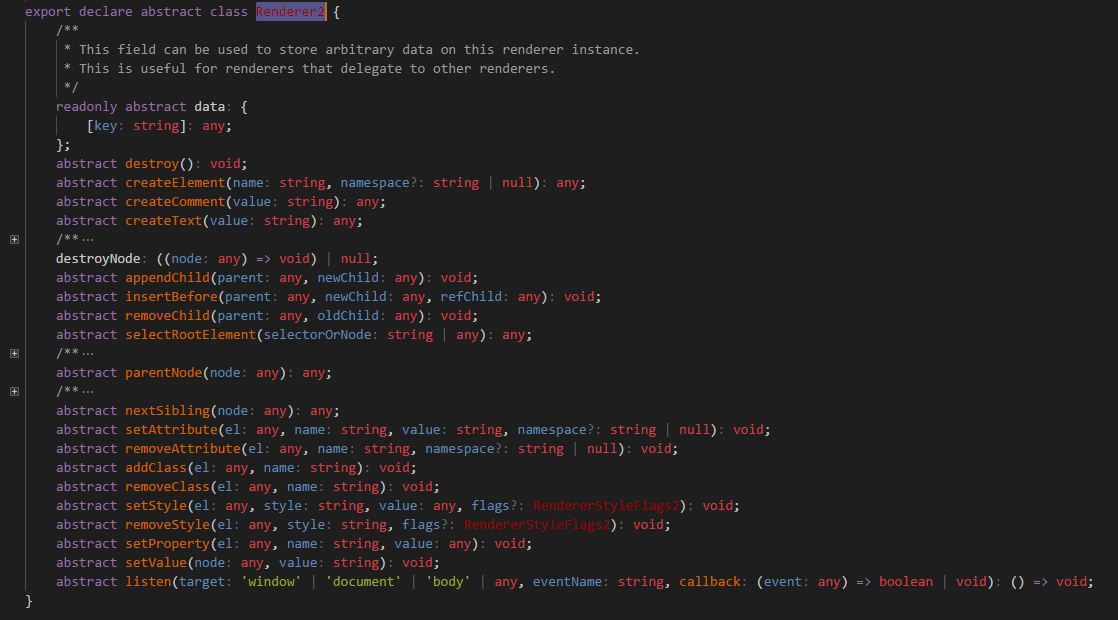
- 原生 JS 获取 dom 对象并进行操作,注意需要/尽量在
ngAfterViewInit()钩子中操作 dom。 - Angular 提供了更好的跨平台方式 Renderer2。引入
import { Renderer2 } from '@angular/core';,然后在 constructor 中注入constructor(private render: Renderer2,...){},然后通过 Renderer2 的 api 进行操作,api 如下:
# 4.4.1 在组件模板中获取
<input type="text" (input)="onInput($event)" (keyup.enter)="onKeyUp(username.value)" #username />
<button (click)="getInputVal(username.value)">get username</button>
2
# 4.4.2 在组件类中获取
使用 ViewChild 装饰器获取一个元素
<p #paragraph>home works!</p>
import { AfterViewInit, ElementRef, ViewChild } from "@angular/core";

export class HomeComponent implements AfterViewInit {
  @ViewChild("paragraph") paragraph: ElementRef<HTMLParagraphElement> | undefined;
  ngAfterViewInit() {
    console.log(this.paragraph?.nativeElement);
  }
}
2
3
4
5
6
7
8
使用 ViewChildren 获取一组元素
<ul>
  <li #items>a</li>
  <li #items>b</li>
  <li #items>c</li>
</ul>
2
3
4
5
import { AfterViewInit, QueryList, ViewChildren } from "@angular/core";

@Component({
  selector: "app-home",
  templateUrl: "./home.component.html",
  styles: [],
})
export class HomeComponent implements AfterViewInit {
  @ViewChildren("items") items: QueryList<HTMLLIElement> | undefined;
  ngAfterViewInit() {
    console.log(this.items?.toArray());
  }
}
2
3
4
5
6
7
8
9
10
11
12
13
# 4.5 双向数据绑定
数据在组件类和组件模板中双向同步。
Angular 将双向数据绑定功能放在了 @angular/forms 模块中,所以要实现双向数据绑定需要依赖该模块。只对表单有效。
- 引入依赖模块并注册
import { FormsModule } from "@angular/forms";

@NgModule({
  imports: [FormsModule],
})
export class AppModule {}
2
3
4
5
6
- DOM 中绑定变量
<!-- 一般的双向绑定 -->
<input type="text" [(ngModel)]="username1" />
<!-- 更灵活 -->
<input type="text" [ngModel]="username2" (ngModelChange)="ngModelChangeHandler($event)" />
<button (click)="change()">在组件类中更改 username</button>
<div>username1: {{ username1 }}</div>
<div>username2: {{ username2 }}</div>
<div>parsedname: {{ parsedName }}</div>
2
3
4
5
6
7
8
- js 中声明变量
export class AppComponent {
  username1: string = "";
  username2: string = "";
  parsedName: string = "";

  change() {
    this.username2 = "hello Angular";
  }
  // ngModel绑定的数据发生变化时触发,有点watch的感觉
  ngModelChangeHandler(e) {
    //...
    this.parsedName = "Parsed" + e.trim();
  }
}
2
3
4
5
6
7
8
9
10
11
12
13
14
# 4.6 内容投影
类似 Vue 中的插槽,Angular 中的内容投影是指将组件模板中的内容插入到组件中。
<!-- app.component.html -->
<bootstrap-panel>
  <div class="heading">Heading</div>
  <div class="body">Body</div>
</bootstrap-panel>
2
3
4
5
<!-- panel.component.html -->
<div class="panel panel-default">
  <div class="panel-heading">
    <ng-content select=".heading"></ng-content>
  </div>
  <div class="panel-body">
    <ng-content select=".body"></ng-content>
  </div>
</div>
2
3
4
5
6
7
8
9
如果只有一个 ng-content,不需要 select 属性。
ng-content 在浏览器中会被 <div class="heading"></div> 替代,如果不想要这个额外的 div,可以使用 ng-container 替代这个 div。
<!-- app.component.html -->
<bootstrap-panel>
  <ng-container class="heading"> Heading </ng-container>
  <ng-container class="body"> Body </ng-container>
</bootstrap-panel>
2
3
4
5
# 4.7 数据绑定容错处理
// app.component.ts
export class AppComponent {
  task = {
    person: {
      name: "张三",
    },
  };
}
2
3
4
5
6
7
8
<!-- 方式一 -->
<span *ngIf="task.person">{{ task.person.name }}</span>
<!-- 方式二 -->
<span>{{ task.person?.name }}</span>
2
3
4
# 4.8 全局样式
/* 第一种方式 在 styles.css 文件中 */
@import "~bootstrap/dist/css/bootstrap.css";
/* ~ 相对node_modules文件夹 */
2
3
<!-- 第二种方式 在 index.html 文件中  -->
<link href="https://cdn.jsdelivr.net/npm/bootstrap@3.3.7/dist/css/bootstrap.min.css" rel="stylesheet" />
2
// 第三种方式 在 angular.json 文件中
"styles": [
  "./node_modules/bootstrap/dist/css/bootstrap.min.css",
  "src/styles.css"
]
2
3
4
5
# 5. 指令 Directive
- 指令是 Angular 提供的操作 DOM 的途径。指令分为属性指令和结构指令。
- 属性指令:修改现有元素的外观或行为,使用 [] 包裹。
- 结构指令:增加、删除 DOM 节点以修改布局,使用*作为指令前缀
# 5.1 内置指令
# 5.1.1 *ngIf
根据条件渲染 DOM 节点或移除 DOM 节点。
<div *ngIf="data.length == 0">没有更多数据</div>
<div *ngIf="data.length > 0; then dataList else noData"></div>
<ng-template #dataList>课程列表</ng-template>
<ng-template #noData>没有更多数据</ng-template>
2
3
# 5.1.2 [hidden]
根据条件显示 DOM 节点或隐藏 DOM 节点 (display)。
<div [hidden]="data.length == 0">课程列表</div>
<div [hidden]="data.length > 0">没有更多数据</div>
2
# 5.1.3 *ngFor
遍历数据生成 HTML 结构
interface List {
  id: number
  name: string
  age: number
}

list: List[] = [
  { id: 1, name: "张三", age: 20 },
  { id: 2, name: "李四", age: 30 }
]
2
3
4
5
6
7
8
9
10
<li
  *ngFor="
      let item of list;
      let i = index;
      let isEven = even;
      let isOdd = odd;
      let isFirst = first;
      let isLast = last;
    "></li>
2
3
4
5
6
7
8
9
<li *ngFor="let item of list; trackBy: identify"></li>
identify(index, item){
  return item.id;
}
2
3
# 5.2 自定义指令
需求:为元素设置默认背景颜色,鼠标移入时的背景颜色以及移出时的背景颜色。
<div [appHover]="{ bgColor: 'skyblue' }">Hello Angular</div>
import { AfterViewInit, Directive, ElementRef, HostListener, Input } from "@angular/core"

// 接收参的数类型
interface Options {
  bgColor?: string
}

@Directive({
  selector: "[appHover]"
})
export class HoverDirective implements AfterViewInit {
  // 接收参数
  @Input("appHover") appHover: Options = {}
  // 要操作的 DOM 节点
  element: HTMLElement
	// 获取要操作的 DOM 节点
  constructor(private elementRef: ElementRef) {
    this.element = this.elementRef.nativeElement
  }
	// 组件模板初始完成后设置元素的背景颜色
  ngAfterViewInit() {
    this.element.style.backgroundColor = this.appHover.bgColor || "skyblue"
  }
	// 为元素添加鼠标移入事件
  @HostListener("mouseenter") enter() {
    this.element.style.backgroundColor = "pink"
  }
	// 为元素添加鼠标移出事件
  @HostListener("mouseleave") leave() {
    this.element.style.backgroundColor = "skyblue"
  }
  // 根据权限为元素直接添加disabled属性,实现禁用效果。(高级用法)
  private hasAuth: boolean = false;
  @HostBinding('attr.disabled') get disabled() {
    return this.hasAuth ? null : true;
  }
}
2
3
4
5
6
7
8
9
10
11
12
13
14
15
16
17
18
19
20
21
22
23
24
25
26
27
28
29
30
31
32
33
34
35
36
37
38
# 6. 管道 Pipe
管道的作用是格式化组件模板数据。
# 6.1 内置管道
- date 日期格式化
- currency 货币格式化
- uppercase 转大写
- lowercase 转小写
- json 格式化 json 数据
{{ date | date: "yyyy-MM-dd" }}
<!-- 显示UTC时间,Angular datePipe会默认把时间转换为本地时间!UTC时间:`+0000` 表示 UTC
时间,即没有时区偏移。-->
{{ date | date: "yyyy-MM-dd" : "UTC" }}
2
3
4
# 使用 dayjs 格式化 utc 格式时间
import { Component, OnInit, ViewChild, AfterViewInit } from "@angular/core";
import dayjs from "dayjs";
// 引入utc插件
import utc from "dayjs/plugin/utc";
// 引入相关格式化适配器等
import { DateAdapter, MAT_DATE_FORMATS, MAT_DATE_LOCALE } from "@angular/material/core";
import { MomentDateAdapter, MAT_MOMENT_DATE_ADAPTER_OPTIONS } from "@angular/material-moment-adapter";
// 动画:表格折叠
import { animate, state, style, transition, trigger } from "@angular/animations";

export const MY_DATE_FORMATS = {
  parse: {
    dateInput: "DD/MM/YYYY",
  },
  display: {
    dateInput: "DD/MM/YYYY",
    monthYearLabel: "MMM YYYY",
    dateA11yLabel: "LL",
    monthYearA11yLabel: "MMMM YYYY",
  },
};

@Component({
  selector: "app-my",
  templateUrl: "./my.component.html",
  styleUrls: ["./my.component.scss"],
  animations: [
    trigger("detailExpand", [
      state("collapsed", style({ height: "0px", minHeight: "0" })),
      state("expanded", style({ height: "*" })),
      transition("expanded <=> collapsed", animate("225ms cubic-bezier(0.4, 0.0, 0.2, 1)")),
    ]),
  ],
  providers: [
    // 注册相关service等
    { provide: DateAdapter, useClass: MomentDateAdapter, deps: [MAT_DATE_LOCALE, MAT_MOMENT_DATE_ADAPTER_OPTIONS] },
    { provide: MAT_DATE_FORMATS, useValue: MY_DATE_FORMATS },
  ],
})
export class MyComponent implements OnInit, AfterViewInit {
  constructor() {
    // 注册utc插件
    dayjs.extend(utc);

    // 使用
    // 此时的dateStr已经是UTC格式,不需要dayjs转换成本地时间localDate,dayjs默认会转换成本地时间!
    const dateStr = "2024-02-01T01:20:00.000+0000";
    // 通过设置utc(false),即表示不转换成localDate
    const utcDate = dayjs(dateStr).utc(false).format("YYYY-MM-DD HH:mm:ss");
  }
}
2
3
4
5
6
7
8
9
10
11
12
13
14
15
16
17
18
19
20
21
22
23
24
25
26
27
28
29
30
31
32
33
34
35
36
37
38
39
40
41
42
43
44
45
46
47
48
49
50
51
# 6.2 自定义管道
需求:指定字符串不能超过规定的长度
// summary.pipe.ts
import { Pipe, PipeTransform } from '@angular/core';

@Pipe({
   name: 'summary'
});
export class SummaryPipe implements PipeTransform {
    transform (value: string, limit?: number) {
        if (!value) return null;
        let actualLimit = (limit) ? limit : 50;
        return value.substr(0, actualLimit) + '...';
    }
}
2
3
4
5
6
7
8
9
10
11
12
13
// app.module.ts
import { SummaryPipe } from './summary.pipe'
@NgModule({
    declarations: [
      SummaryPipe
    ]
});
2
3
4
5
6
7
# 7. 组件通讯
# 7.1 向组件内部传递数据
<app-favorite [isFavorite]="true"></app-favorite>
// favorite.component.ts
import { Input } from "@angular/core";
export class FavoriteComponent {
  @Input() isFavorite: boolean = false;
}
2
3
4
5
注意:在属性的外面加 [] 表示绑定动态值,在组件内接收后是布尔类型,不加 [] 表示绑定普通值,在组件内接收后是字符串类型。
<app-favorite [is-Favorite]="true"></app-favorite>
import { Input } from "@angular/core";

export class FavoriteComponent {
  @Input("is-Favorite") isFavorite: boolean = false;
}
2
3
4
5
# 7.2 组件向外部传递数据
需求:在子组件中通过点击按钮将数据传递给父组件
<!-- 子组件模板 -->
<button (click)="onClick()">click</button>
2
// 子组件类
import { EventEmitter, Output } from "@angular/core";

export class FavoriteComponent {
  @Output() change = new EventEmitter();
  onClick() {
    this.change.emit({ name: "张三" });
  }
}
2
3
4
5
6
7
8
9
<!-- 父组件模板 -->
<app-favorite (change)="onChange($event)"></app-favorite>
2
// 父组件类
export class AppComponent {
  onChange(event: { name: string }) {
    console.log(event);
  }
}
2
3
4
5
6
# 8. 组件生命周期
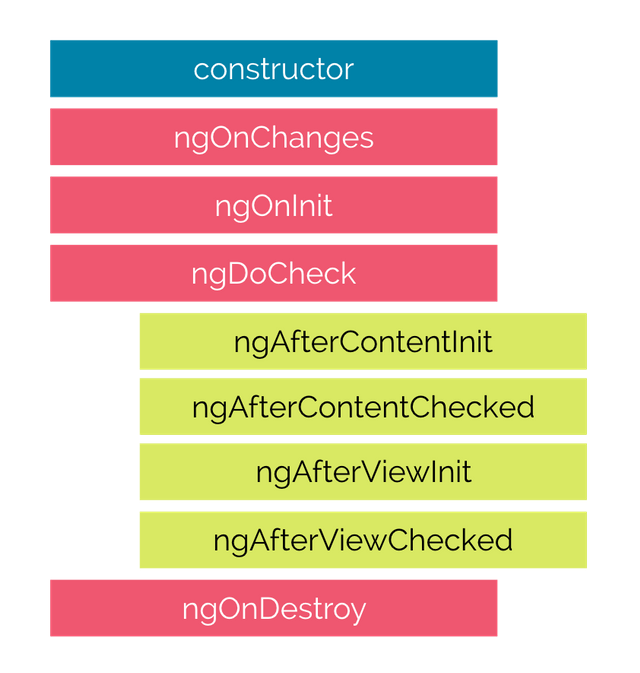
# 8.1 挂载阶段
挂载阶段的生命周期函数只在挂载阶段执行一次,数据更新时不再执行。
- constructor
Angular 在实例化组件类时执行, 可以用来接收 Angular 注入的服务实例对象。
export class ChildComponent {
  constructor (private test: TestService) {
    console.log(this.test) // "test"
  }
}
2
3
4
5
- ngOnInit
在首次接收到输入属性值后执行,在此处可以执行请求操作。
<app-child name="张三"></app-child>
export class ChildComponent implements OnInit {
  @Input("name") name: string = "";
  ngOnInit() {
    console.log(this.name); // "张三"
  }
}
2
3
4
5
6
- ngAfterContentInit
当内容投影初始渲染完成后调用。
<app-child>
  <div #box>Hello Angular</div>
</app-child>
2
3
export class ChildComponent implements AfterContentInit {
  @ContentChild("box") box: ElementRef<HTMLDivElement> | undefined;

  ngAfterContentInit() {
    console.log(this.box); // <div>Hello Angular</div>
  }
}
2
3
4
5
6
7
- ngAfterViewInit
当组件视图渲染完成后调用。
<!-- app-child 组件模板 -->
<p #p>app-child works</p>
2
export class ChildComponent implements AfterViewInit {
  @ViewChild("p") p: ElementRef<HTMLParagraphElement> | undefined;
  ngAfterViewInit() {
    console.log(this.p); // <p>app-child works</p>
  }
}
2
3
4
5
6
# 8.2 更新阶段
ngOnChanges
- 当输入属性值发生变化时执行,初始设置时也会执行一次,顺序优于 ngOnInit
- 不论多少输入属性同时变化,钩子函数只会执行一次,变化的值会同时存储在参数中
- 参数类型为 SimpleChanges,子属性类型为 SimpleChange
- 对于基本数据类型来说, 只要值发生变化就可以被检测到
- 对于引用数据类型来说, 可以检测从一个对象变成另一个对象, 但是检测不到同一个对象中属性值的变化,但是不影响组件模板更新数据。
基本数据类型值变化
<app-child [name]="name" [age]="age"></app-child> <button (click)="change()">change</button>
export class AppComponent {
  name: string = "张三";
  age: number = 20;
  change() {
    this.name = "李四";
    this.age = 30;
  }
}
2
3
4
5
6
7
8
export class ChildComponent implements OnChanges {
  @Input("name") name: string = "";
  @Input("age") age: number = 0;

  ngOnChanges(changes: SimpleChanges) {
    console.log("基本数据类型值变化可以被检测到");
  }
}
2
3
4
5
6
7
8
引用数据类型变化
<app-child [person]="person"></app-child> <button (click)="change()">change</button>
export class AppComponent {
  person = { name: "张三", age: 20 };
  change() {
    this.person = { name: "李四", age: 30 };
  }
}
2
3
4
5
6
export class ChildComponent implements OnChanges {
  @Input("person") person = { name: "", age: 0 };

  ngOnChanges(changes: SimpleChanges) {
    console.log("对于引用数据类型, 只能检测到引用地址发生变化, 对象属性变化不能被检测到");
  }
}
2
3
4
5
6
7
ngDoCheck:主要用于调试,只要输入属性发生变化,不论是基本数据类型还是引用数据类型还是引用数据类型中的属性变化,都会执行。
ngAfterContentChecked:内容投影更新完成后执行。
ngAfterViewChecked:组件视图更新完成后执行。
# 8.3 卸载阶段
- ngOnDestroy
当组件被销毁之前调用, 用于清理操作。
export class HomeComponent implements OnDestroy {
  ngOnDestroy() {
    console.log("组件被卸载");
  }
}
2
3
4
5
# 9. 依赖注入
# 9.1 概述
依赖注入 ( Dependency Injection ) 简称 DI,是面向对象编程中的一种设计原则,用来减少代码之间的耦合度。
class MailService {
  constructor(APIKEY) {}
}

class EmailSender {
  mailService: MailService;
  constructor() {
    this.mailService = new MailService("APIKEY1234567890");
  }

  sendMail(mail) {
    this.mailService.sendMail(mail);
  }
}

const emailSender = new EmailSender();
emailSender.sendMail(mail);
2
3
4
5
6
7
8
9
10
11
12
13
14
15
16
17
EmailSender 类运行时要使用 MailService 类,EmailSender 类依赖 MailService 类,MailService 类是 EmailSender 类的依赖项。
以上写法的耦合度太高,代码并不健壮。如果 MailService 类改变了参数的传递方式,在 EmailSender 类中的写法也要跟着改变。
class EmailSender {
  mailService: MailService;
  constructor(mailService: MailService) {
    this.mailService = mailService;
  }
}
const mailService = new MailService("APIKEY1234567890");
const emailSender = new EmailSender(mailService);
2
3
4
5
6
7
8
在实例化 EmailSender 类时将它的依赖项通过 constructor 构造函数参数的形式注入到类的内部,这种写法就是依赖注入。
通过依赖注入降了代码之间的耦合度,增加了代码的可维护性。MailService 类中代码的更改再也不会影响 EmailSender 类。
# 9.2 DI 框架
Angular 有自己的 DI 框架,它将实现依赖注入的过程隐藏了,对于开发者来说只需使用很简单的代码就可以使用复杂的依赖注入功能。
在 Angular 的 DI 框架中有四个核心概念:
- Dependency:组件要依赖的实例对象,服务实例对象
- Token:获取服务实例对象的标识
- Injector:注入器,负责创建维护服务类的实例对象并向组件中注入服务实例对象。
- Provider:配置注入器的对象,指定创建服务实例对象的服务类和获取实例对象的标识。
# 9.2.1 注入器 Injectors
注入器负责创建服务类实例对象,并将服务类实例对象注入到需要的组件中。
- 创建注入器
import { ReflectiveInjector } from "@angular/core";
// 服务类
class MailService {}
// 创建注入器并传入服务类
const injector = ReflectiveInjector.resolveAndCreate([MailService]);
2
3
4
5
- 获取注入器中的服务类实例对象
const mailService = injector.get(MailService);
- 服务实例对象为单例模式,注入器在创建服务实例后会对其进行缓存
const mailService1 = injector.get(MailService);
const mailService2 = injector.get(MailService);

console.log(mailService1 === mailService2); // true
2
3
4
- 不同的注入器返回不同的服务实例对象
const injector = ReflectiveInjector.resolveAndCreate([MailService]);
const childInjector = injector.resolveAndCreateChild([MailService]);

const mailService1 = injector.get(MailService);
const mailService2 = childInjector.get(MailService);

console.log(mailService1 === mailService2);
2
3
4
5
6
7
- 服务实例的查找类似函数作用域链,当前级别可以找到就使用当前级别,当前级别找不到去父级中查找
const injector = ReflectiveInjector.resolveAndCreate([MailService]);
const childInjector = injector.resolveAndCreateChild([]);

const mailService1 = injector.get(MailService);
const mailService2 = childInjector.get(MailService);

console.log(mailService1 === mailService2);
2
3
4
5
6
7
# 9.2.2 提供者 Provider
- 配置注入器的对象,指定了创建实例对象的服务类和访问服务实例对象的标识。
const injector = ReflectiveInjector.resolveAndCreate([{ provide: MailService, useClass: MailService }]);
- 访问依赖对象的标识也可以是字符串类型
const injector = ReflectiveInjector.resolveAndCreate([{ provide: "mail", useClass: MailService }]);
const mailService = injector.get("mail");
2
- useValue
const injector = ReflectiveInjector.resolveAndCreate([
  {
    provide: "Config",
    useValue: Object.freeze({
      APIKEY: "API1234567890",
      APISCRET: "500-400-300",
    }),
  },
]);
const Config = injector.get("Config");
2
3
4
5
6
7
8
9
10
将实例对象和外部的引用建立了松耦合关系,外部通过标识获取实例对象,只要标识保持不变,内部代码怎么变都不会影响到外部。
# 10. 服务 Service
# 10.1 创建服务
import { Injectable } from "@angular/core";

@Injectable({
  providedIn: "root",
})
export class TestService {}
2
3
4
5
6
export class AppComponent {
 	constructor (private testService: TestService) {}
}
2
3
# 10.2 服务的作用域
使用服务可以轻松实现跨模块跨组件共享数据,这取决于服务的作用域。
- 在根注入器中注册服务,所有模块使用同一个服务实例对象。
import { Injectable } from "@angular/core";

@Injectable({
  providedIn: "root",
})
export class CarListService {}
2
3
4
5
6
- 在模块级别注册服务,该模块中的所有组件使用同一个服务实例对象。
import { Injectable } from "@angular/core";
import { CarModule } from "./car.module";

@Injectable({
  providedIn: CarModule,
})
export class CarListService {}
2
3
4
5
6
7
import { CarListService } from "./car-list.service";

@NgModule({
  providers: [CarListService],
})
export class CarModule {}
2
3
4
5
6
- 在组件级别注册服务,该组件及其子组件使用同一个服务实例对象。
import { Component } from '@angular/core';
import { CarListService } from '../car-list.service.ts'

@Component({
  selector:    'app-car-list',
  templateUrl: './car-list.component.html',
  providers:  [ CarListService ]
})
2
3
4
5
6
7
8
# 11. 表单
在 Angular 中,表单有两种类型,分别为模板驱动和模型驱动。
# 11.1 模板驱动
# 11.1.1 概述
表单的控制逻辑写在组件模板中,适合简单的表单类型。
# 11.1.2 快速上手
- 引入依赖模块 FormsModule
import { FormsModule } from "@angular/forms";

@NgModule({
  imports: [FormsModule],
})
export class AppModule {}
2
3
4
5
6
- 将 DOM 表单转换为 ngForm
<form #f="ngForm" (submit)="onSubmit(f)"></form>
- 声明表单字段为 ngModel
<form #f="ngForm" (submit)="onSubmit(f)">
  <input type="text" name="username" ngModel />
  <button>提交</button>
</form>
2
3
4
- 获取表单字段值
import { NgForm } from "@angular/forms";

export class AppComponent {
  onSubmit(form: NgForm) {
    console.log(form.value);
  }
}
2
3
4
5
6
7
- 表单分组
<form #f="ngForm" (submit)="onSubmit(f)">
  <div ngModelGroup="user">
    <input type="text" name="username" ngModel />
  </div>
  <div ngModelGroup="contact">
    <input type="text" name="phone" ngModel />
  </div>
  <button>提交</button>
</form>
2
3
4
5
6
7
8
9
# 11.1.3 表单验证
- required 必填字段
- minlength 字段最小长度
- maxlength 字段最大长度
- pattern 验证正则 例如:
pattern="\d"匹配一个数值 - ngModel 表明双向绑定
<form #f="ngForm" (submit)="onSubmit(f)">
  <input type="text" name="username" ngModel required pattern="\d" />
  <button>提交</button>
</form>
2
3
4
export class AppComponent {
  onSubmit(form: NgForm) {
    // 查看表单整体是否验证通过
    console.log(form.valid);
  }
}
2
3
4
5
6
<!-- 表单整体未通过验证时禁用提交表单 -->
<button type="submit" [disabled]="f.invalid">提交</button>
2
在组件模板中显示表单项未通过时的错误信息。
<form #f="ngForm" (submit)="onSubmit(f)">
  <input #username="ngModel" type="text" required />
  <div *ngIf="username.touched && !username.valid && username.errors">
    <div *ngIf="username.errors.required">请填写用户名</div>
    <div *ngIf="username.errors.pattern">不符合正则规则</div>
  </div>
</form>
2
3
4
5
6
7
- 模板引用变量 username 这个对象上有很多有用的属性,比如:valid,value,等等。
指定表单项未通过验证时的样式。
input.ng-touched.ng-invalid {
  border: 2px solid red;
}
2
3
| 状态 | 为 true 时的 class | 为 false 时的 class |
|---|---|---|
| 控件已经被访问过 | ng-touched | ng-untouched |
| 控件值已经变化 | ng-dirty | ng-pristine |
| 控件值是有效的 | ng-valid | ng-invalid |
# 11.1.4 自定义表单验证
- 引入依赖
# 11.2 模型驱动
# 11.2.1 概述
表单的控制逻辑写在组件类中,对验证逻辑拥有更多的控制权,适合复杂的表单的类型。
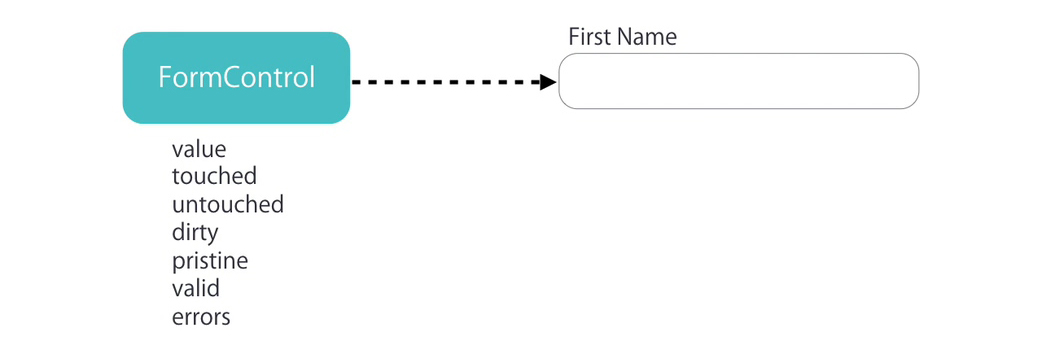
在模型驱动表单中,表单字段需要是 FormControl 类的实例,实例对象可以验证表单字段中的值,值是否被修改过等等
一组表单字段构成整个表单,整个表单需要是 FormGroup 类的实例,它可以对表单进行整体验证。
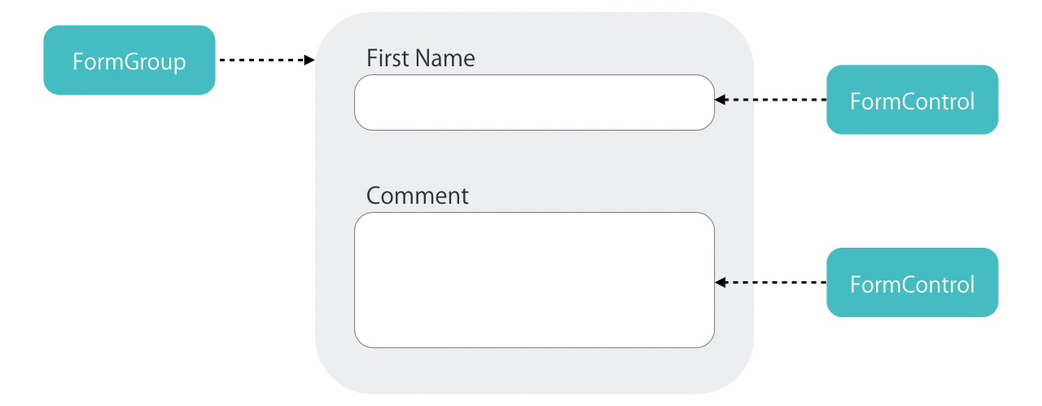
- FormControl:表单组中的一个表单项
- FormGroup:表单组,表单至少是一个 FormGroup
- FormArray:用于复杂表单,可以动态添加表单项或表单组,在表单验证时,FormArray 中有一项没通过,整体没通过。
# 11.2.2 快速上手
- 引入 ReactiveFormsModule
import { ReactiveFormsModule } from "@angular/forms";

@NgModule({
  imports: [ReactiveFormsModule],
})
export class AppModule {}
2
3
4
5
6
- 在组件类中创建 FormGroup 表单控制对象
FormControl 简单用法: required 表示必填项
<input type="text" [formControl]="singleForm" required />
<p>input: {{singleForm.value}}</p>
<button (click)="resetSingleForm">reset input above</button>
2
3
import { FormControl, FormGroup } from "@angular/forms";

export class AppComponent {
  contactForm: FormGroup = new FormGroup({
    name: new FormControl(),
    phone: new FormControl(),
  });
  singleForm = new FormControl("");

  resetSingleForm() {
    this.singleForm.setValue("");
  }
}
2
3
4
5
6
7
8
9
10
11
12
13
- 关联组件模板中的表单
<form [formGroup]="contactForm" (submit)="onSubmit()">
  <input type="text" formControlName="name" />
  <input type="text" formControlName="phone" />
  <button>提交</button>
</form>
<input type="text" [formControl]="singleForm" />
<p>input: {{singleForm.value}}</p>
<button (click)="resetSingleForm">reset input above</button>
2
3
4
5
6
7
8
- 获取表单值
export class AppComponent {
  onSubmit() {
    console.log(this.contactForm.value);
  }
}
2
3
4
5
- 设置表单默认值
contactForm: FormGroup = new FormGroup({
  name: new FormControl("默认值"),
  phone: new FormControl(15888888888),
});
2
3
4
- 表单分组
contactForm: FormGroup = new FormGroup({
  fullName: new FormGroup({
    firstName: new FormControl(),
    lastName: new FormControl(),
  }),
  phone: new FormControl(),
});
2
3
4
5
6
7
<form [formGroup]="contactForm" (submit)="onSubmit()">
  <div formGroupName="fullName">
    <input type="text" formControlName="firstName" />
    <input type="text" formControlName="lastName" />
  </div>
  <input type="text" formControlName="phone" />
  <button>提交</button>
</form>
2
3
4
5
6
7
8
onSubmit() {
  console.log(this.contactForm.value.name.username)
  console.log(this.contactForm.get(["name", "username"])?.value)
}
2
3
4
# 11.2.3 FormArray
需求:在页面中默认显示一组联系方式,通过点击按钮可以添加更多联系方式组。
import { Component, OnInit } from "@angular/core"
import { FormArray, FormControl, FormGroup } from "@angular/forms"
@Component({
  selector: "app-root",
  templateUrl: "./app.component.html",
  styles: []
})
export class AppComponent implements OnInit {
  // 表单
  contactForm: FormGroup = new FormGroup({
    contacts: new FormArray([])
  })

  get contacts() {
    return this.contactForm.get("contacts") as FormArray;
  }

  // 添加联系方式
  addContact() {
    // 联系方式
    const myContact: FormGroup = new FormGroup({
      name: new FormControl(),
      address: new FormControl(),
      phone: new FormControl()
    })
    // 向联系方式数组中添加联系方式
    this.contacts.push(myContact)
  }

  // 删除联系方式
  removeContact(i: number) {
    this.contacts.removeAt(i)
  }

  ngOnInit() {
    // 添加默认的联系方式
    this.addContact()
  }

  onSubmit() {
    console.log(this.contactForm.value)
  }
}
2
3
4
5
6
7
8
9
10
11
12
13
14
15
16
17
18
19
20
21
22
23
24
25
26
27
28
29
30
31
32
33
34
35
36
37
38
39
40
41
42
43
<form [formGroup]="contactForm" (submit)="onSubmit()">
  <div formArrayName="contacts">
    <div *ngFor="let contact of contacts.controls; let i = index" [formGroupName]="i">
      <input type="text" formControlName="name" />
      <input type="text" formControlName="address" />
      <input type="text" formControlName="phone" />
      <button (click)="removeContact(i)">删除联系方式</button>
    </div>
  </div>
  <button (click)="addContact()">添加联系方式</button>
  <button>提交</button>
</form>
2
3
4
5
6
7
8
9
10
11
12
# 11.2.4 内置表单验证器
- 使用内置验证器提供的验证规则验证表单字段
import { FormControl, FormGroup, Validators } from "@angular/forms";

contactForm: FormGroup = new FormGroup({
  name: new FormControl("默认值", [Validators.required, Validators.minLength(2)]),
});
2
3
4
5
- 获取整体表单是否验证通过
onSubmit() {
  console.log(this.contactForm.valid)
}
2
3
<!-- 表单整体未验证通过时禁用表单按钮 -->
<button [disabled]="contactForm.invalid">提交</button>
2
- 在组件模板中显示为验证通过时的错误信息
get name() {
  return this.contactForm.get("name")!
}
2
3
<form [formGroup]="contactForm" (submit)="onSubmit()">
  <input type="text" formControlName="name" />
  <div *ngIf="name.touched && name.invalid && name.errors">
    <div *ngIf="name.errors.required">请填写姓名</div>
    <div *ngIf="name.errors.maxlength">
      姓名长度不能大于 {{ name.errors.maxlength.requiredLength }} 实际填写长度为 {{ name.errors.maxlength.actualLength
      }}
    </div>
  </div>
</form>
2
3
4
5
6
7
8
9
10
# 11.2.5 自定义同步表单验证器
- 自定义验证器的类型是 TypeScript 类
- 类中包含具体的验证方法,验证方法必须为静态方法
- 验证方法有一个参数 control,类型为 AbstractControl。其实就是 FormControl 类的实例对象的类型
- 如果验证成功,返回 null
- 如果验证失败,返回对象,对象中的属性即为验证标识,值为 true,标识该项验证失败
- 验证方法的返回值为 ValidationErrors | null
import { AbstractControl, ValidationErrors } from "@angular/forms";

export class NameValidators {
  // 字段值中不能包含空格
  static cannotContainSpace(control: AbstractControl): ValidationErrors | null {
    // 验证未通过
    if (/\s/.test(control.value)) return { cannotContainSpace: true };
    // 验证通过
    return null;
  }
}
2
3
4
5
6
7
8
9
10
11
import { NameValidators } from "./Name.validators";

contactForm: FormGroup = new FormGroup({
  name: new FormControl("", [Validators.required, NameValidators.cannotContainSpace]),
});
2
3
4
5
<div *ngIf="name.touched && name.invalid && name.errors">
  <div *ngIf="name.errors.cannotContainSpace">姓名中不能包含空格</div>
</div>
2
3
# 11.2.6 自定义异步表单验证器
import { AbstractControl, ValidationErrors } from "@angular/forms";
import { Observable } from "rxjs";

export class NameValidators {
  static shouldBeUnique(control: AbstractControl): Promise<ValidationErrors | null> {
    return new Promise((resolve) => {
      if (control.value == "admin") {
        resolve({ shouldBeUnique: true });
      } else {
        resolve(null);
      }
    });
  }
}
2
3
4
5
6
7
8
9
10
11
12
13
14
contactForm: FormGroup = new FormGroup({
  name: new FormControl("", [Validators.required], NameValidators.shouldBeUnique),
});
2
3
<div *ngIf="name.touched && name.invalid && name.errors">
  <div *ngIf="name.errors.shouldBeUnique">用户名重复</div>
</div>
<div *ngIf="name.pending">正在检测姓名是否重复</div>
2
3
4
# 11.2.7 FormBuilder
创建表单的快捷方式。
this.fb.control:表单项this.fb.group:表单组,表单至少是一个 FormGroupthis.fb.array:用于复杂表单,可以动态添加表单项或表单组,在表单验证时,FormArray 中有一项没通过,整体没通过。
import { FormBuilder, FormGroup, Validators } from "@angular/forms"

export class AppComponent {
  contactForm: FormGroup
  constructor(private fb: FormBuilder) {
    this.contactForm = this.fb.group({
      fullName: this.fb.group({
        firstName: ["😝", [Validators.required, Validators.maxLength(18), Validators.minLength(1)]],
        lastName: [""]
      }),
      phone: []
    })
  }
}
2
3
4
5
6
7
8
9
10
11
12
13
14
# 11.2.8 练习
- 获取一组复选框中选中的值
<form [formGroup]="form" (submit)="onSubmit()">
  <label *ngFor="let item of Data">
    <input type="checkbox" [value]="item.value" (change)="onChange($event)" />
    {{ item.name }}
  </label>
  <button>提交</button>
</form>
2
3
4
5
6
7
import { Component } from "@angular/core"
import { FormArray, FormBuilder, FormGroup } from "@angular/forms"
interface Data {
  name: string
  value: string
}
@Component({
  selector: "app-checkbox",
  templateUrl: "./checkbox.component.html",
  styles: []
})
export class CheckboxComponent {
  Data: Array<Data> = [
    { name: "Pear", value: "pear" },
    { name: "Plum", value: "plum" },
    { name: "Kiwi", value: "kiwi" },
    { name: "Apple", value: "apple" },
    { name: "Lime", value: "lime" }
  ]
  form: FormGroup

  constructor(private fb: FormBuilder) {
    this.form = this.fb.group({
      checkArray: this.fb.array([])
    })
  }

  onChange(event: Event) {
    const target = event.target as HTMLInputElement
    const checked = target.checked
    const value = target.value
    const checkArray = this.form.get("checkArray") as FormArray

    if (checked) {
      checkArray.push(this.fb.control(value))
    } else {
      const index = checkArray.controls.findIndex(
        control => control.value === value
      )
      checkArray.removeAt(index)
    }
  }

  onSubmit() {
    console.log(this.form.value)
  }
}
2
3
4
5
6
7
8
9
10
11
12
13
14
15
16
17
18
19
20
21
22
23
24
25
26
27
28
29
30
31
32
33
34
35
36
37
38
39
40
41
42
43
44
45
46
47
48
- 获取单选框中选中的值
export class AppComponent {
  form: FormGroup

  constructor(public fb: FormBuilder) {
    this.form = this.fb.group({ gender: "" })
  }

  onSubmit() {
    console.log(this.form.value)
  }
}
2
3
4
5
6
7
8
9
10
11
<form [formGroup]="form" (submit)="onSubmit()">
  <input type="radio" value="male" formControlName="gender" /> Male
  <input type="radio" value="female" formControlName="gender" /> Female
  <button type="submit">Submit</button>
</form>
2
3
4
5
# 11.2.9 其他
- patchValue:设置表单控件的值(可以设置全部,也可以设置其中某一个,其他不受影响)
- setValue:设置表单控件的值 (设置全部,不能排除任何一个)
- valueChanges:当表单控件的值发生变化时被触发的事件
- reset:表单内容置空
# 12. 路由
# 12.1 概述
在 Angular 中,路由是以模块为单位的,每个模块都可以有自己的路由。
# 12.2 快速上手
创建页面组件、Layout 组件以及 Navigation 组件,供路由使用
- 创建首页页面组件
ng g c pages/home - 创建关于我们页面组件
ng g c pages/about - 创建布局组件
ng g c pages/layout - 创建导航组件
ng g c pages/navigation
- 创建首页页面组件
创建路由规则
// app.module.ts
import { Routes } from "@angular/router";

const routes: Routes = [
  {
    path: "home",
    component: HomeComponent,
  },
  {
    path: "about",
    component: AboutComponent,
  },
];
2
3
4
5
6
7
8
9
10
11
12
13
- 引入路由模块并启动
// app.module.ts
import { RouterModule, Routes } from "@angular/router";

@NgModule({
  imports: [RouterModule.forRoot(routes, { useHash: true })],
})
export class AppModule {}
2
3
4
5
6
7
- 添加路由插座
<!-- 路由插座即占位组件 匹配到的路由组件将会显示在这个地方 -->
<router-outlet></router-outlet>
2
- 在导航组件中定义链接
<a routerLink="/home">首页</a> <a routerLink="/about">关于我们</a>
# 12.3 匹配规则
# 12.3.1 重定向
const routes: Routes = [
  {
    path: "home",
    component: HomeComponent,
  },
  {
    path: "about",
    component: AboutComponent,
  },
  {
    path: "",
    // 重定向
    redirectTo: "home",
    // 完全匹配
    pathMatch: "full",
  },
];
2
3
4
5
6
7
8
9
10
11
12
13
14
15
16
17
# 12.3.2 404 页面
const routes: Routes = [
  {
    path: "home",
    component: HomeComponent,
  },
  {
    path: "about",
    component: AboutComponent,
  },
  {
    path: "**",
    component: NotFoundComponent,
  },
];
2
3
4
5
6
7
8
9
10
11
12
13
14
# 12.4 路由传参
# 12.4.1 查询参数
<a routerLink="/about" [queryParams]="{ name: 'kitty' }">关于我们</a>
import { ActivatedRoute } from "@angular/router"

export class AboutComponent implements OnInit {
  constructor(private route: ActivatedRoute) {}

  ngOnInit(): void {
    this.route.queryParamMap.subscribe(query => {
      query.get("name")
    })
  }
}
2
3
4
5
6
7
8
9
10
11
# 12.4.2 动态参数
const routes: Routes = [
  {
    path: "home",
    component: HomeComponent,
  },
  {
    path: "about/:name",
    component: AboutComponent,
  },
];
2
3
4
5
6
7
8
9
10
<a [routerLink]="['/about', 'zhangsan']">关于我们</a>
import { ActivatedRoute } from "@angular/router"

export class AboutComponent implements OnInit {
  constructor(private route: ActivatedRoute) {}

  ngOnInit(): void {
    this.route.paramMap.subscribe(params => {
      params.get("name")
    })
  }
}
2
3
4
5
6
7
8
9
10
11
12
# 12.5 路由嵌套
路由嵌套指的是如何定义子级路由。
const routes: Routes = [
  {
    path: "about",
    component: AboutComponent,
    children: [
      {
        path: "introduce",
        component: IntroduceComponent,
      },
      {
        path: "history",
        component: HistoryComponent,
      },
    ],
  },
];
2
3
4
5
6
7
8
9
10
11
12
13
14
15
16
<!-- about.component.html -->
<app-layout>
  <p>about works!</p>
  <a routerLink="/about/introduce">公司简介</a>
  <a routerLink="/about/history">发展历史</a>
  <div>
    <router-outlet></router-outlet>
  </div>
</app-layout>
2
3
4
5
6
7
8
9
# 12.6 命名插座
将子级路由组件显示到不同的路由插座中。
{
  path: "about",
  component: AboutComponent,
  children: [
    {
      path: "introduce",
      component: IntroduceComponent,
      outlet: "left"
    },
    {
      path: "history",
      component: HistoryComponent,
      outlet: "right"
    }
  ]
}
2
3
4
5
6
7
8
9
10
11
12
13
14
15
16
<!-- about.component.html -->
<app-layout>
  <p>about works!</p>
  <router-outlet name="left"></router-outlet>
  <router-outlet name="right"></router-outlet>
</app-layout>
2
3
4
5
6
<a
  [routerLink]="[
      '/about',
      {
        outlets: {
          left: ['introduce'],
          right: ['history']
        }
      }
    ]"
  >关于我们
</a>
2
3
4
5
6
7
8
9
10
11
12
# 12.7 导航路由
<!-- app.component.html -->
<button (click)="jump()">跳转到发展历史</button>
2
// app.component.ts
import { Router } from "@angular/router"

export class HomeComponent {
  constructor(private router: Router) {}
  jump() {
    this.router.navigate(["/about/history"], {
      queryParams: {
        name: "Kitty"
      }
    })
  }
}
2
3
4
5
6
7
8
9
10
11
12
13
# 12.8 路由模块
将根模块中的路由配置抽象成一个单独的路由模块,称之为根路由模块,然后在根模块中引入根路由模块。
import { NgModule } from "@angular/core";

import { HomeComponent } from "./pages/home/home.component";
import { NotFoundComponent } from "./pages/not-found/not-found.component";

const routes: Routes = [
  {
    path: "",
    component: HomeComponent,
  },
  {
    path: "**",
    component: NotFoundComponent,
  },
];

@NgModule({
  declarations: [],
  imports: [RouterModule.forRoot(routes, { useHash: true })],
  // 导出 Angular 路由功能模块,因为在根模块的根组件中使用了 RouterModule 模块中提供的路由插座组件
  exports: [RouterModule],
})
export class AppRoutingModule {}
2
3
4
5
6
7
8
9
10
11
12
13
14
15
16
17
18
19
20
21
22
23
import { BrowserModule } from "@angular/platform-browser"
import { NgModule } from "@angular/core"
import { AppComponent } from "./app.component"
import { AppRoutingModule } from "./app-routing.module"
import { HomeComponent } from "./pages/home/home.component"
import { NotFoundComponent } from "./pages/not-found/not-found.component"

@NgModule({
  declarations: [AppComponent,HomeComponent, NotFoundComponent],
  imports: [BrowserModule, AppRoutingModule],
  providers: [],
  bootstrap: [AppComponent]
})
export class AppModule {}
2
3
4
5
6
7
8
9
10
11
12
13
14
# 12.9 路由懒加载
路由懒加载是以模块为单位的。
创建用户模块
ng g m user --routing=true一并创建该模块的路由模块创建登录页面组件
ng g c user/pages/login创建注册页面组件
ng g c user/pages/register配置用户模块的路由规则
import { NgModule } from "@angular/core";
import { Routes, RouterModule } from "@angular/router";
import { LoginComponent } from "./pages/login/login.component";
import { RegisterComponent } from "./pages/register/register.component";

const routes: Routes = [
  {
    path: "login",
    component: LoginComponent,
  },
  {
    path: "register",
    component: RegisterComponent,
  },
];

@NgModule({
  imports: [RouterModule.forChild(routes)],
  exports: [RouterModule],
})
export class UserRoutingModule {}
2
3
4
5
6
7
8
9
10
11
12
13
14
15
16
17
18
19
20
21
- 将用户路由模块关联到主路由模块
// app-routing.module.ts
const routes: Routes = [
  {
    path: "user",
    loadChildren: () => import("./user/user.module").then((m) => m.UserModule),
  },
];
2
3
4
5
6
7
- 在导航组件中添加访问链接
<a routerLink="/user/login">登录</a> <a routerLink="/user/register">注册</a>
# 12.10 路由守卫
路由守卫会告诉路由是否允许导航到请求的路由。
路由守方法可以返回 boolean 或 Observable <boolean> 或 Promise <boolean>,它们在将来的某个时间点解析为布尔值。
# 12.10.1 CanActivate
检查用户是否可以访问某一个路由。
CanActivate 为接口,路由守卫类要实现该接口,该接口规定类中需要有 canActivate 方法,方法决定是否允许访问目标路由。
路由可以应用多个守卫,所有守卫方法都允许,路由才被允许访问,有一个守卫方法不允许,则路由不允许被访问。
创建路由守卫:ng g guard guards/auth
import { Injectable } from "@angular/core"
import { CanActivate, ActivatedRouteSnapshot, RouterStateSnapshot, UrlTree, Router } from "@angular/router"
import { Observable } from "rxjs"

@Injectable({
  providedIn: "root"
})
export class AuthGuard implements CanActivate {
  constructor(private router: Router) {}
  canActivate(): boolean | UrlTree {
    // 用于实现跳转
    return this.router.createUrlTree(["/user/login"])
    // 禁止访问目标路由
    return false
    // 允许访问目标路由
    return true
  }
}
2
3
4
5
6
7
8
9
10
11
12
13
14
15
16
17
18
19
{
  path: "about",
  component: AboutComponent,
  canActivate: [AuthGuard]
}
2
3
4
5
# 12.10.2 CanActivateChild
检查用户是否方可访问某个子路由。
创建路由守卫:ng g guard guards/admin 注意:选择 CanActivateChild,需要将箭头移动到这个选项并且敲击空格确认选择。
import { Injectable } from "@angular/core";
import { CanActivateChild, ActivatedRouteSnapshot, RouterStateSnapshot, UrlTree } from "@angular/router";
import { Observable } from "rxjs";

@Injectable({
  providedIn: "root",
})
export class AdminGuard implements CanActivateChild {
  canActivateChild(): boolean | UrlTree {
    return true;
  }
}
2
3
4
5
6
7
8
9
10
11
12
{
  path: "about",
  component: AboutComponent,
  canActivateChild: [AdminGuard],
  children: [
    {
      path: "introduce",
      component: IntroduceComponent
    }
  ]
}
2
3
4
5
6
7
8
9
10
11
# 12.10.3 CanDeactivate
检查用户是否可以退出路由。比如用户在表单中输入的内容没有保存,用户又要离开路由,此时可以调用该守卫提示用户。
import { Injectable } from "@angular/core";
import { CanDeactivate, ActivatedRouteSnapshot, RouterStateSnapshot, UrlTree } from "@angular/router";
import { Observable } from "rxjs";

export interface CanComponentLeave {
  canLeave: () => boolean;
}

@Injectable({
  providedIn: "root",
})
export class UnsaveGuard implements CanDeactivate<CanComponentLeave> {
  canDeactivate(component: CanComponentLeave): boolean {
    if (component.canLeave()) {
      return true;
    }
    return false;
  }
}
2
3
4
5
6
7
8
9
10
11
12
13
14
15
16
17
18
19
{
  path: "",
  component: HomeComponent,
  canDeactivate: [UnsaveGuard]
}
2
3
4
5
import { CanComponentLeave } from "src/app/guards/unsave.guard"

export class HomeComponent implements CanComponentLeave {
  myForm: FormGroup = new FormGroup({
    username: new FormControl()
  })
  canLeave(): boolean {
    if (this.myForm.dirty) {
      if (window.confirm("有数据未保存, 确定要离开吗")) {
        return true
      } else {
        return false
      }
    }
    return true
  }
2
3
4
5
6
7
8
9
10
11
12
13
14
15
16
17
# 12.10.4 Resolve
允许在进入路由之前先获取数据,待数据获取完成之后再进入路由。
ng g resolver <name>
import { Injectable } from "@angular/core";
import { Resolve } from "@angular/router";

type returnType = Promise<{ name: string }>;

@Injectable({
  providedIn: "root",
})
export class ResolveGuard implements Resolve<returnType> {
  resolve(): returnType {
    return new Promise(function (resolve) {
      setTimeout(() => {
        resolve({ name: "张三" });
      }, 2000);
    });
  }
}
2
3
4
5
6
7
8
9
10
11
12
13
14
15
16
17
{
   path: "",
   component: HomeComponent,
   resolve: {
     user: ResolveGuard
   }
}
2
3
4
5
6
7
export class HomeComponent {
  constructor(private route: ActivatedRoute) {}
  ngOnInit(): void {
    console.log(this.route.snapshot.data.user)
  }
}
2
3
4
5
6
# 13. RxJS (opens new window)
# 13.1 概述

# 13.1.1 什么是 RxJS ?
RxJS 是一个用于处理异步编程的 JavaScript 库,目标是使编写异步和基于回调的代码更容易。
# 13.1.2 为什么要学习 RxJS ?
就像 Angular 深度集成 TypeScript 一样,Angular 也深度集成了 RxJS。
服务、表单、事件、全局状态管理、异步请求 ...
# 13.1.3 快速入门
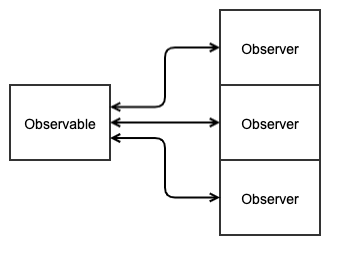
可观察对象 ( Observable ) :类比 Promise 对象,内部可以用于执行异步代码,通过调用内部提供的方法将异步代码执行的结果传递到可观察对象外部。
观察者 ( Observer ):类比 then 方法中的回调函数,用于接收可观察对象中传递出来数据。
订阅 ( subscribe ):类比 then 方法,通过订阅将可观察对象和观察者连接起来,当可观察对象发出数据时,订阅者可以接收到数据。

import { Observable } from "rxjs";

const observable = new Observable(function (observer) {
  setTimeout(function () {
    observer.next({
      name: "张三",
    });
  }, 2000);
});

const observer = {
  next: function (value) {
    console.log(value);
  },
};

observable.subscribe(observer);
2
3
4
5
6
7
8
9
10
11
12
13
14
15
16
17
# 13.2 可观察对象
# 13.2.1 Observable
- 在 Observable 对象内部可以多次调用 next 方法向外发送数据。
const observable = new Observable(function (observer) {
  let index = 0;
  setInterval(function () {
    observer.next(index++);
  }, 1000);
});

const observer = {
  next: function (value) {
    console.log(value);
  },
};

observable.subscribe(observer);
2
3
4
5
6
7
8
9
10
11
12
13
14
- 当所有数据发送完成以后,可以调用 complete 方法终止数据发送。
const observable = new Observable(function (observer) {
  let index = 0;
  let timer = setInterval(function () {
    observer.next(index++);
    if (index === 3) {
      observer.complete();
      clearInterval(timer);
    }
  }, 1000);
});

const observer = {
  next: function (value) {
    console.log(value);
  },
  complete: function () {
    console.log("数据发送完成");
  },
};

observable.subscribe(observer);
2
3
4
5
6
7
8
9
10
11
12
13
14
15
16
17
18
19
20
21
- 当 Observable 内部逻辑发生错误时,可以调用 error 方法将失败信息发送给订阅者,Observable 终止。
import { Observable } from "rxjs";

const observable = new Observable(function (observer) {
  let index = 0;
  let timer = setInterval(function () {
    observer.next(index++);
    if (index === 3) {
      observer.error("发生错误");
      clearInterval(timer);
    }
  }, 1000);
});

const observer = {
  next: function (value) {
    console.log(value);
  },
  error: function (error) {
    console.log(error);
  },
};

observable.subscribe(observer);
2
3
4
5
6
7
8
9
10
11
12
13
14
15
16
17
18
19
20
21
22
23
- 可观察对象是惰性的,只有被订阅后才会执行
const observable = new Observable(function () {
  console.log("Hello RxJS");
});
// observable.subscribe()
2
3
4
- 可观察对象可以有 n 多订阅者,每次被订阅时都会得到执行
const observable = new Observable(function () {
  console.log("Hello RxJS");
});

observable.subscribe();
observable.subscribe();
observable.subscribe();
observable.subscribe();
observable.subscribe();
2
3
4
5
6
7
8
9
- 取消订阅
import { interval } from "rxjs";

const obs = interval(1000);
const subscription = obs.subscribe(console.log);

setTimeout(function () {
  subscription.unsubscribe();
}, 2000);
2
3
4
5
6
7
8
# 13.2.2 Subject
- 用于创建空的可观察对象,在订阅后不会立即执行,next 方法可以在可观察对象外部调用
import { Subject } from "rxjs";

const demoSubject = new Subject();

demoSubject.subscribe({
  next: function (value) {
    console.log(value);
  },
});
demoSubject.subscribe({
  next: function (value) {
    console.log(value);
  },
});

setTimeout(function () {
  demoSubject.next("hahaha");
}, 3000);
2
3
4
5
6
7
8
9
10
11
12
13
14
15
16
17
18
# 13.2.3 BehaviorSubject
拥有 Subject 全部功能,但是在创建 Obervable 对象时可以传入默认值,观察者订阅后可以直接拿到默认值。
import { BehaviorSubject } from "rxjs";

const demoBehavior = new BehaviorSubject("默认值");
demoBehavior.subscribe({
  next: function (value) {
    console.log(value);
  },
});
demoBehavior.next("Hello");
2
3
4
5
6
7
8
9
# 13.2.3 ReplaySubject
功能类似 Subject,但有新订阅者时两者处理方式不同,Subject 不会广播历史结果,而 ReplaySubject 会广播所有历史结果。
import { ReplaySubject } from "rxjs";

const rSubject = new ReplaySubject();

rSubject.subscribe((value) => {
  console.log(value);
});

rSubject.next("Hello 1");
rSubject.next("Hello 2");

setTimeout(function () {
  rSubject.subscribe({
    next: function (value) {
      console.log(value);
    },
  });
}, 3000);
2
3
4
5
6
7
8
9
10
11
12
13
14
15
16
17
18
# 13.3 辅助方法
# 13.3.1 range
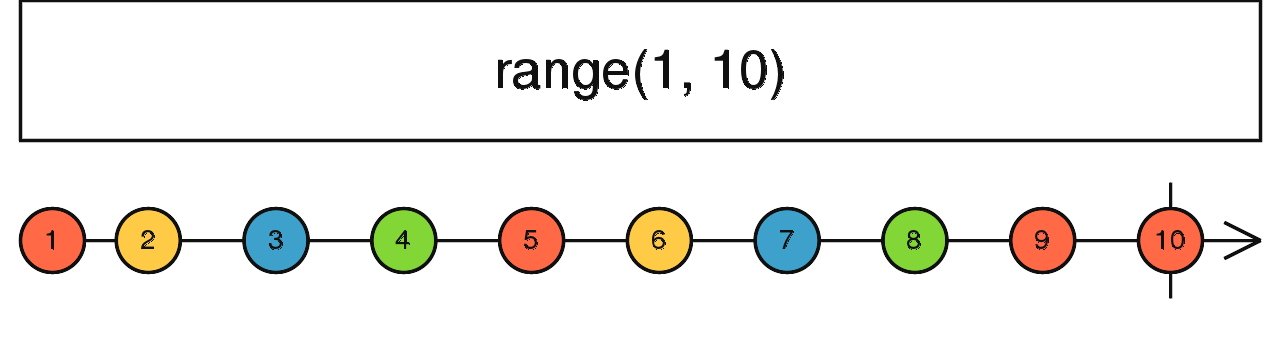
range(start, length),调用方法后返回 observable 对象,被订阅后会发出指定范围的数值。
import { range } from "rxjs";

range(0, 5).subscribe((n) => console.log(n));

// 0
// 1
// 2
// 3
// 4
2
3
4
5
6
7
8
9
方法内部并不是一次发出 length 个数值,而是发送了 length 次,每次发送一个数值,就是说内部调用了 length 次 next 方法。
# 13.3.2 of
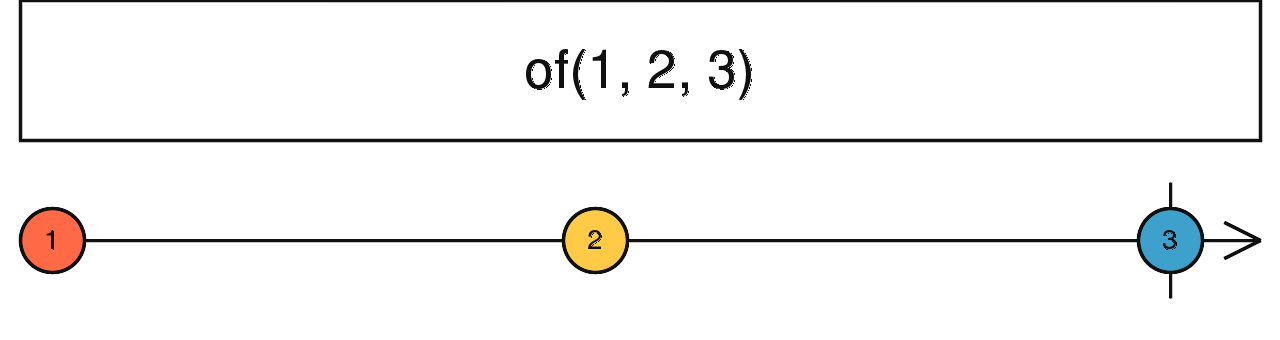
将参数列表作为数据流返回。
of("a", "b", [], {}, true, 20).subscribe((v) => console.log(v));
# 13.3.3 from
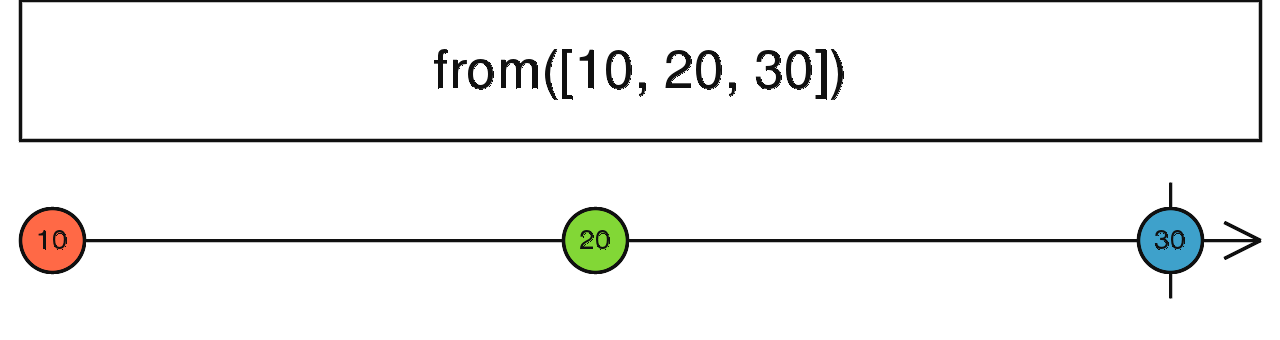
将 Array,Promise, Iterator 转换为 observable 对象。
from(["a", "b", "c"]).subscribe((v) => console.log(v));
// a
// b
// c
2
3
4
import { from } from "rxjs";

function p() {
  return new Promise(function (resolve) {
    resolve([100, 200]);
  });
}

from(p()).subscribe((v) => console.log(v));
// [100, 200]
2
3
4
5
6
7
8
9
10
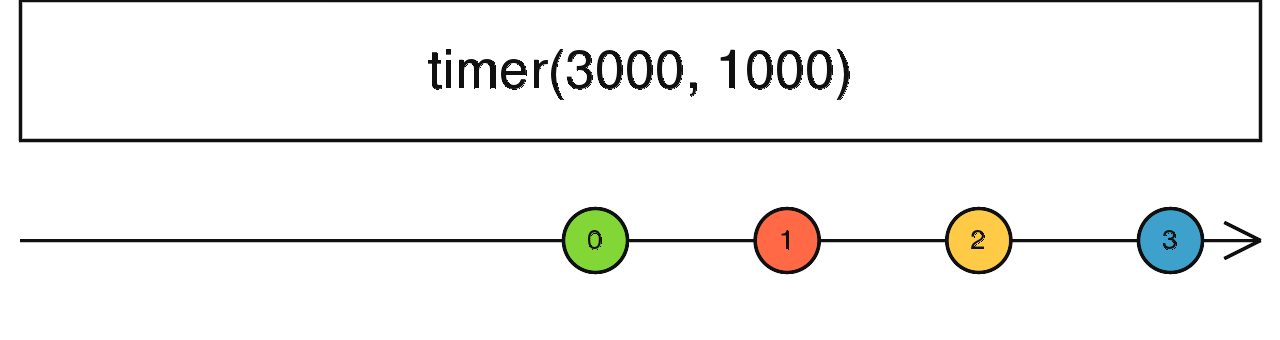
# 13.3.4 interval、timer
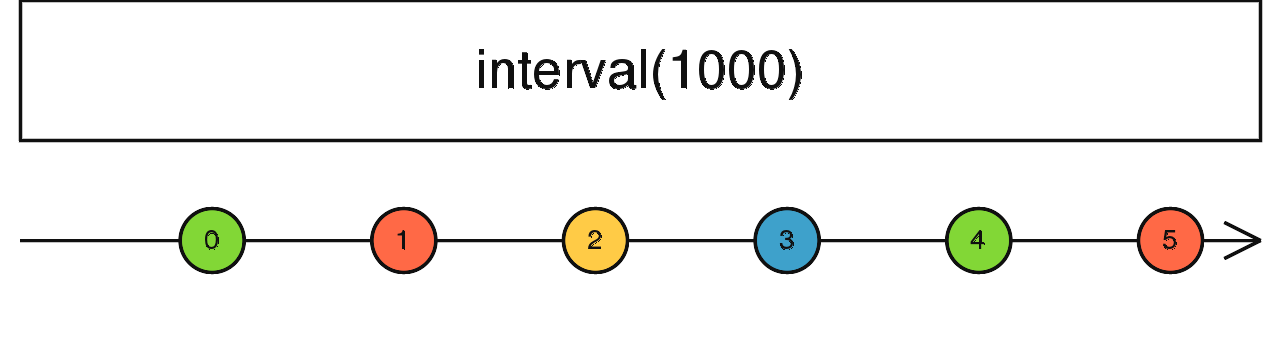
**Interval:**每隔一段时间发出一个数值,数值递增
import { interval } from "rxjs";

interval(1000).subscribe((n) => console.log(n));
2
3
**timer:**间隔时间过去以后发出数值,行为终止,或间隔时间发出数值后,继续按第二个参数的时间间隔继续发出值
import { timer } from "rxjs";

timer(2000).subscribe((n) => console.log(n));
timer(0, 1000).subscribe((n) => console.log(n));
2
3
4
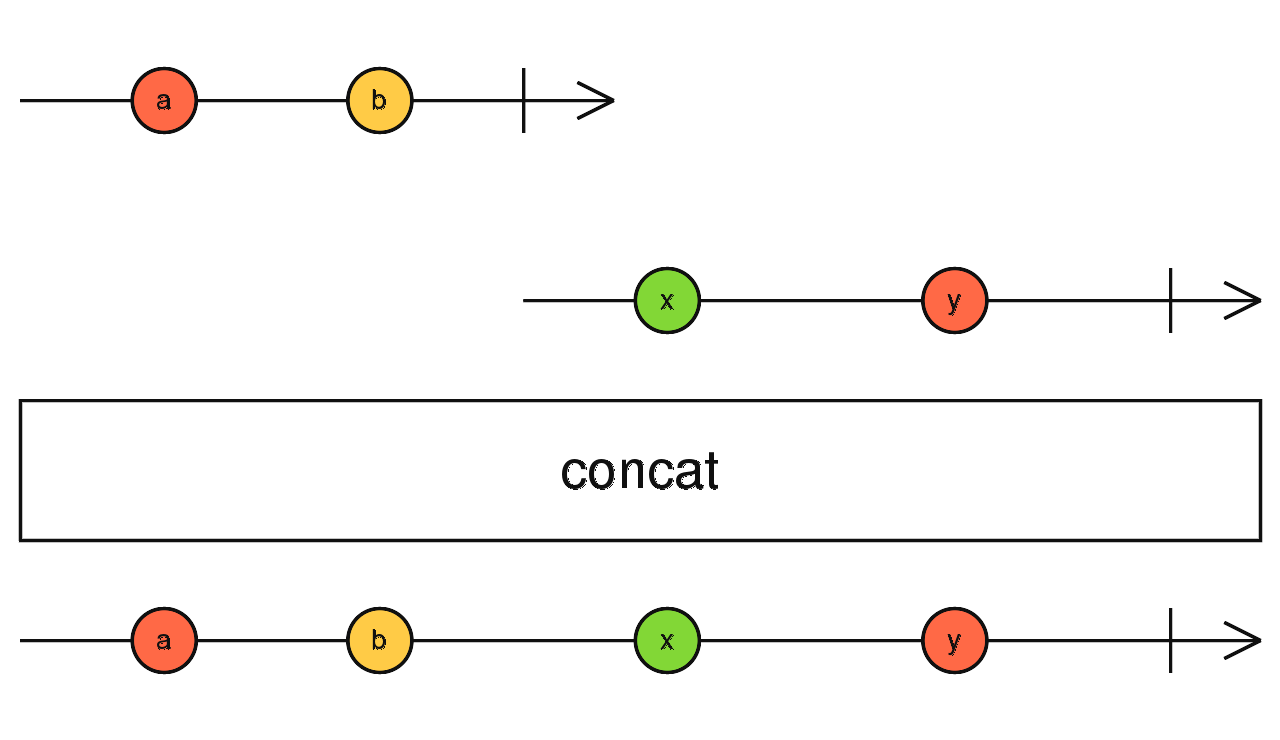
# 13.3.5 concat
合并数据流,先让第一个数据流发出值,结束后再让第二个数据流发出值,进行整体合并。
import { concat, range } from "rxjs";

concat(range(1, 5), range(6, 5)).subscribe(console.log);
2
3
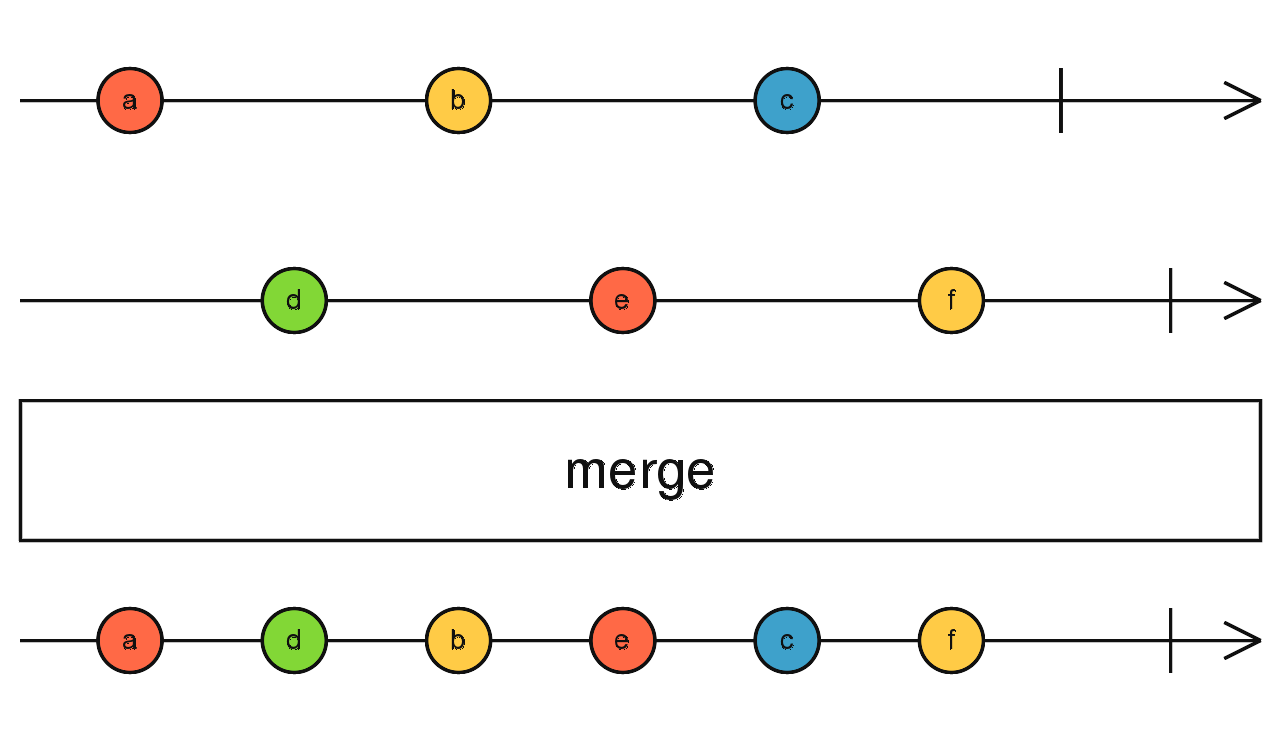
# 13.3.6 merge
合并数据流,多个参数一起发出数据流,按照时间线进行交叉合并。
import { merge, fromEvent, interval } from "rxjs";

const clicks = fromEvent(document, "click");
const timer = interval(1000);

merge(clicks, timer).subscribe(console.log);
2
3
4
5
6
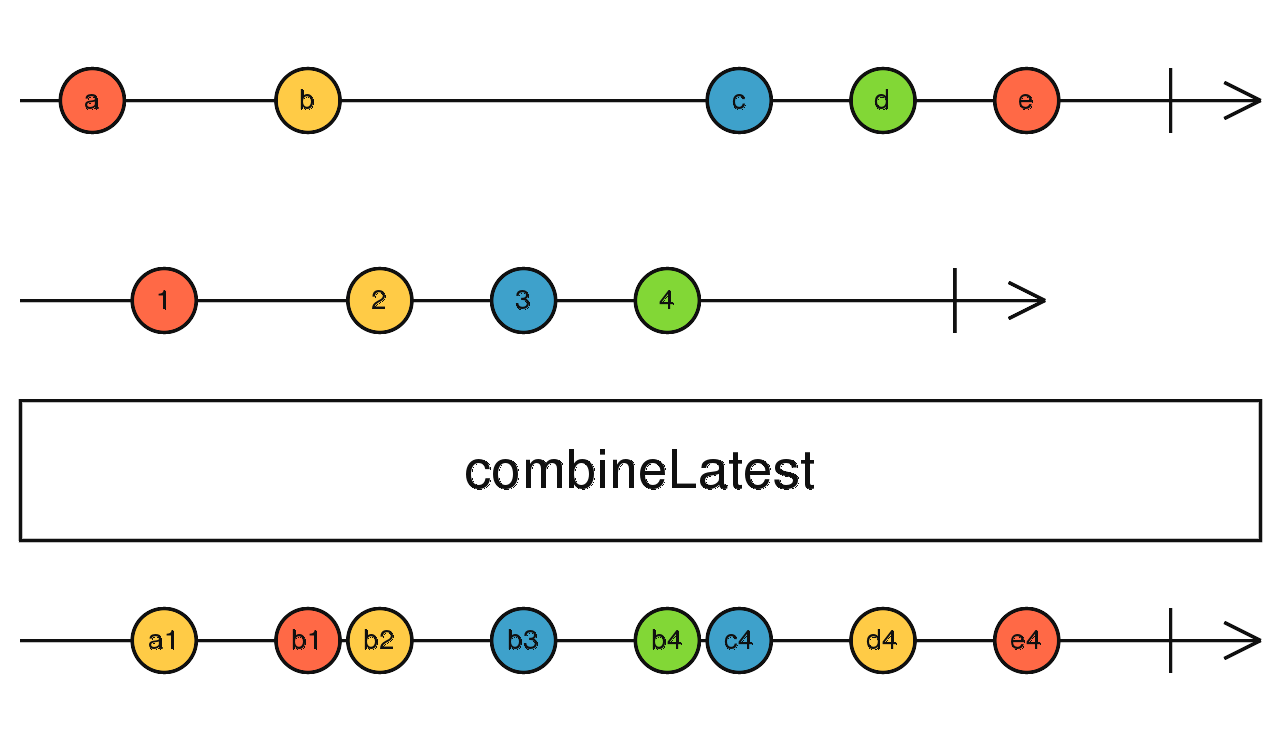
# 13.3.7 combineLatest
将两个 Obserable 中最新发出的数据流进行组合成新的数据流,以数组的形式发出。和当前最新的进行组合。
import { combineLatest, timer } from "rxjs";

const firstTimer = timer(0, 1000); // emit 0, 1, 2... after every second, starting from now
const secondTimer = timer(500, 1000); // emit 0, 1, 2... after every second, starting 0,5s from now
combineLatest(firstTimer, secondTimer).subscribe(console.log);

// [0, 0] after 0.5s
// [1, 0] after 1s
// [1, 1] after 1.5s
// [2, 1] after 2s
2
3
4
5
6
7
8
9
10
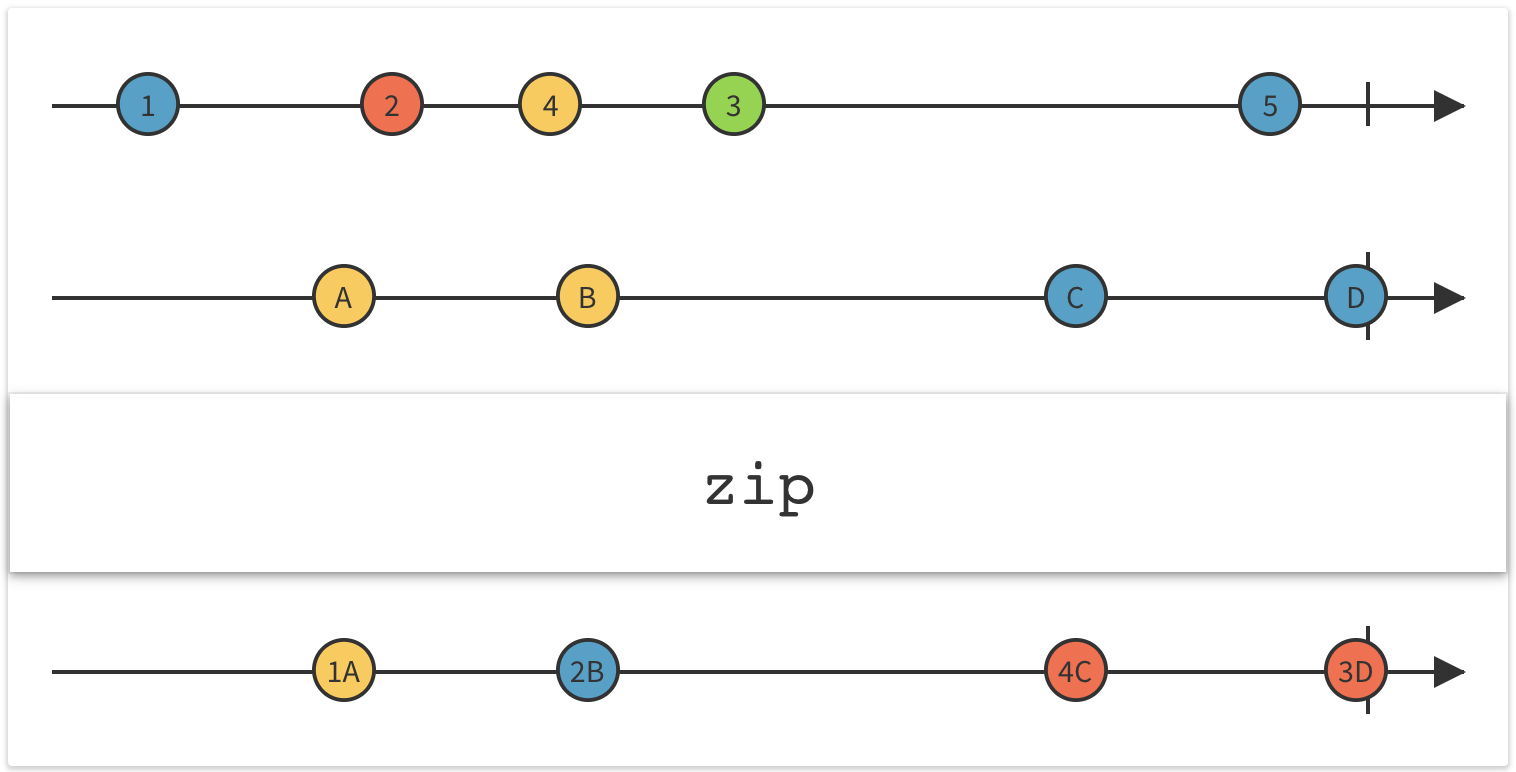
# 13.3.8 zip
将多个 Observable 中的数据流进行组合。和将来最新的进行组合。
import { zip, of } from "rxjs";
import { map } from "rxjs/operators";

let age = of(27, 25, 29);
let name = of("Foo", "Bar", "Beer");
let isDev = of(true, true, false);

zip(name, age, isDev)
  .pipe(map(([name, age, isDev]) => ({ name, age, isDev })))
  .subscribe(console.log);

// { name: 'Foo', age: 27, isDev: true }
// { name: 'Bar', age: 25, isDev: true }
// { name: 'Beer', age: 29, isDev: false }
2
3
4
5
6
7
8
9
10
11
12
13
14
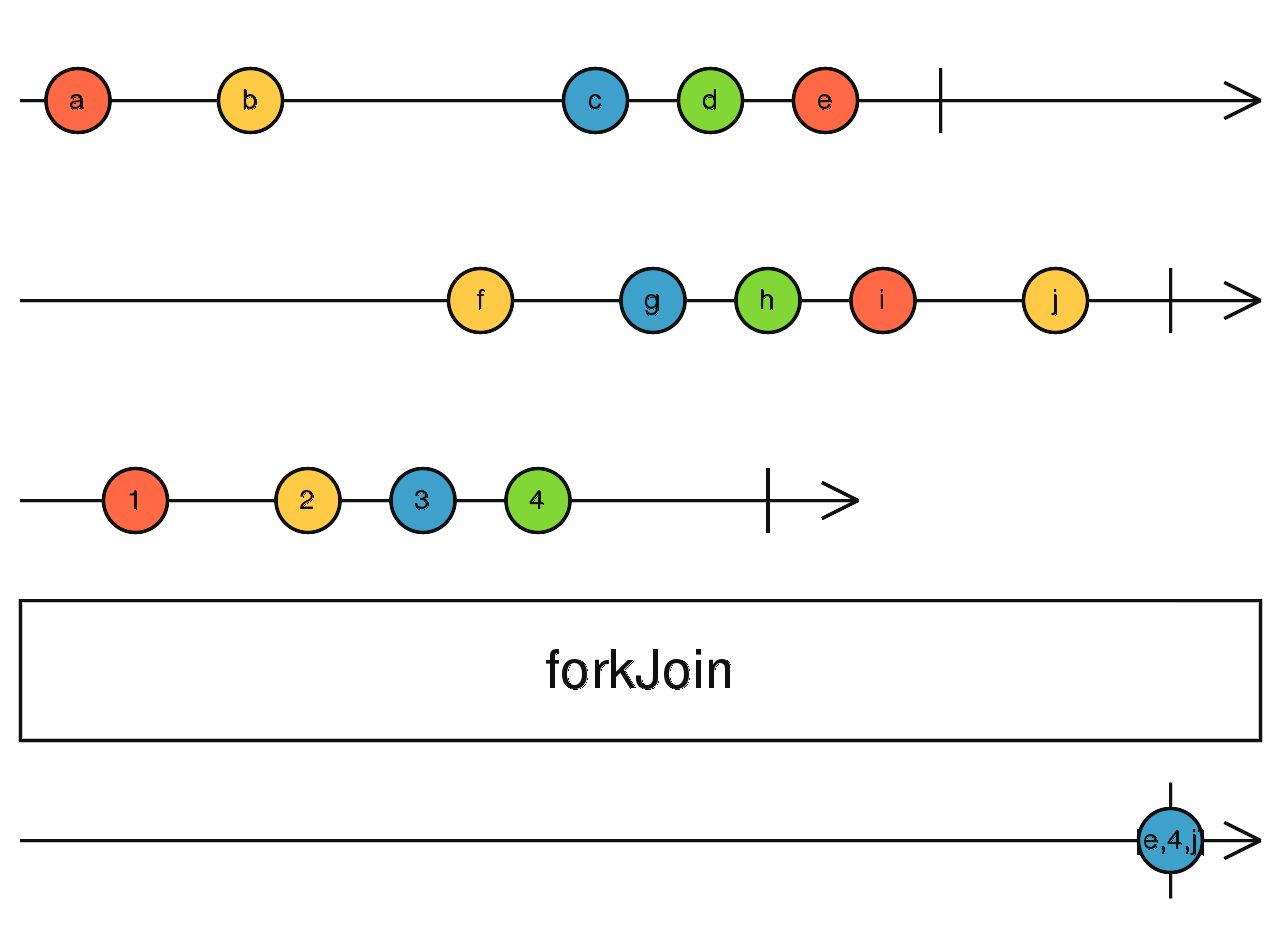
# 13.3.9 forkJoin
forkJoin 是 Rx 版本的 Promise.all(),即表示等到所有的 Observable 都完成后,才一次性返回值。
import axios from "axios";
import { forkJoin, from } from "rxjs";

axios.interceptors.response.use((response) => response.data);

forkJoin({
  goods: from(axios.get("http://localhost:3005/goods")),
  category: from(axios.get("http://localhost:3005/category")),
}).subscribe(console.log);
2
3
4
5
6
7
8
9
# 13.3.10 throwError
返回可观察对象并向订阅者抛出错误。

import { throwError } from "rxjs";

throwError("发生了未知错误").subscribe({ error: console.log });
2
3
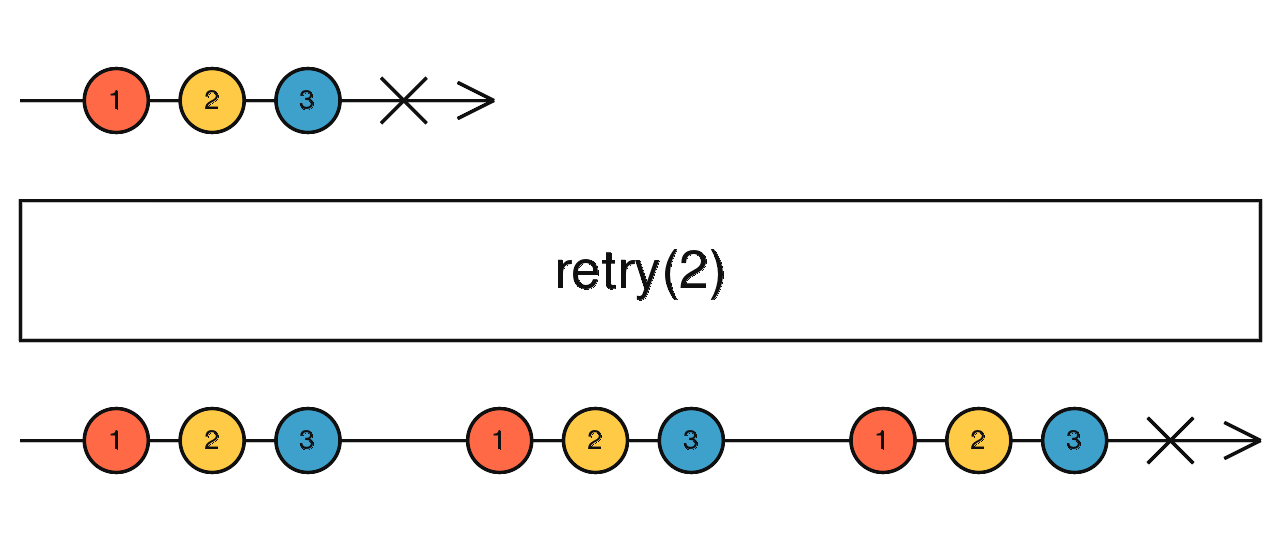
# 13.3.11 retry
如果 Observable 对象抛出错误,则该辅助方法会重新订阅 Observable 以获取数据流,参数为重新订阅次数。
import { interval, of, throwError } from "rxjs";
import { mergeMap, retry } from "rxjs/operators";

interval(1000)
  .pipe(
    mergeMap((val) => {
      if (val > 2) {
        return throwError("Error!");
      }
      return of(val);
    }),
    retry(2)
  )
  .subscribe({
    next: console.log,
    error: console.log,
  });
2
3
4
5
6
7
8
9
10
11
12
13
14
15
16
17
# 13.3.12 race
接收并同时执行多个可观察对象,只将最快发出的数据流传递给订阅者。
import { race, timer } from "rxjs";
import { mapTo } from "rxjs/operators";

const obs1 = timer(1000).pipe(mapTo("fast one"));
const obs2 = timer(3000).pipe(mapTo("medium one"));
const obs3 = timer(5000).pipe(mapTo("slow one"));

race(obs3, obs1, obs2).subscribe(console.log);
2
3
4
5
6
7
8
# 13.3.13 fromEvent
将事件转换为 Observable。
import { fromEvent } from "rxjs";

const btn = document.getElementById("btn");
// 可以将 Observer 简写成一个函数,表示 next
fromEvent(btn, "click").subscribe((e) => console.log(e));
2
3
4
5
# 13.4 操作符
- 数据流:从可观察对象内部输出的数据就是数据流,可观察对象内部可以向外部源源不断的输出数据。
- 操作符:用于操作数据流,可以对象数据流进行转换,过滤等等操作。
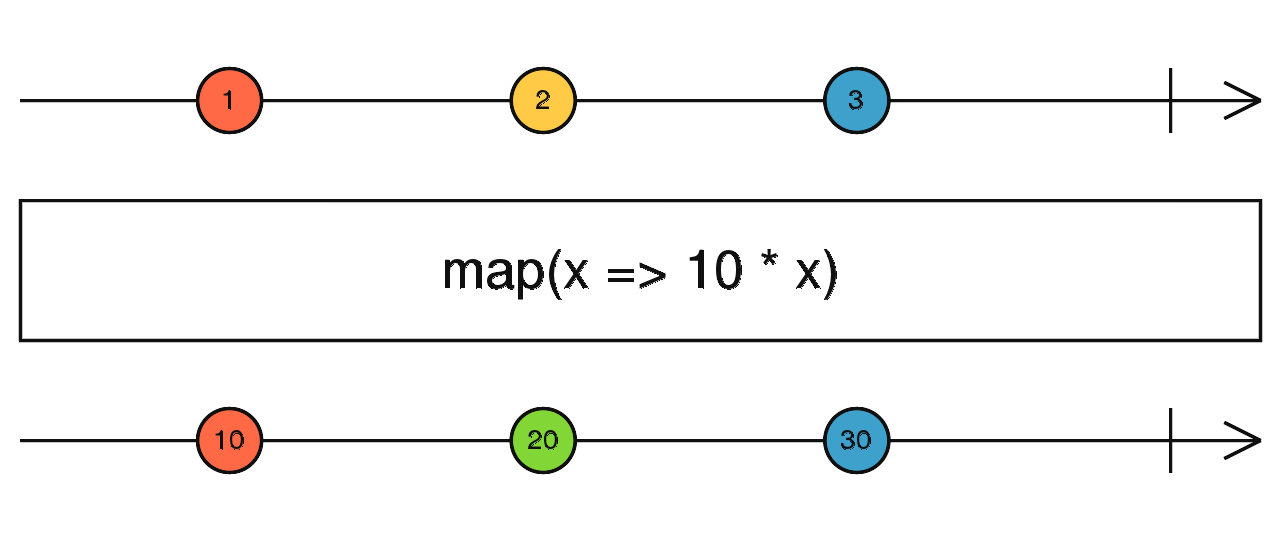
# 13.4.1 map、mapTo
map:对数据流进行转换,基于原有值进行转换。
import { interval } from "rxjs";
import { map } from "rxjs/operators";

interval(1000)
  .pipe(map((n) => n * 2))
  .subscribe((n) => console.log(n));
2
3
4
5
6
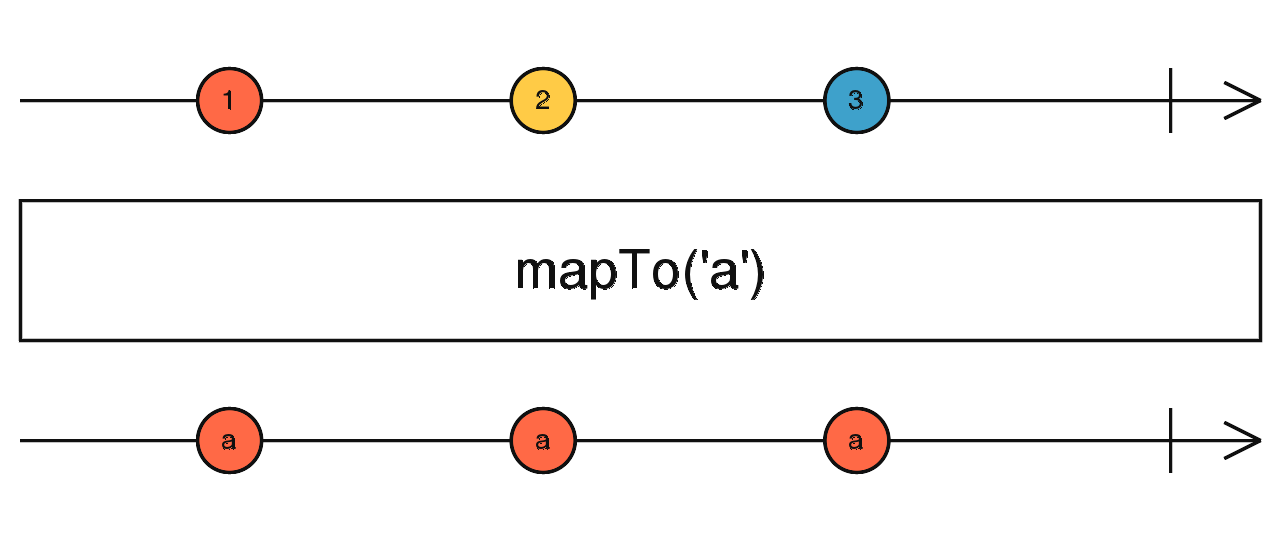
mapTo:对数据流进行转换,不关心原有值,可以直接传入要转换后的值。
import { interval } from "rxjs";
import { mapTo } from "rxjs/operators";

interval(1000)
  .pipe(mapTo({ msg: "接收到了数据流" }))
  .subscribe((msg) => console.log(msg));
2
3
4
5
6
# 13.4.2 filter
对数据流进行过滤。

import { range } from "rxjs";
import { filter } from "rxjs/operators";

range(1, 10)
  .pipe(filter((n) => n % 2 === 0))
  .subscribe((even) => console.log(even));
2
3
4
5
6
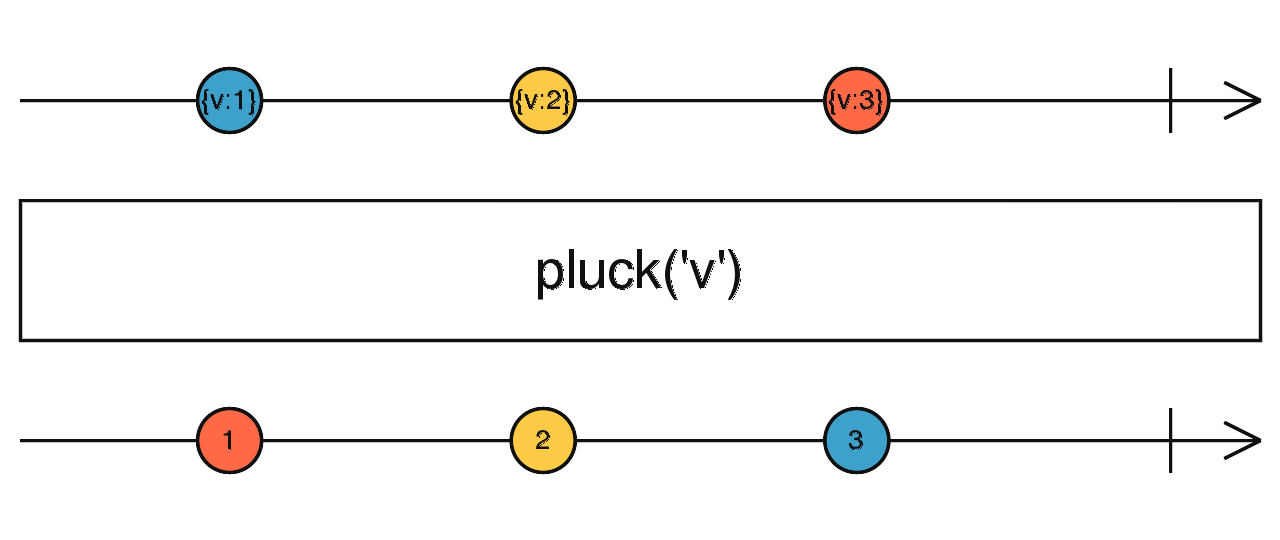
# 13.4.3 pluck
获取数据流对象中的属性值。
import { interval } from "rxjs";
import { pluck, mapTo } from "rxjs/operators";

interval(1000)
  .pipe(mapTo({ name: "张三", a: { b: "c" } }), pluck("a", "b"))
  .subscribe((n) => console.log(n));
2
3
4
5
6
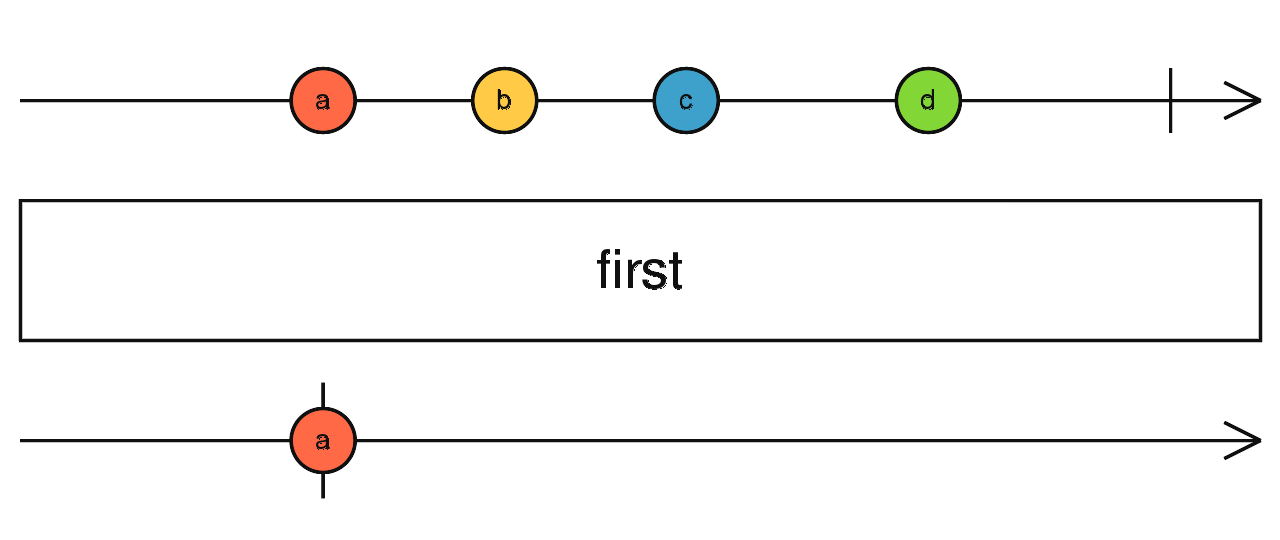
# 13.4.4 first
获取数据流中的第一个值或者查找数据流中第一个符合条件的值,类似数组中的 find 方法。获取到值以后终止行为。
import { interval } from "rxjs";
import { first } from "rxjs/operators";

interval(1000)
  .pipe(first())
  .subscribe((n) => console.log(n));

interval(1000)
  .pipe(first((n) => n === 3))
  .subscribe((n) => console.log(n));
2
3
4
5
6
7
8
9
10
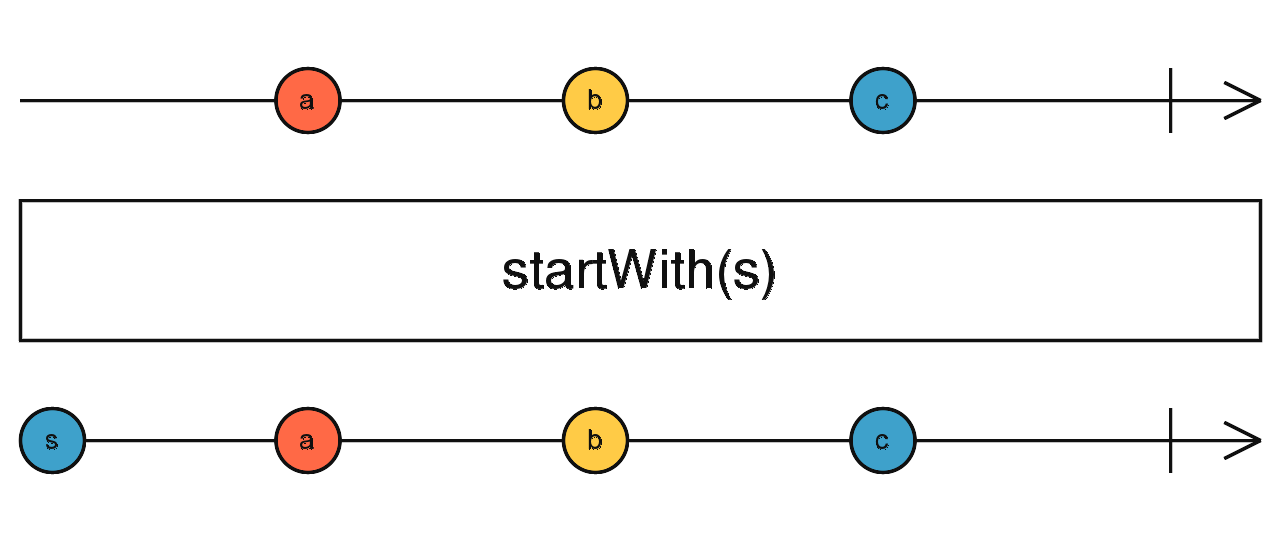
# 13.4.5 startWith
创建一个新的 observable 对象并将参数值发送出去,然后再发送源 observable 对象发出的值。
在异步编程中提供默认值的时候非常有用。
import { interval } from "rxjs";
import { map, startWith } from "rxjs/operators";

interval(1000)
  .pipe(
    map((n) => n + 100),
    startWith(505)
  )
  .subscribe((n) => console.log(n));
// 505
// 100
// 101
// 102
// ...
2
3
4
5
6
7
8
9
10
11
12
13
14
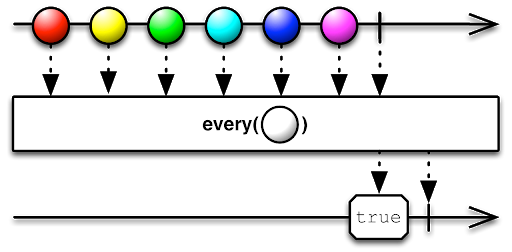
# 13.4.6 every
查看数据流中的每个值是否都符合条件,返回布尔值。类似数组中的 every 方法。
import { range } from "rxjs";
import { every, map } from "rxjs/operators";

range(1, 9)
  .pipe(
    map((n) => n * 2),
    every((n) => n % 2 === 0)
  )
  .subscribe((b) => console.log(b));
2
3
4
5
6
7
8
9
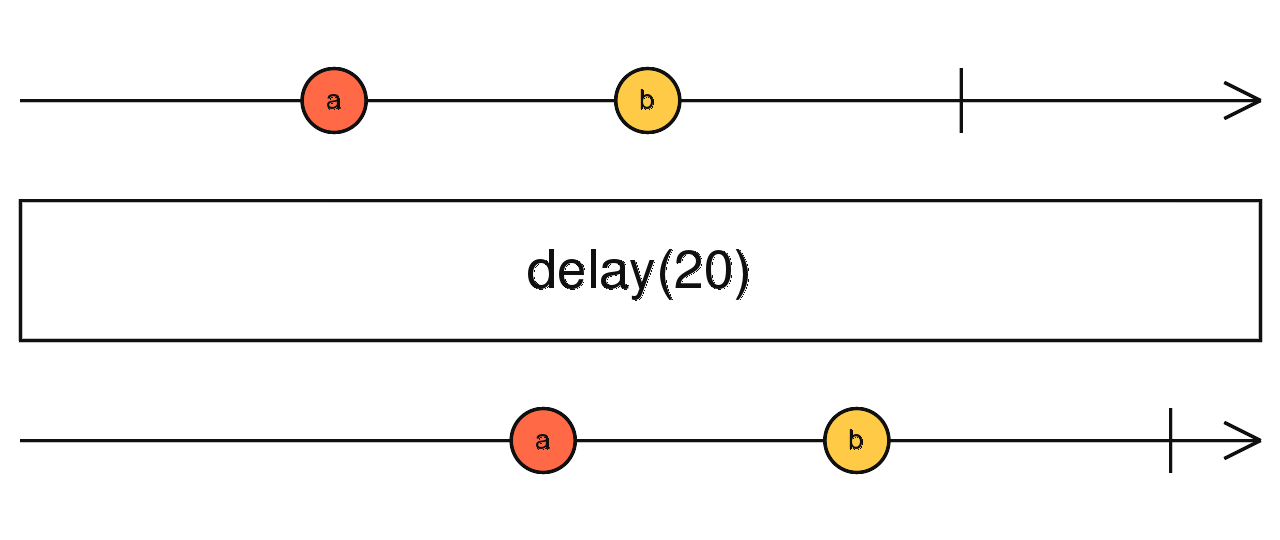
# 13.4.7 delay、delayWhen
delay:对上一环节的操作整体进行延迟,只执行一次。
import { from } from "rxjs";
import { delay, map, tap } from "rxjs/operators";

from([1, 2, 3])
  .pipe(
    delay(1000),
    tap((n) => console.log("已经延迟 1s", n)),
    map((n) => n * 2),
    delay(1000),
    tap(() => console.log("又延迟了 1s"))
  )
  .subscribe(console.log);

// tap 操作符不会对数据流造成影响, 它被用来执行简单的副作用, 比如输出, 但是复杂的副作用不要在这执行, 比如 Ajax
2
3
4
5
6
7
8
9
10
11
12
13
14
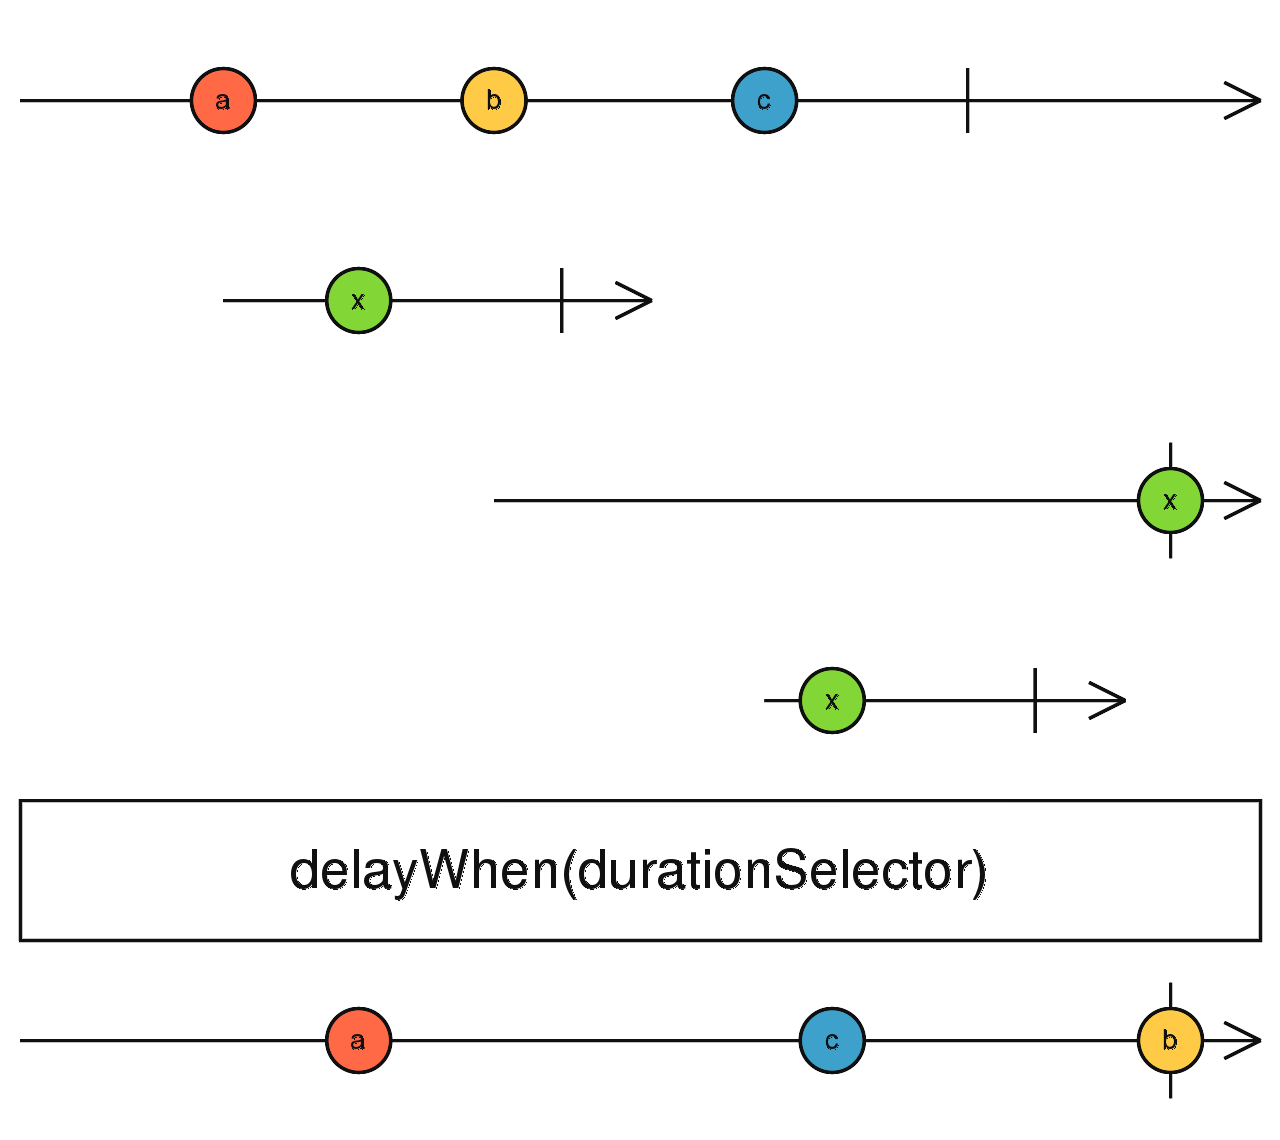
delayWhen:对上一环节的操作进行延迟,上一环节发出多少数据流,传入的回调函数就会执行多次。
import { range, timer } from "rxjs";
import { delayWhen } from "rxjs/operators";

range(1, 10)
  .pipe(
    delayWhen((n) => {
      console.log(n);
      return timer(n * 1000);
    })
  )
  .subscribe(console.log);
2
3
4
5
6
7
8
9
10
11
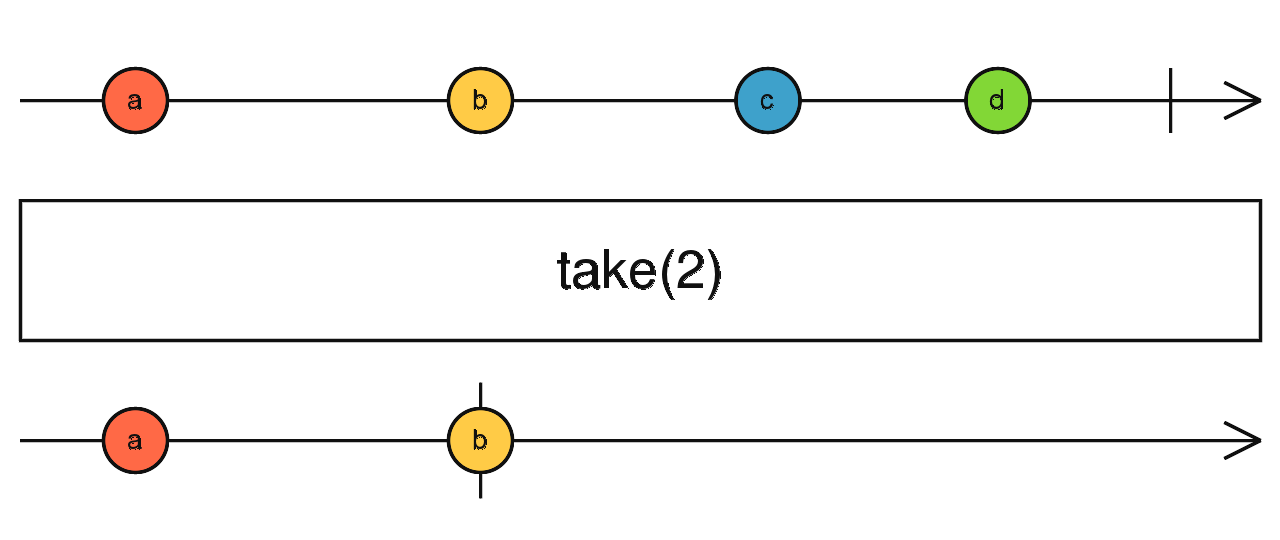
# 13.4.8 take、takeWhile、takeUtil
take:获取数据流中的前几个
import { range } from "rxjs";
import { take } from "rxjs/operators";

range(1, 10).pipe(take(5)).subscribe(console.log);
2
3
4
takeWhile:根据条件从数据源前面开始获取。

import { range } from "rxjs";
import { takeWhile } from "rxjs/operators";

range(1, 10)
  .pipe(takeWhile((n) => n < 8))
  .subscribe(console.log);
2
3
4
5
6
takeUntil:接收可观察对象,当可观察对象发出值时,终止主数据源。
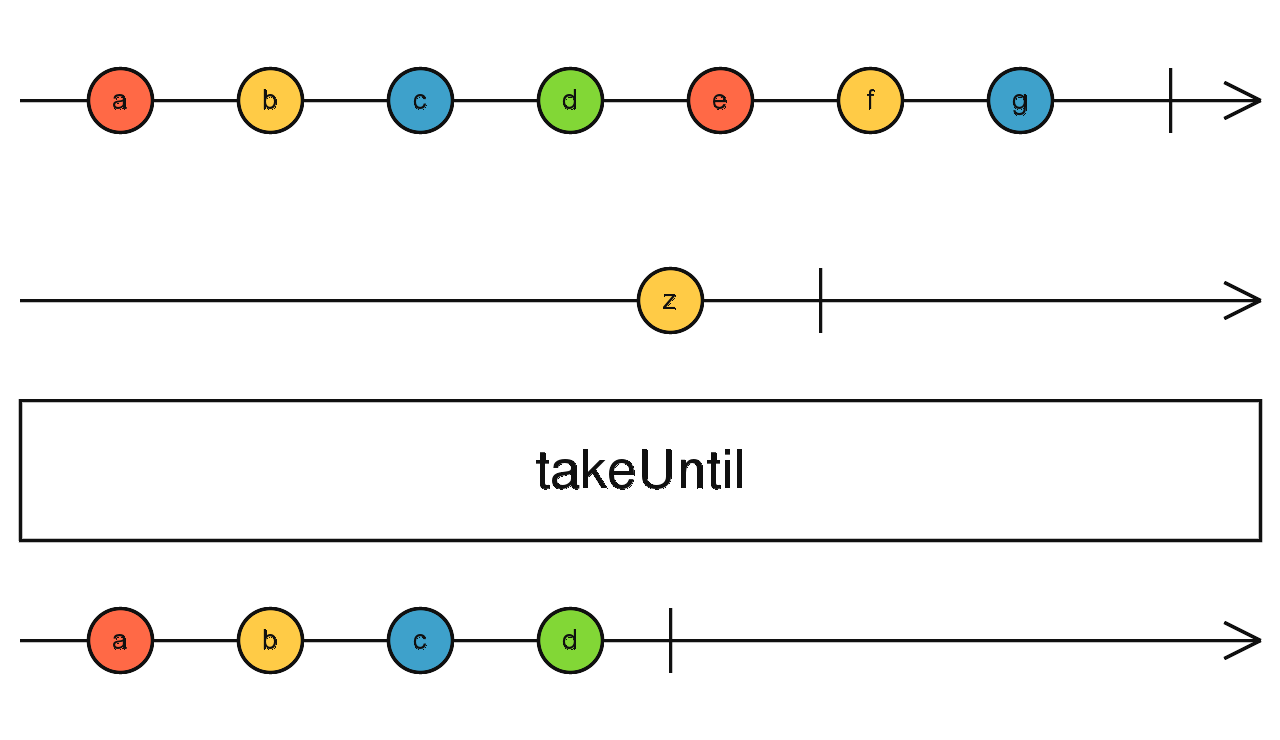
import { interval, timer } from "rxjs";
import { takeUntil } from "rxjs/operators";

interval(100)
  .pipe(takeUntil(timer(2000)))
  .subscribe(console.log);
// 结果少两个数据流的原因:第一次和最后一次,都需要延迟 100 毫秒。
2
3
4
5
6
7
# 13.4.9 skip、skipWhile、skipUntil
skip:跳过前几个数据流。
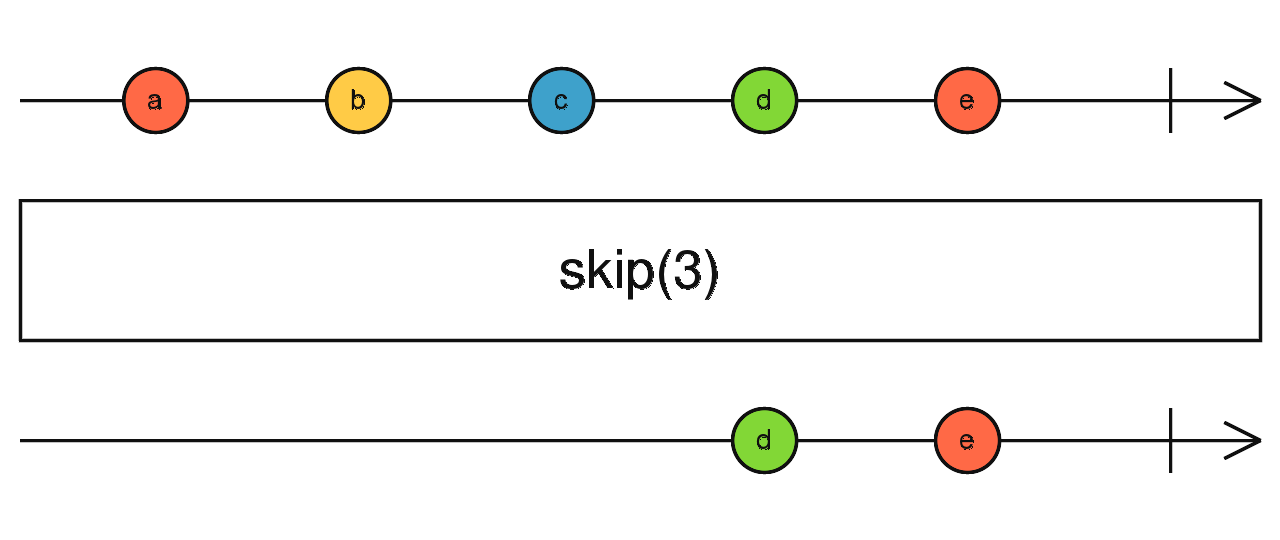
import { range } from "rxjs";
import { skip } from "rxjs/operators";

range(1, 10).pipe(skip(5)).subscribe(console.log);
2
3
4
skipWhile:根据条件进行数据流的跳过。
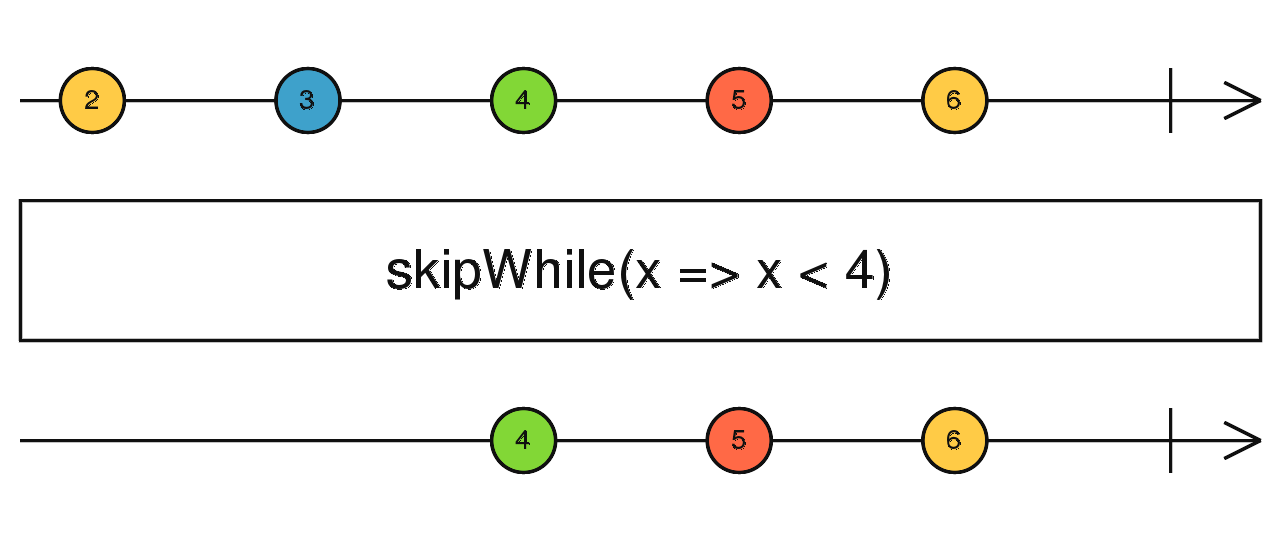
import { range } from "rxjs";
import { skipWhile } from "rxjs/operators";

range(1, 10)
  .pipe(skipWhile((n) => n < 5))
  .subscribe(console.log);
2
3
4
5
6
skipUntil:跳过数据源中前多少时间发出的数据流,发送从这个时间以后数据源中发送的数据流。
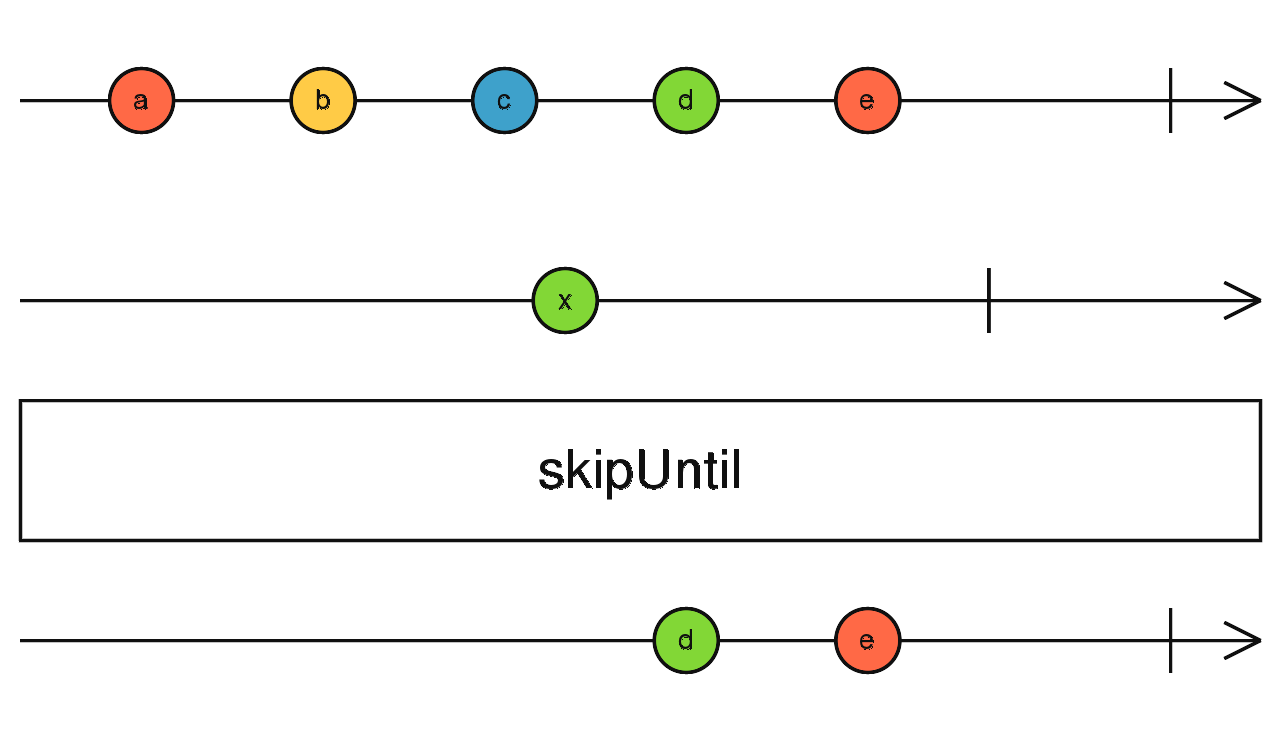
import { timer, interval } from "rxjs";
import { skipUntil } from "rxjs/operators";

interval(100)
  .pipe(skipUntil(timer(2000)))
  .subscribe(console.log);
2
3
4
5
6
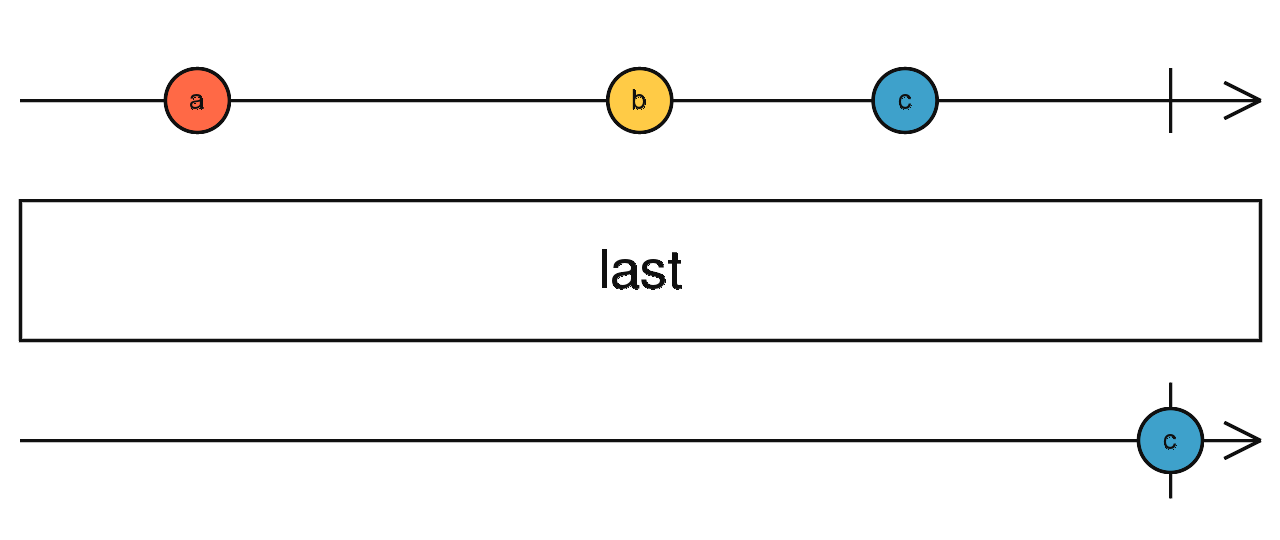
# 13.4.10 last
获取数据流中的最后一个。
import { range } from "rxjs";
import { last } from "rxjs/operators";

range(1, 10).pipe(last()).subscribe(console.log);
2
3
4
如果数据源不变成完成状态,则没有最后一个。
import { interval } from "rxjs";
import { last, take } from "rxjs/operators";

interval(1000).pipe(take(5), last()).subscribe(console.log);
2
3
4
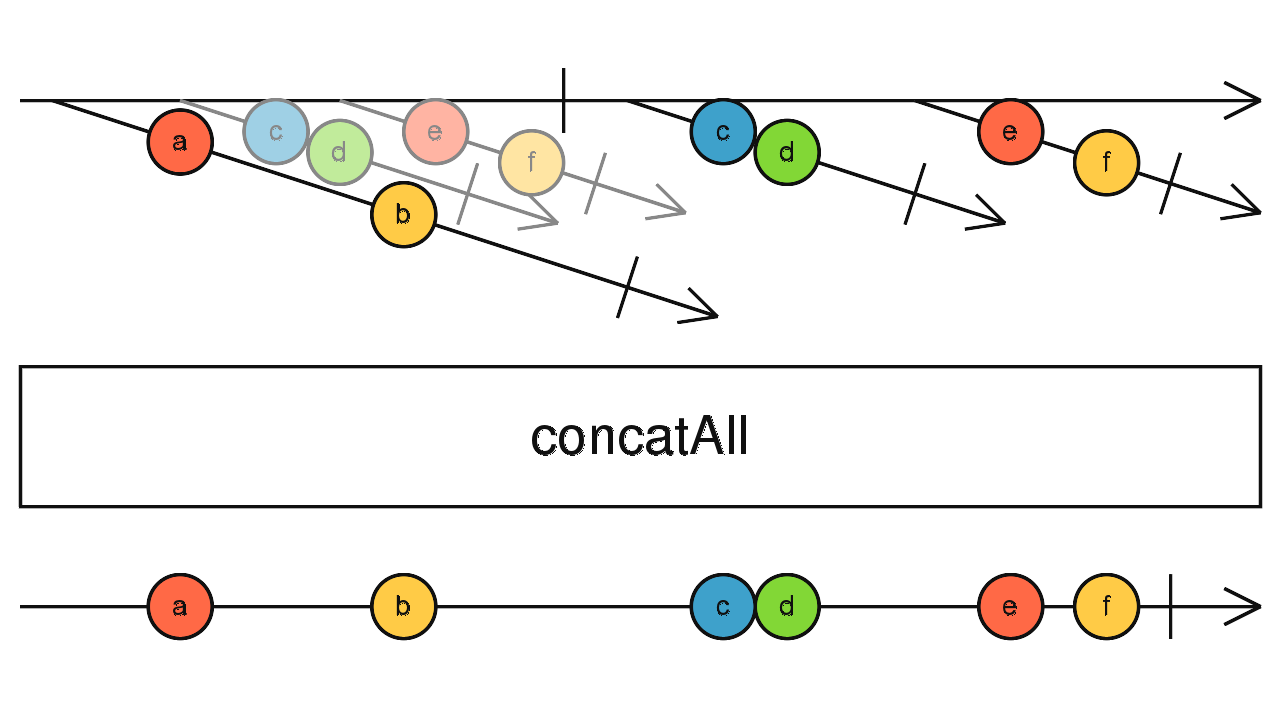
# 13.4.11 concatAll、concatMap
concatAll:有时 Observable 发出的又是一个 Obervable,concatAll 的作用就是将新的可观察对象和数据源进行合并。
Observable => [1, 2, 3]
Observable => [Observable, Observable]
import { fromEvent, interval } from "rxjs";
import { map, take, concatAll } from "rxjs/operators";

fromEvent(document, "click")
  .pipe(
    map((event) => interval(1000).pipe(take(2))),
    concatAll()
  )
  .subscribe(console.log);
2
3
4
5
6
7
8
9
import { map, concatAll } from "rxjs/operators";
import { of, interval } from "rxjs";

interval(1000)
  .pipe(
    map((val) => of(val + 10)),
    concatAll()
  )
  .subscribe(console.log);
2
3
4
5
6
7
8
9
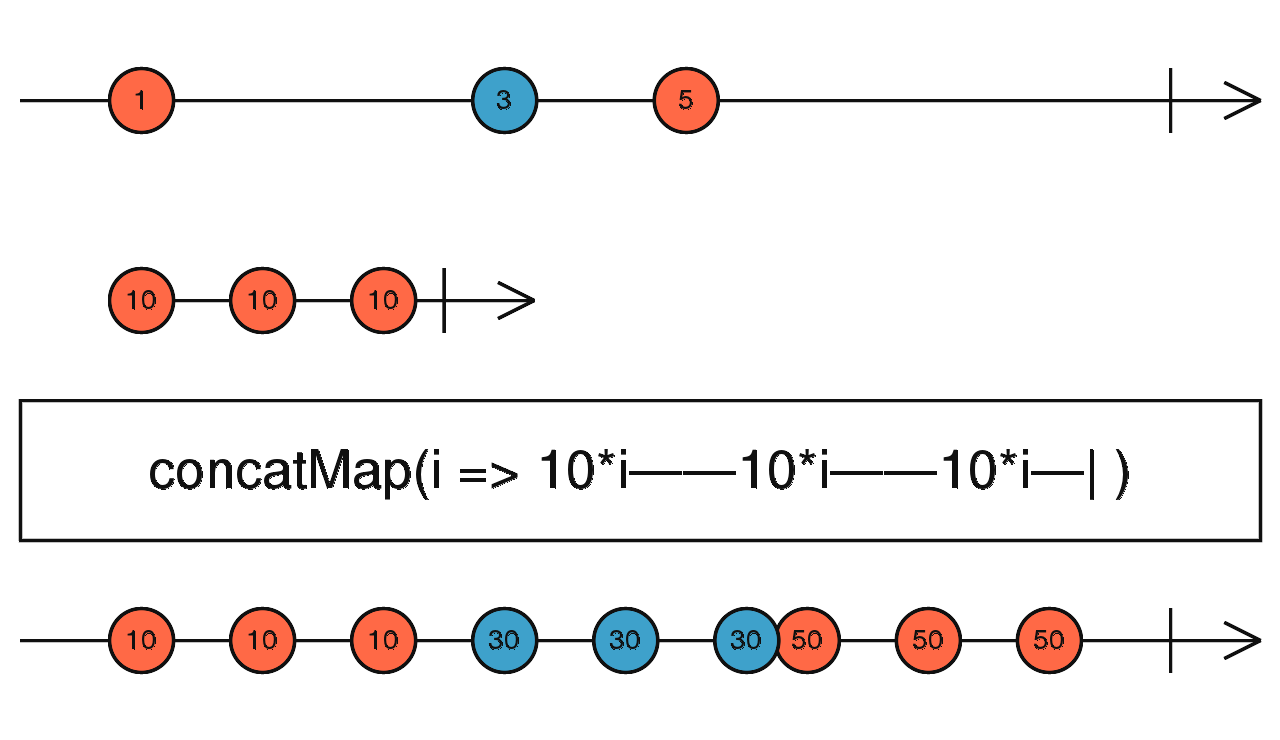
concatMap:合并可观察对象并处理其发出的数据流。
# 13.4.13 reduce、scan
reduce: 类似 JavaScript 数组中的 reduce,对数数据进行累计操作。reduce 会等待数据源中的数据流发送完成后再执行,执行时 reduce 内部遍历每一个数据流进行累计操作,操作完成得到结果将结果作为数据流发出。

import { interval } from "rxjs";
import { take, reduce } from "rxjs/operators";

interval(500)
  .pipe(
    take(5),
    reduce((acc, value) => (acc += value), 0)
  )
  .subscribe((v) => console.log());
2
3
4
5
6
7
8
9
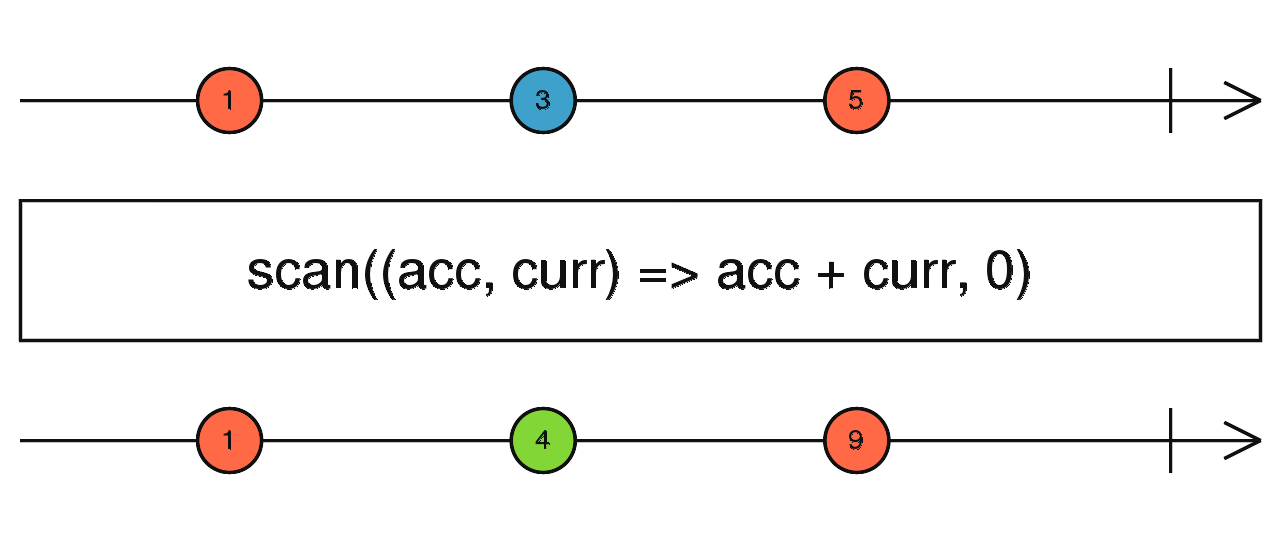
scan:类似 reduce,进行累计操作,但执行时机不同,数据源每次发出数据流 scan 都会执行。reduce 是发送出最终计算的结果,而 scan 是发出每次计算的结果。
import { interval } from "rxjs";
import { take, scan } from "rxjs/operators";

interval(500)
  .pipe(
    take(5),
    scan((acc, value) => (acc += value), 0)
  )
  .subscribe((v) => console.log());
2
3
4
5
6
7
8
9
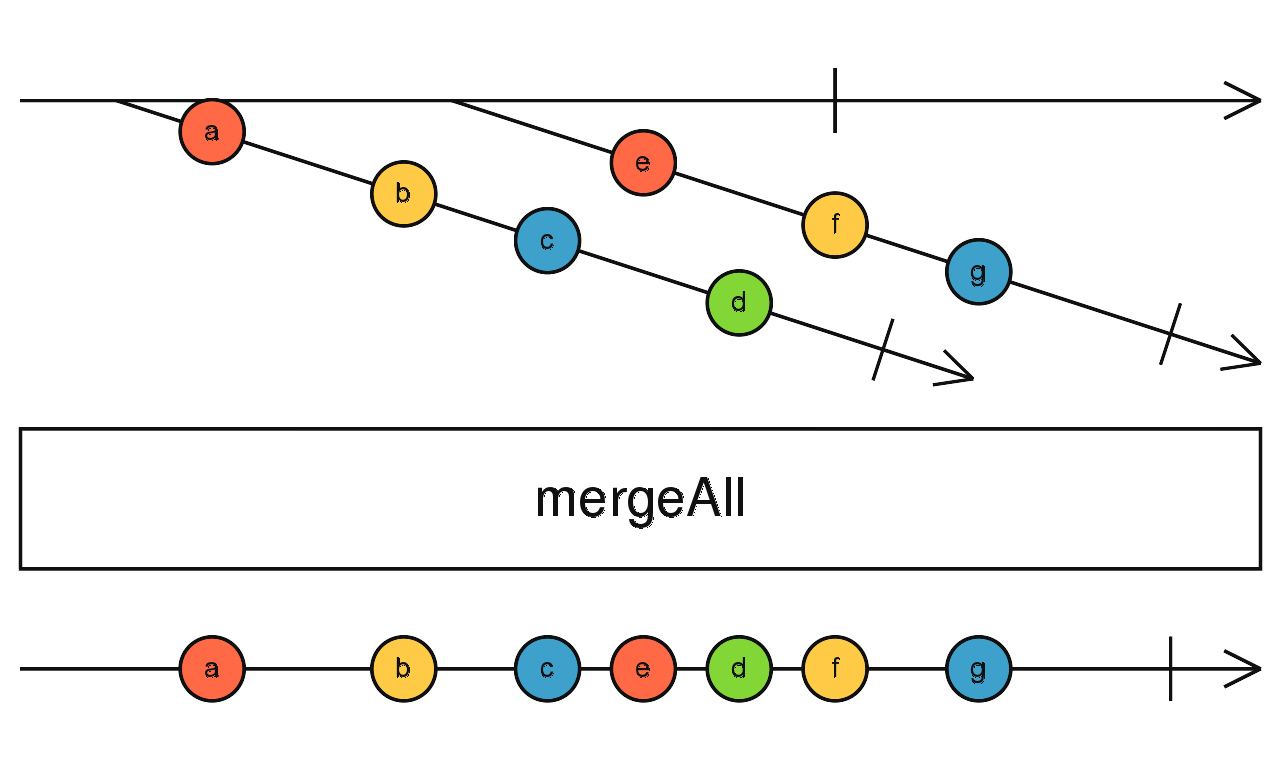
# 13.4.14 mergeAll、mergeMap
mergeAll:交叉合并可观察对象。
import { fromEvent, interval } from "rxjs";
import { map, mergeAll } from "rxjs/operators";

fromEvent(document, "click")
  .pipe(
    map(() => interval(1000)),
    mergeAll()
  )
  .subscribe(console.log);
2
3
4
5
6
7
8
9
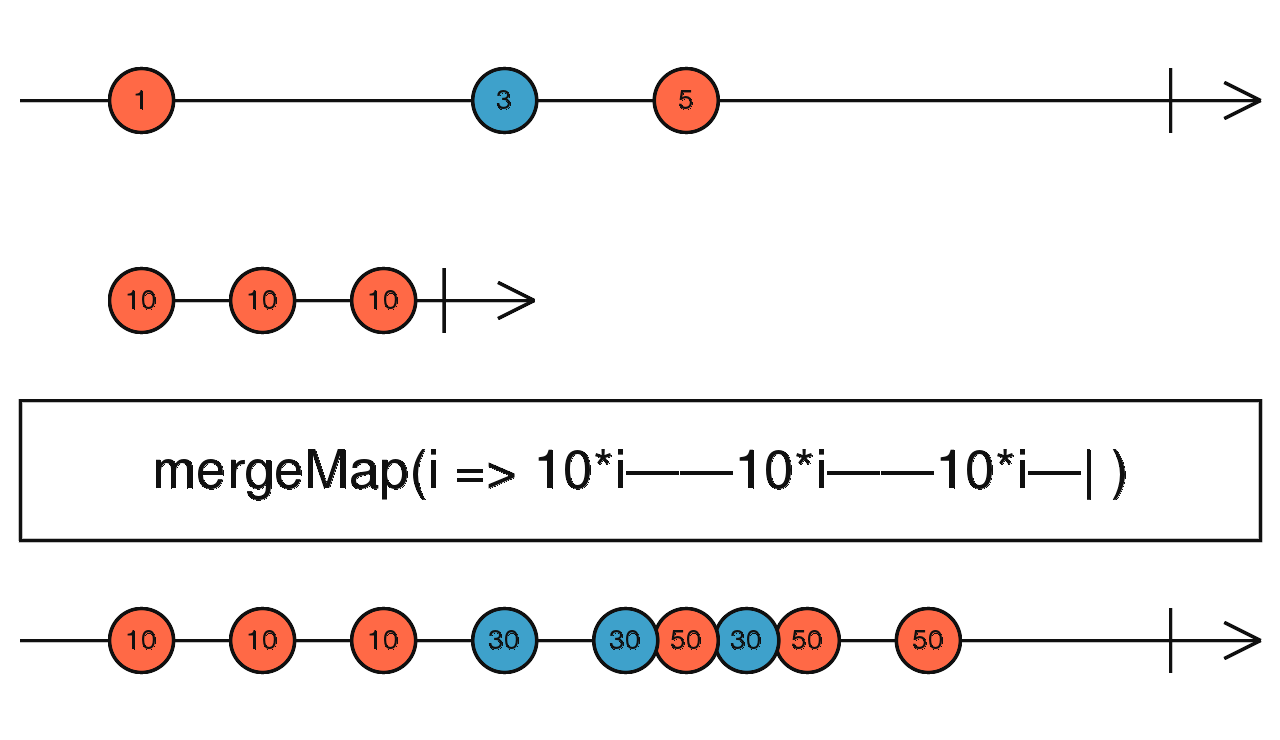
mergeMap:交叉合并可观察对象以后对可观察对象发出的数据流进行转换。
import { of, interval } from "rxjs";
import { mergeMap, map } from "rxjs/operators";

of("a", "b", "c")
  .pipe(mergeMap((x) => interval(1000).pipe(map((i) => x + i))))
  .subscribe((x) => console.log(x));
2
3
4
5
6
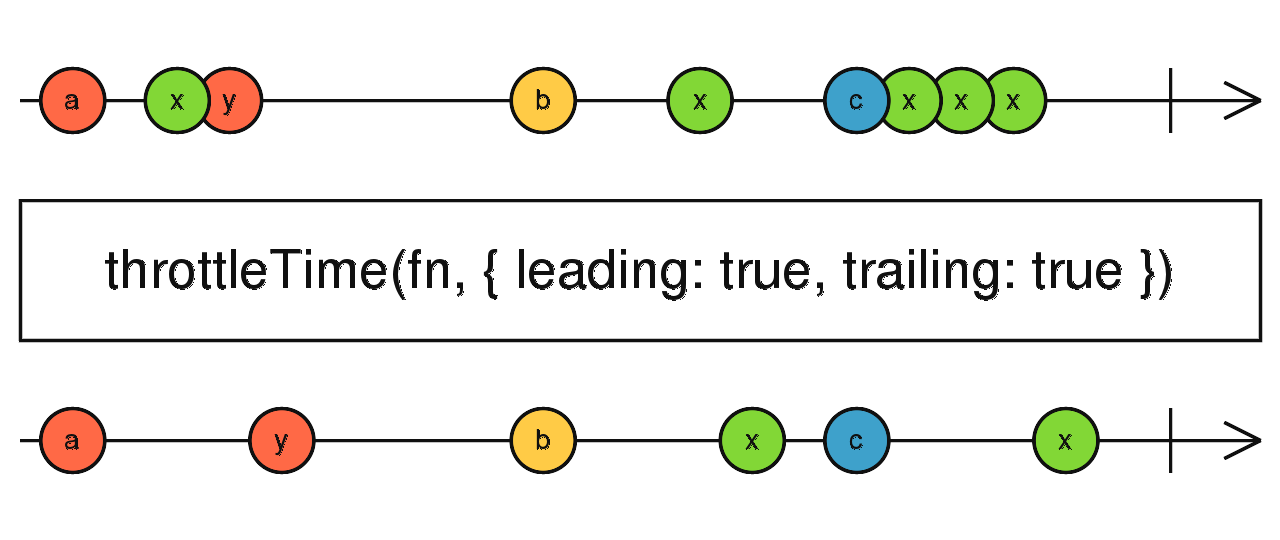
# 13.4.15 throttleTime
节流,可观察对象高频次向外部发出数据流,通过 throttleTime 限制在规定时间内每次只向订阅者传递一次数据流。
import { fromEvent } from "rxjs";
import { throttleTime } from "rxjs/operators";

fromEvent(document, "click")
  .pipe(throttleTime(2000))
  .subscribe((x) => console.log(x));
2
3
4
5
6
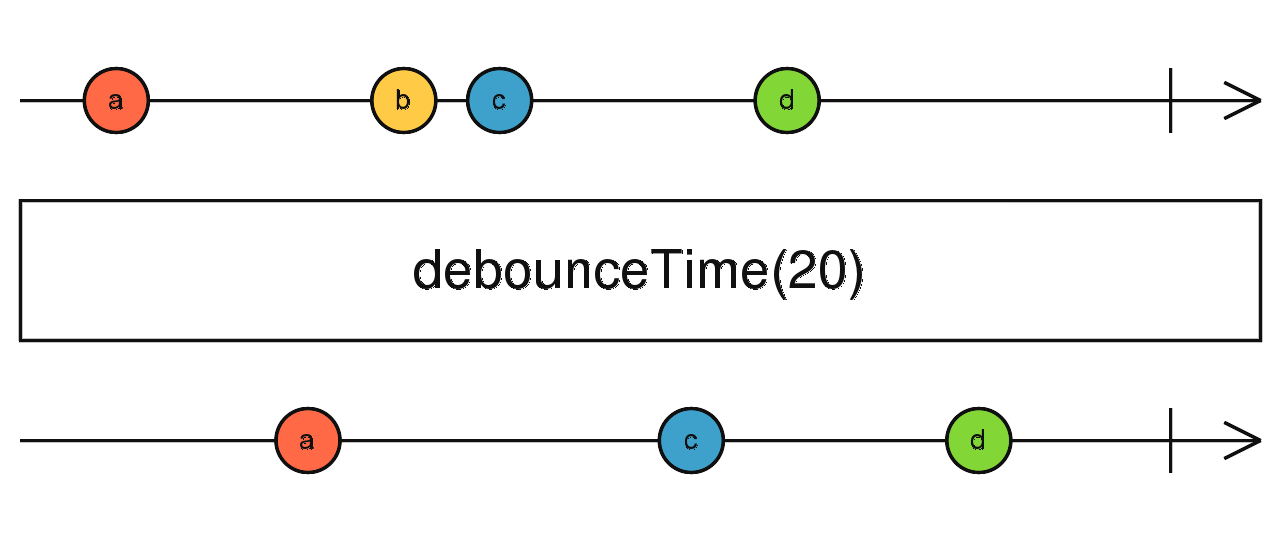
# 13.4.16 debounceTime
防抖,触发高频事件,只响应最后一次。
import { fromEvent } from "rxjs";
import { debounceTime } from "rxjs/operators";

fromEvent(document, "click")
  .pipe(debounceTime(1000))
  .subscribe((x) => console.log(x));
2
3
4
5
6
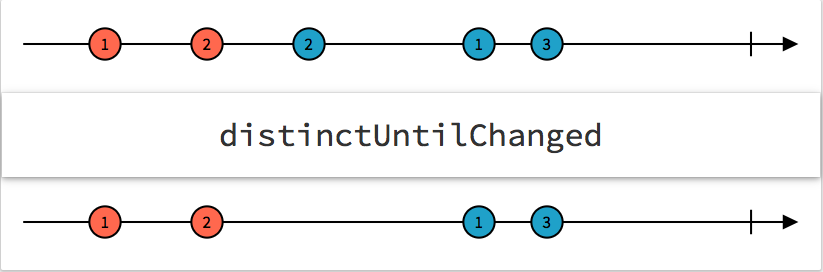
# 13.4.17 distinctUntilChanged
检测数据源当前发出的数据流是否和上次发出的相同,如相同,跳过,不相同,发出。
import { of } from "rxjs";
import { distinctUntilChanged } from "rxjs/operators";

of(1, 1, 2, 2, 2, 1, 1, 2, 3, 3, 4)
  .pipe(distinctUntilChanged())
  .subscribe((x) => console.log(x)); // 1, 2, 1, 2, 3, 4
2
3
4
5
6
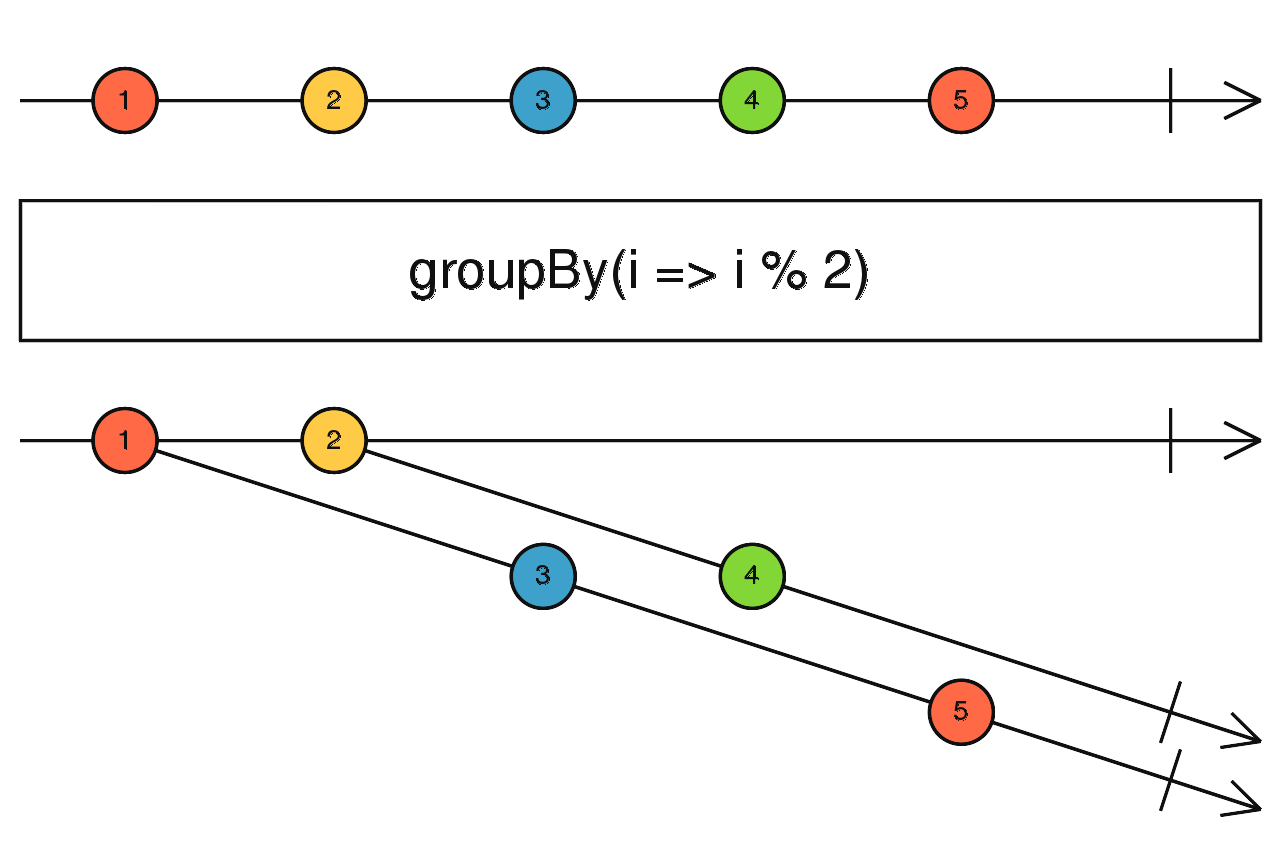
# 13.4.18 groupBy
对数据流进行分组。
import { of } from "rxjs";
import { mergeMap, groupBy, toArray } from "rxjs/operators";

of({ name: "Sue", age: 25 }, { name: "Joe", age: 30 }, { name: "Frank", age: 25 }, { name: "Sarah", age: 35 })
  .pipe(
    groupBy((person) => person.age),
    mergeMap((group) => group.pipe(toArray()))
  )
  .subscribe(console.log);

// [{name: "Sue", age: 25}, { name: "Frank", age: 25 }]
// [{ name: "Joe", age: 30 }]
// [{ name: "Sarah", age: 35 }]
2
3
4
5
6
7
8
9
10
11
12
13
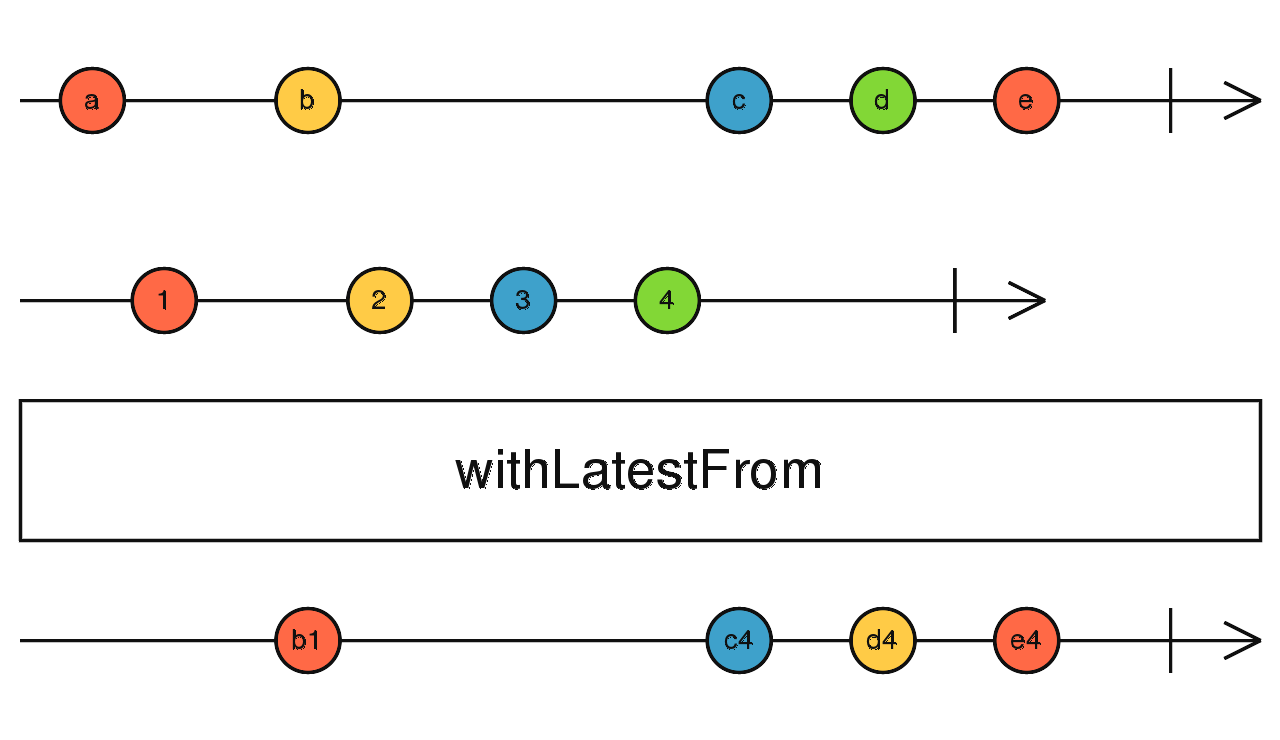
# 13.4.19 withLatestFrom
主数据源发出的数据流总是和支数据源中的最新数据流进行结合,返回数组。
import { fromEvent, interval } from "rxjs";
import { withLatestFrom } from "rxjs/operators";

const clicks = fromEvent(document, "click");
const timer = interval(1000);
clicks.pipe(withLatestFrom(timer)).subscribe(console.log);
2
3
4
5
6
# 13.4.20 switchMap
切换可观察对象。

import { fromEvent, interval } from "rxjs";
import { switchMap } from "rxjs/operators";

fromEvent(document, "click")
  .pipe(switchMap((ev) => interval(1000)))
  .subscribe((x) => console.log(x));
2
3
4
5
6
# 13.5 练习
# 13.5.1 元素拖拽
<style>
  #box {
    width: 200px;
    height: 200px;
    background: skyblue;
    position: absolute;
    left: 0;
    top: 0;
  }
</style>
<div id="box"></div>
2
3
4
5
6
7
8
9
10
11
// 原生 JavaScript
box.onmousedown = function (event) {
  let distanceX = event.clientX - event.target.offsetLeft;
  let distanceY = event.clientY - event.target.offsetTop;
  document.onmousemove = function (event) {
    let positionX = event.clientX - distanceX;
    let positionY = event.clientY - distanceY;
    box.style.left = positionX + "px";
    box.style.top = positionY + "px";
  };
  box.onmouseup = function () {
    document.onmousemove = null;
  };
};
2
3
4
5
6
7
8
9
10
11
12
13
14
// RxJS
import { fromEvent } from "rxjs";
import { map, switchMap, takeUntil } from "rxjs/operators";

const box = document.getElementById("box");

fromEvent(box, "mousedown")
  .pipe(
    map((event) => ({
      distanceX: event.clientX - event.target.offsetLeft,
      distanceY: event.clientY - event.target.offsetTop,
    })),
    switchMap(({ distanceX, distanceY }) =>
      fromEvent(document, "mousemove").pipe(
        map((event) => ({
          positionX: event.clientX - distanceX,
          positionY: event.clientY - distanceY,
        })),
        takeUntil(fromEvent(document, "mouseup"))
      )
    )
  )
  .subscribe(({ positionX, positionY }) => {
    box.style.left = positionX + "px";
    box.style.top = positionY + "px";
  });
2
3
4
5
6
7
8
9
10
11
12
13
14
15
16
17
18
19
20
21
22
23
24
25
26
# 13.5.2 搜索
<input id="search" type="text" placeholder="请输入搜索内容..." />
import { fromEvent, from, throwError } from "rxjs";
import { debounceTime, distinctUntilChanged, map, switchMap, catchError } from "rxjs/operators";
import axios from "axios";

const search = document.getElementById("search");

fromEvent(search, "keyup")
  .pipe(
    debounceTime(700),
    map((event) => event.target.value),
    distinctUntilChanged(),
    switchMap((keyword) =>
      from(axios.get(`https://j1sonplaceholder.typicode.com/posts?q=${keyword}`)).pipe(
        map((response) => response.data),
        catchError((error) => throwError(`发生了错误: ${error.message}`))
      )
    )
  )
  .subscribe({
    next: (value) => {
      console.log(value);
    },
    error: (error) => {
      console.log(error);
    },
  });
2
3
4
5
6
7
8
9
10
11
12
13
14
15
16
17
18
19
20
21
22
23
24
25
26
# 13.5.3 串联请求
先获取 token,再根据 token 获取用户信息
<button id="btn">获取用户信息</button>
import axios from "axios";
import { from, fromEvent } from "rxjs";
import { pluck, concatMap } from "rxjs/operators";

const button = document.getElementById("btn");

fromEvent(button, "click")
  .pipe(
    concatMap((event) => from(axios.get("http://localhost:3005/token")).pipe(pluck("data", "token"))),
    concatMap((token) => from(axios.get("http://localhost:3005/userInfo")).pipe(pluck("data")))
  )
  .subscribe(console.log);
2
3
4
5
6
7
8
9
10
11
12
# 13.6 RxJS 的四种不同类型 Subject
| Observable | Subject | BehaviorSubject | AsyncSubject | ReplaySubject |
|---|---|---|---|---|
| 每次从源头开始将值推送给观察者 | 将值多播给已订阅的该 Subject 的观察者列表 | 把最后一个值(当前值)发送给观察者(需要一个初始值) | 执行的最后一个值发给观察者 | 可以把之前错过的值发给观察者 |
# 14. HttpClientModule
该模块用于发送 Http 请求,用于发送请求的方法都返回 Observable 对象。
# 14.1 快速开始
- 引入 HttpClientModule 模块
// app.module.ts
import { httpClientModule } from "@angular/common/http";
imports: [httpClientModule];
2
3
- 注入 HttpClient 服务实例对象,用于发送请求
// app.component.ts
import { HttpClient } from '@angular/common/http';
export class AppComponent {
constructor(private http: HttpClient) {}
}
2
3
4
5
6
- 发送请求
import { HttpClient } from "@angular/common/http"
export class AppComponent implements OnInit {
constructor(private http: HttpClient) {}
ngOnInit() {
this.getUsers().subscribe(console.log)
}
getUsers() {
return this.http.get("https://jsonplaceholder.typicode.com/users")
}
}
2
3
4
5
6
7
8
9
10
11
# 14.2 请求方法
this.http.get(url [, options]);
this.http.post(url, data [, options]);
this.http.delete(url [, options]);
this.http.put(url, data [, options]);
2
3
4
this.http.get<Post[]>('/getAllPosts')
.subscribe(response => console.log(response))
2
# 14.3 请求参数
- HttpParams 类
export declare class HttpParams {
constructor(options?: HttpParamsOptions);
has(param: string): boolean;
get(param: string): string | null;
getAll(param: string): string[] | null;
keys(): string[];
append(param: string, value: string): HttpParams;
set(param: string, value: string): HttpParams;
delete(param: string, value?: string): HttpParams;
toString(): string;
}
2
3
4
5
6
7
8
9
10
11
- HttpParamsOptions 接口
declare interface HttpParamsOptions {
fromString?: string;
fromObject?: {
[param: string]: string | ReadonlyArray<string>,
};
encoder?: HttpParameterCodec;
}
2
3
4
5
6
7
- 使用示例
import { HttpParams } from "@angular/common/http";
let params = new HttpParams({ fromObject: { name: "zhangsan", age: "20" } });
params = params.append("sex", "male");
let params = new HttpParams({ fromString: "name=zhangsan&age=20" });
2
3
4
5
# 14.4 请求头
请求头字段的创建需要使用 HttpHeaders 类,在类实例对象下面有各种操作请求头的方法。
export declare class HttpHeaders {
constructor(headers?: string | {
[name: string]: string | string[];
});
has(name: string): boolean;
get(name: string): string | null;
keys(): string[];
getAll(name: string): string[] | null;
append(name: string, value: string | string[]): HttpHeaders;
set(name: string, value: string | string[]): HttpHeaders;
delete(name: string, value?: string | string[]): HttpHeaders;
}
2
3
4
5
6
7
8
9
10
11
12
let headers = new HttpHeaders({ test: "Hello" });
# 14.5 响应内容
declare type HttpObserve = "body" | "response";
// response 读取完整响应体
// body 读取服务器端返回的数据
2
3
this.http.get("https://jsonplaceholder.typicode.com/users", { observe: "body" }).subscribe(console.log);
# 14.6 拦截器
拦截器是 Angular 应用中全局捕获和修改 HTTP 请求和响应的方式。(Token、Error)。
拦截器将只拦截使用 HttpClientModule 模块发出的请求。ng g interceptor <name>


# 14.6.1 请求拦截
@Injectable()
export class AuthInterceptor implements HttpInterceptor {
constructor() {}
// 拦截方法
intercept(
// unknown 指定请求体 (body) 的类型
request: HttpRequest<unknown>,
next: HttpHandler
// unknown 指定响应内容 (body) 的类型
): Observable<HttpEvent<unknown>> {
// 克隆并修改请求头
const req = request.clone({
setHeaders: {
Authorization: "Bearer xxxxxxx",
},
});
// 通过回调函数将修改后的请求头回传给应用
return next.handle(req);
}
}
2
3
4
5
6
7
8
9
10
11
12
13
14
15
16
17
18
19
20
# 14.6.2 响应拦截
@Injectable()
export class AuthInterceptor implements HttpInterceptor {
constructor() {}
// 拦截方法
intercept(request: HttpRequest<unknown>, next: HttpHandler): Observable<any> {
return next.handle(request).pipe(
retry(2),
catchError((error: HttpErrorResponse) => throwError(error))
);
}
}
2
3
4
5
6
7
8
9
10
11
# 14.6.3 拦截器注入
import { AuthInterceptor } from "./auth.interceptor"
import { HTTP_INTERCEPTORS } from "@angular/common/http"
@NgModule({
providers: [
{
provide: HTTP_INTERCEPTORS,
useClass: AuthInterceptor,
multi: true
}
]
})
2
3
4
5
6
7
8
9
10
11
12
# 14.7 Angular Proxy
- 在项目的根目录下创建
proxy.conf.json文件并加入如下代码
{
"/api/*": {
"target": "http://localhost:3070",
"secure": false,
"changeOrigin": true
}
}
2
3
4
5
6
7
/api/*:在应用中发出的以/api开头的请求走此代理target:服务器端 URLsecure:如果服务器端 URL 的协议是 https,此项需要为 truechangeOrigin:如果服务器端不是 localhost, 此项需要为 true指定 proxy 配置文件 (方式一)
"scripts": {
"start": "ng serve --proxy-config proxy.conf.json",
}
2
3
- 指定 proxy 配置文件 (方式二)
"serve": {
"options": {
"proxyConfig": "proxy.conf.json"
},
2
3
4
# 14.8 跨域
上面使用 proxy 已经可以搞定绝大部分需求,还可以使用 jsonp。注意,下面的代码只是示意,不是在同一个文件里的!
// app.module.ts
// 如果需要用到jsonp解决跨域请求问题,还需要引入HttpClientJsonpModule
import { HttpClientModule, HttpClientJsonpModule } from "@angular/common/http";
// 如果用到了JOSNP,那么也需要在app.module.ts模块配置中配置一下
imports: [BrowserModule, HttpClientModule, HttpClientJsonpModule];
// http.service.ts
let api: any = "http://www.jiekou.com/api";
// 第一个参数是接口地址,第二个参数callback是回调函数
this.http.jsonp(api, "callback").subscribe((response) => {
console.log(response);
});
2
3
4
5
6
7
8
9
10
11
12
在展示 jsonp 请求代码之前,有几点要提一下:
- 如果你的后台代码不允许跨域,那么我们用 jsonp 去解决跨域没啥问题。
- jsonp 请求有个前提就是,你的服务器需要支持 jsonp 请求
- 当然,如果你的后台允许你进行跨域请求,那你正常请求即可,不需要用到 jsonp
# 15. NgRx
# 15.1 概述
NgRx 是 Angular 应用中实现全局状态管理的 Redux 架构解决方案。
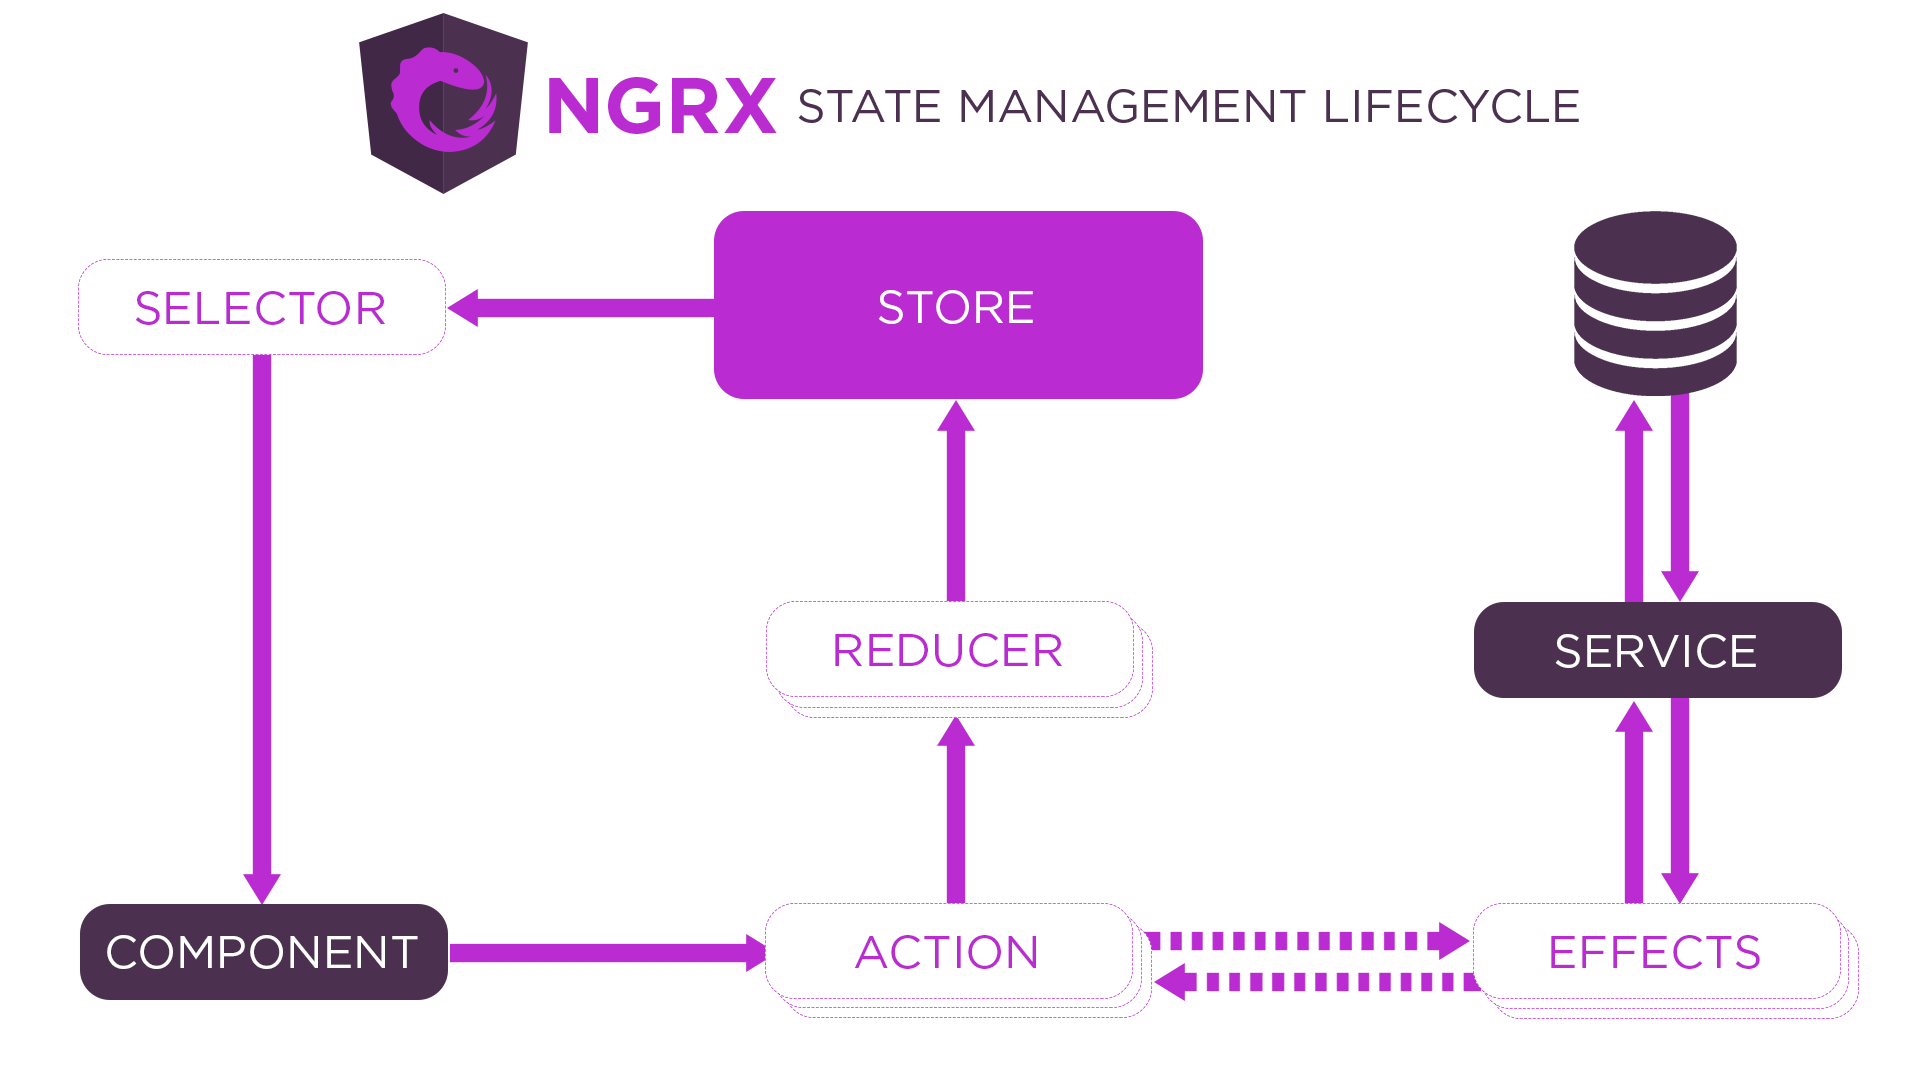
@ngrx/store:全局状态管理模块@ngrx/effects:处理副作用@ngrx/store-devtools:浏览器调试工具,需要依赖 Redux Devtools Extension (opens new window)@ngrx/schematics:命令行工具,快速生成 NgRx 文件@ngrx/entity:提高开发者在 Reducer 中操作数据的效率@ngrx/router-store:将路由状态同步到全局 Store
# 15.2 快速开始
- 下载 NgRx
npm install @ngrx/store @ngrx/effects @ngrx/entity @ngrx/router-store @ngrx/store-devtools @ngrx/schematics
- 配置 NgRx CLI
ng config cli.defaultCollection @ngrx/schematics
// angular.json
"cli": {
"defaultCollection": "@ngrx/schematics"
}
2
3
4
- 创建 Store
ng g store State --root --module app.module.ts --statePath store --stateInterface AppState
- 创建 Action
ng g action store/actions/counter --skipTests
import { createAction } from "@ngrx/store";
export const increment = createAction("increment");
export const decrement = createAction("decrement");
2
3
4
- 创建 Reducer
ng g reducer store/reducers/counter --skipTests --reducers=../index.ts
import { createReducer, on } from "@ngrx/store";
import { decrement, increment } from "../actions/counter.actions";
export const counterFeatureKey = "counter";
export interface State {
count: number;
}
export const initialState: State = {
count: 0,
};
export const reducer = createReducer(
initialState,
on(increment, (state) => ({ count: state.count + 1 })),
on(decrement, (state) => ({ count: state.count - 1 }))
);
2
3
4
5
6
7
8
9
10
11
12
13
14
15
16
17
18
- 创建 Selector
ng g selector store/selectors/counter --skipTests
import { createFeatureSelector, createSelector } from "@ngrx/store"
import { counterFeatureKey, State } from "../reducers/counter.reducer"
import { AppState } from ".."
export const selectCounter = createFeatureSelector<AppState, State>(counterFeatureKey)
export const selectCount = createSelector(selectCounter, state => state.count)
2
3
4
5
6
- 组件类触发 Action、获取状态
import { select, Store } from "@ngrx/store"
import { Observable } from "rxjs"
import { AppState } from "./store"
import { decrement, increment } from "./store/actions/counter.actions"
import { selectCount } from "./store/selectors/counter.selectors"
export class AppComponent {
count: Observable<number>
constructor(private store: Store<AppState>) {
this.count = this.store.pipe(select(selectCount))
}
increment() {
this.store.dispatch(increment())
}
decrement() {
this.store.dispatch(decrement())
}
}
2
3
4
5
6
7
8
9
10
11
12
13
14
15
16
17
18
- 组件模板显示状态
<button (click)="increment()">+</button>
<span>{{ count | async }}</span>
<button (click)="decrement()">-</button>
2
3
# 15.3 Action Payload
- 在组件中使用 dispatch 触发 Action 时传递参数,参数最终会被放置在 Action 对象中。
this.store.dispatch(increment({ count: 5 }));
- 在创建 Action Creator 函数时,获取参数并指定参数类型。
import { createAction, props } from "@ngrx/store"
export const increment = createAction("increment", props<{ count: number }>())
2
export declare function props<P extends object>(): Props<P>;
- 在 Reducer 中通过 Action 对象获取参数。
export const reducer = createReducer(
initialState,
on(increment, (state, action) => ({ count: state.count + action.count }))
);
2
3
4
# 15.4 MetaReducer
metaReducer 是 Action -> Reducer 之间的钩子,允许开发者对 Action 进行预处理 (在普通 Reducer 函数调用之前调用)。
function debug(reducer: ActionReducer<any>): ActionReducer<any> {
return function (state, action) {
return reducer(state, action);
};
}
export const metaReducers: MetaReducer<AppState>[] = !environment.production ? [debug] : [];
2
3
4
5
6
7
# 15.5 Effect
需求:在页面中新增一个按钮,点击按钮后延迟一秒让数值增加。
- 在组件模板中新增一个用于异步数值增加的按钮,按钮被点击后执行
increment_async方法
<button (click)="increment_async()">async</button>
- 在组件类中新增
increment_async方法,并在方法中触发执行异步操作的 Action
increment_async() {
this.store.dispatch(increment_async())
}
2
3
- 在 Action 文件中新增执行异步操作的 Action
export const increment_async = createAction("increment_async");
- 创建 Effect,接收 Action 并执行副作用,继续触发 Action
ng g effect store/effects/counter --root --module app.module.ts --skipTests
Effect 功能由 @ngrx/effects 模块提供,所以在根模块中需要导入相关的模块依赖
import { Injectable } from "@angular/core"
import { Actions, createEffect, ofType } from "@ngrx/effects"
import { increment, increment_async } from "../actions/counter.actions"
import { mergeMap, map } from "rxjs/operators"
import { timer } from "rxjs"
// createEffect
// 用于创建 Effect, Effect 用于执行副作用.
// 调用方法时传递回调函数, 回调函数中返回 Observable 对象, 对象中要发出副作用执行完成后要触发的 Action 对象
// 回调函数的返回值在 createEffect 方法内部被继续返回, 最终返回值被存储在了 Effect 类的属性中
// NgRx 在实例化 Effect 类后, 会订阅 Effect 类属性, 当副作用执行完成后它会获取到要触发的 Action 对象并触发这个 Action
// Actions
// 当组件触发 Action 时, Effect 需要通过 Actions 服务接收 Action, 所以在 Effect 类中通过 constructor 构造函数参数的方式将 Actions 服务类的实例对象注入到 Effect 类中
// Actions 服务类的实例对象为 Observable 对象, 当有 Action 被触发时, Action 对象本身会作为数据流被发出
// ofType
// 对目标 Action 对象进行过滤.
// 参数为目标 Action 的 Action Creator 函数
// 如果未过滤出目标 Action 对象, 本次不会继续发送数据流
// 如果过滤出目标 Action 对象, 会将 Action 对象作为数据流继续发出
@Injectable()
export class CounterEffects {
constructor(private actions: Actions) {
// this.loadCount.subscribe(console.log)
}
loadCount = createEffect(() => {
return this.actions.pipe(
ofType(increment_async),
mergeMap(() => timer(1000).pipe(map(() => increment({ count: 10 }))))
)
})
}
2
3
4
5
6
7
8
9
10
11
12
13
14
15
16
17
18
19
20
21
22
23
24
25
26
27
28
29
30
31
32
33
34
# 15.6 Entity
# 15.6.1 概述
Entity 译为实体,实体就是集合中的一条数据。
NgRx 中提供了实体适配器对象,在实体适配器对象下面提供了各种操作集合中实体的方法,目的就是提高开发者操作实体的效率。
# 15.6.2 核心
- EntityState:实体类型接口
/*
{
ids: [1, 2],
entities: {
1: { id: 1, title: "Hello Angular" },
2: { id: 2, title: "Hello NgRx" }
}
}
*/
export interface State extends EntityState<Todo> {}
2
3
4
5
6
7
8
9
10
createEntityAdapter: 创建实体适配器对象
EntityAdapter:实体适配器对象类型接口
export const adapter: EntityAdapter<Todo> = createEntityAdapter<Todo>()
// 获取初始状态 可以传递对象参数 也可以不传
// {ids: [], entities: {}}
export const initialState: State = adapter.getInitialState()
2
3
4
# 15.6.3 实例方法
[实例方法](https://ngrx.io/guide/entity/adapter#adapter-collection-methods)
# 15.6.4 选择器
// selectTotal 获取数据条数
// selectAll 获取所有数据 以数组形式呈现
// selectEntities 获取实体集合 以字典形式呈现
// selectIds 获取id集合, 以数组形式呈现
const { selectIds, selectEntities, selectAll, selectTotal } = adapter.getSelectors();
2
3
4
5
export const selectTodo = createFeatureSelector<AppState, State>(todoFeatureKey)
export const selectTodos = createSelector(selectTodo, selectAll)
2
# 15.7 Router Store
# 15.7.1 同步路由状态
- 引入模块
import { StoreRouterConnectingModule } from "@ngrx/router-store";
@NgModule({
imports: [StoreRouterConnectingModule.forRoot()],
})
export class AppModule {}
2
3
4
5
6
- 将路由状态集成到 Store
import * as fromRouter from "@ngrx/router-store";
export interface AppState {
router: fromRouter.RouterReducerState;
}
export const reducers: ActionReducerMap<AppState> = {
router: fromRouter.routerReducer,
};
2
3
4
5
6
7
8
# 15.7.2 创建获取路由状态的 Selector
// router.selectors.ts
import { createFeatureSelector } from "@ngrx/store"
import { AppState } from ".."
import { RouterReducerState, getSelectors } from "@ngrx/router-store"
const selectRouter = createFeatureSelector<AppState, RouterReducerState>(
"router"
)
export const {
// 获取和当前路由相关的信息 (路由参数、路由配置等)
selectCurrentRoute,
// 获取地址栏中 # 号后面的内容
selectFragment,
// 获取路由查询参数
selectQueryParams,
// 获取具体的某一个查询参数 selectQueryParam('name')
selectQueryParam,
// 获取动态路由参数
selectRouteParams,
// 获取某一个具体的动态路由参数 selectRouteParam('name')
selectRouteParam,
// 获取路由自定义数据
selectRouteData,
// 获取路由的实际访问地址
selectUrl
} = getSelectors(selectRouter)
2
3
4
5
6
7
8
9
10
11
12
13
14
15
16
17
18
19
20
21
22
23
24
25
26
27
// home.component.ts
import { select, Store } from "@ngrx/store"
import { AppState } from "src/app/store"
import { selectQueryParams } from "src/app/store/selectors/router.selectors"
export class AboutComponent {
constructor(private store: Store<AppState>) {
this.store.pipe(select(selectQueryParams)).subscribe(console.log)
}
}
2
3
4
5
6
7
8
9
10
# 16. 动画
# 16.1 状态
# 16.6.1 什么是状态
状态表示的是要进行运动的元素在运动的不同时期所呈现的样式。
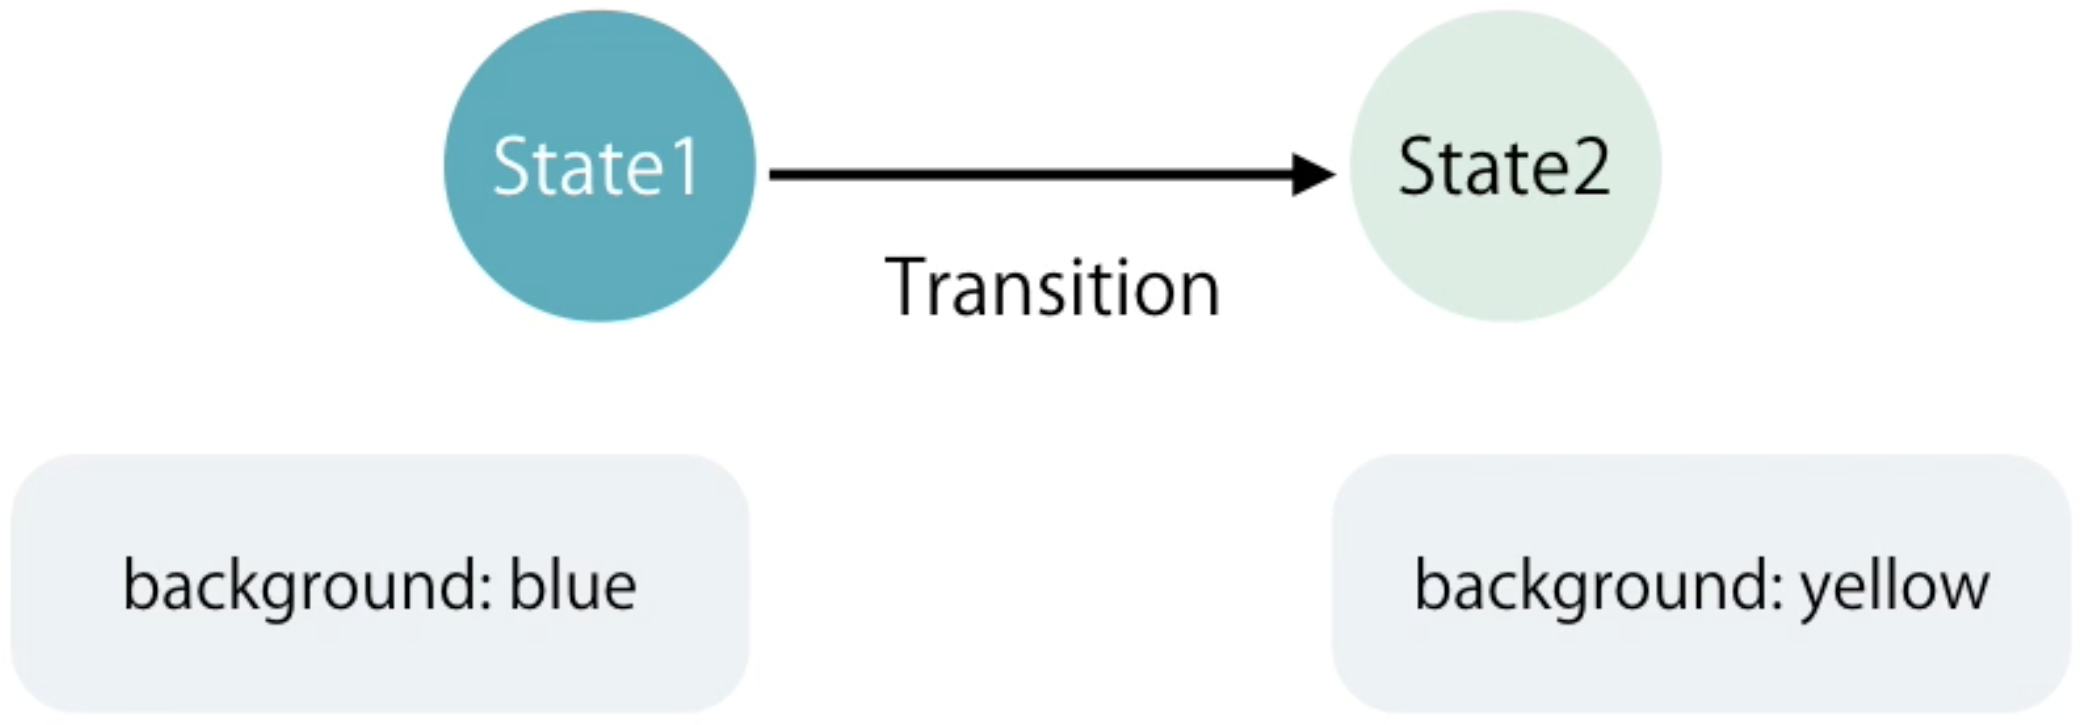
# 16.6.2 状态的种类
在 Angular 中,有三种类型的状态,分别为:void、*、custom
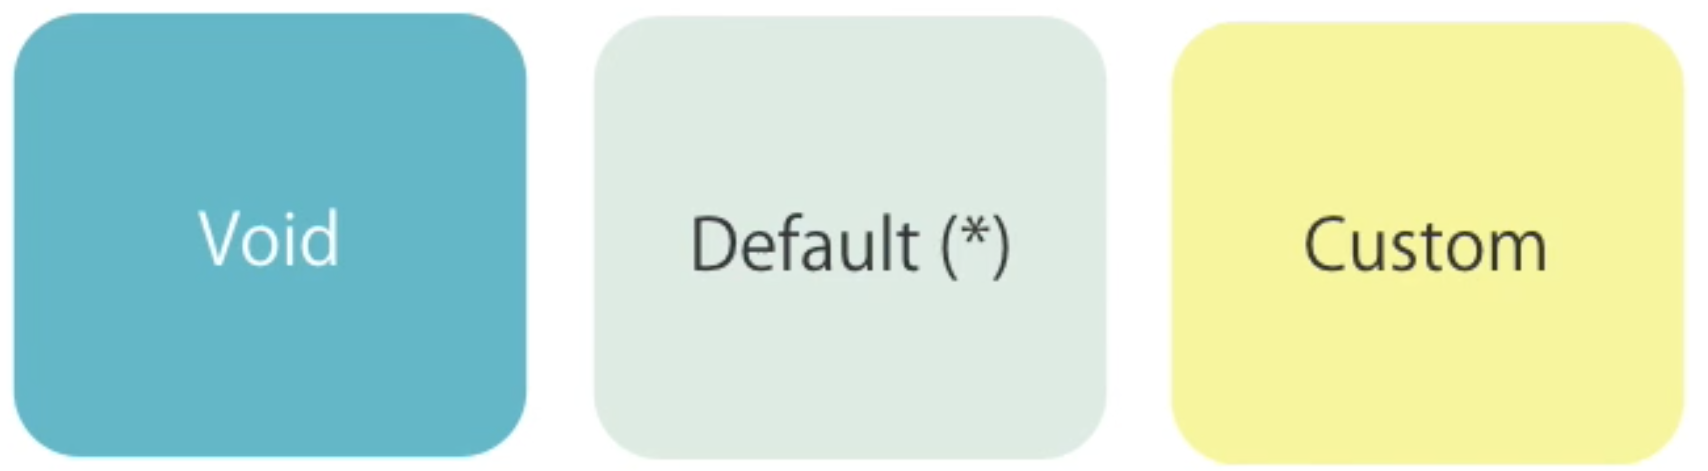
void:当元素在内存中创建好但尚未被添加到 DOM 中或将元素从 DOM 中删除时会发生此状态
*:元素被插入到 DOM 树之后的状态,或者是已经在 DOM 树中的元素的状态,也叫默认状态
custom:自定义状态,元素默认就在页面之中,从一个状态运动到另一个状态,比如面板的折叠和展开。
# 16.6.3 进出场动画
进场动画是指元素被创建后以动画的形式出现在用户面前,进场动画的状态用 void => * 表示,别名为 :enter
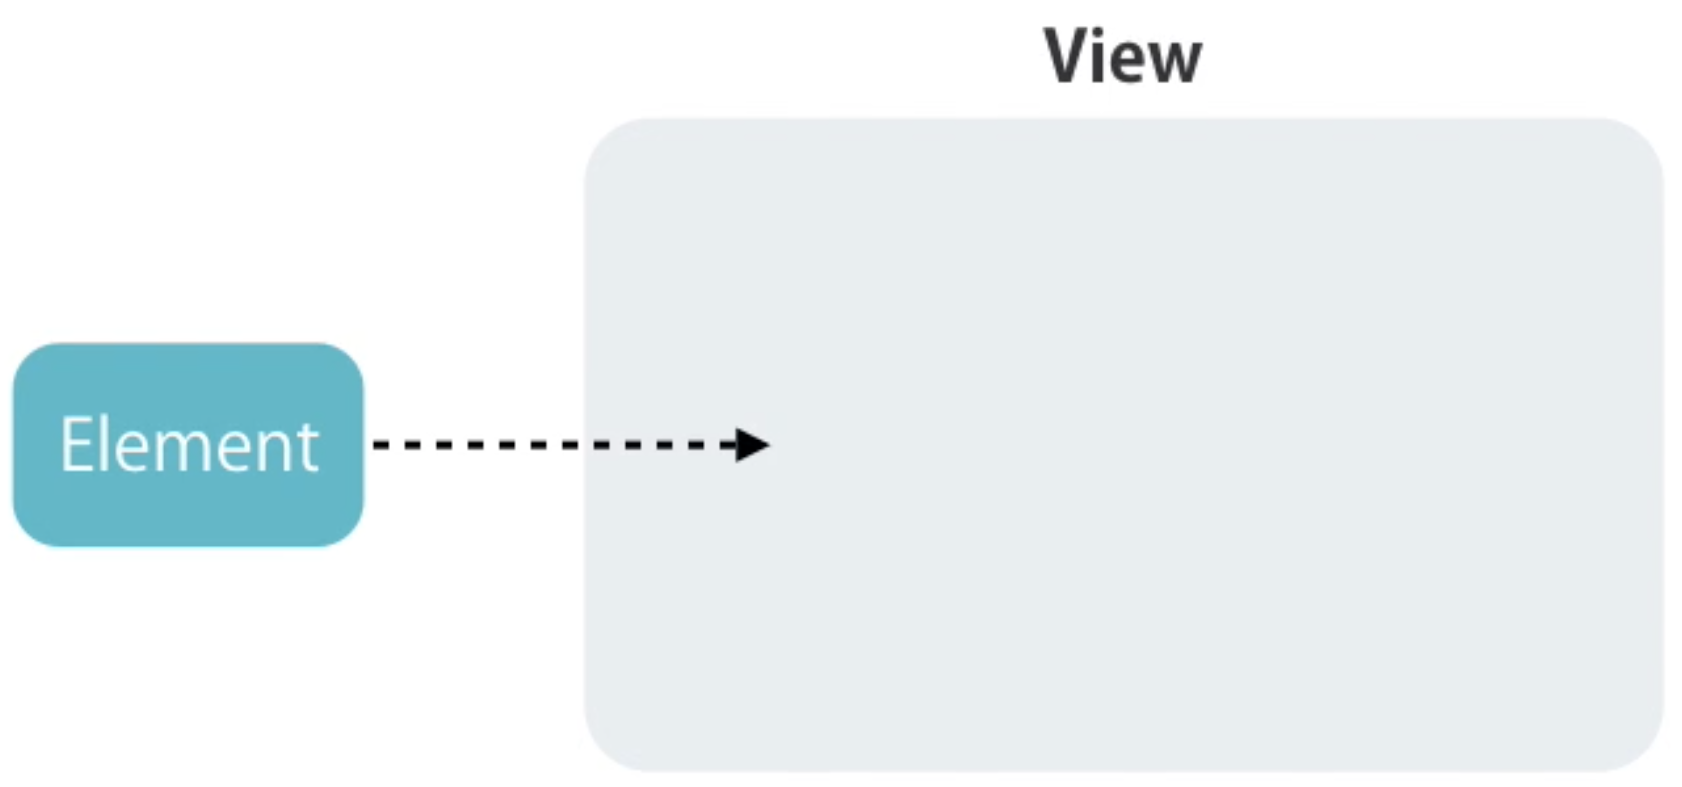
出场动画是指元素在被删除前执行的一段告别动画,出场动画的状态用 * => void,别名为 :leave
# 16.2 快速上手
- 在使用动画功能之前,需要引入动画模块,即
BrowserAnimationsModule
import { BrowserAnimationsModule } from "@angular/platform-browser/animations";
@NgModule({
imports: [BrowserAnimationsModule],
})
export class AppModule {}
2
3
4
5
6
- 默认代码解析,todo 之删除任务和添加任务
<!-- 在 index.html 文件中引入 bootstrap.min.css -->
<link rel="stylesheet" href="https://cdn.jsdelivr.net/npm/bootstrap@3.3.7/dist/css/bootstrap.min.css" />
2
<div class="container">
<h2>Todos</h2>
<div class="form-group">
<input (keyup.enter)="addItem(input)" #input type="text" class="form-control" placeholder="add todos" />
</div>
<ul class="list-group">
<li (click)="removeItem(i)" *ngFor="let item of todos; let i = index" class="list-group-item">{{ item }}</li>
</ul>
</div>
2
3
4
5
6
7
8
9
import { Component } from "@angular/core";
@Component({
selector: "app-root",
templateUrl: "./app.component.html",
styles: [],
})
export class AppComponent {
// todo 列表
todos: string[] = ["Learn Angular", "Learn RxJS", "Learn NgRx"];
// 添加 todo
addItem(input: HTMLInputElement) {
this.todos.push(input.value);
input.value = "";
}
// 删除 todo
removeItem(index: number) {
this.todos.splice(index, 1);
}
}
2
3
4
5
6
7
8
9
10
11
12
13
14
15
16
17
18
19
20
创建动画
- trigger 方法用于创建动画,指定动画名称
- transition 方法用于指定动画的运动状态,出场动画或者入场动画,或者自定义状态动画。
- style 方法用于设置元素在不同的状态下所对应的样式
- animate 方法用于设置运动参数,比如动画运动时间,延迟事件,运动形式
@Component({
animations: [
// 创建动画, 动画名称为 slide
trigger("slide", [
// 指定入场动画 注意: 字符串两边不能有空格, 箭头两边可以有也可以没有空格
// void => * 可以替换为 :enter
transition("void => *", [
// 指定元素未入场前的样式
style({ opacity: 0, transform: "translateY(40px)" }),
// 指定元素入场后的样式及运动参数
animate(250, style({ opacity: 1, transform: "translateY(0)" }))
]),
// 指定出场动画
// * => void 可以替换为 :leave
transition("* => void", [
// 指定元素出场后的样式和运动参数
animate(600, style({ opacity: 0, transform: "translateX(100%)" }))
])
])
]
})
2
3
4
5
6
7
8
9
10
11
12
13
14
15
16
17
18
19
20
21
<li @slide></li>
注意:入场动画中可以不指定元素的默认状态,Angular 会将 void 状态清空作为默认状态
trigger("slide", [
transition(":enter", [style({ opacity: 0, transform: "translateY(40px)" }), animate(250)]),
transition(":leave", [animate(600, style({ opacity: 0, transform: "translateX(100%)" }))]),
]);
2
3
4
注意:要设置动画的运动参数,需要将 animate 方法的一个参数更改为字符串类型
// 动画执行总时间 延迟时间 (可选) 运动形式 (可选)
animate("600ms 1s ease-out", style({ opacity: 0, transform: "translateX(100%)" }));
2
# 16.3 关键帧动画
关键帧动画使用 keyframes 方法定义
transition(":leave", [
animate(
600,
keyframes([
style({ offset: 0.3, transform: "translateX(-80px)" }),
style({ offset: 1, transform: "translateX(100%)" }),
])
),
]);
2
3
4
5
6
7
8
9
# 16.4 动画回调
Angular 提供了和动画相关的两个回调函数,分别为动画开始执行时和动画执行完成后
<li @slide (@slide.start)="start($event)" (@slide.done)="done($event)"></li>
import { AnimationEvent } from "@angular/animations"
start(event: AnimationEvent) {
console.log(event)
}
done(event: AnimationEvent) {
console.log(event)
}
2
3
4
5
6
7
8
# 16.5 创建可重用动画
- 将动画的定义放置在单独的文件中,方便多组件调用。
import { animate, keyframes, style, transition, trigger } from "@angular/animations";
export const slide = trigger("slide", [
transition(":enter", [style({ opacity: 0, transform: "translateY(40px)" }), animate(250)]),
transition(":leave", [
animate(
600,
keyframes([
style({ offset: 0.3, transform: "translateX(-80px)" }),
style({ offset: 1, transform: "translateX(100%)" }),
])
),
]),
]);
2
3
4
5
6
7
8
9
10
11
12
13
14
import { slide } from "./animations"
@Component({
animations: [slide]
})
2
3
4
5
- 抽取具体的动画定义,方便多动画调用。
import { animate, animation, keyframes, style, transition, trigger, useAnimation } from "@angular/animations";
export const slideInUp = animation([style({ opacity: 0, transform: "translateY(40px)" }), animate(250)]);
export const slideOutLeft = animation([
animate(
600,
keyframes([
style({ offset: 0.3, transform: "translateX(-80px)" }),
style({ offset: 1, transform: "translateX(100%)" }),
])
),
]);
export const slide = trigger("slide", [
transition(":enter", useAnimation(slideInUp)),
transition(":leave", useAnimation(slideOutLeft)),
]);
2
3
4
5
6
7
8
9
10
11
12
13
14
15
16
17
18
- 调用动画时传递运动总时间,延迟时间,运动形式
export const slideInUp = animation(
[style({ opacity: 0, transform: "translateY(40px)" }), animate("{{ duration }} {{ delay }} {{ easing }}")],
{
params: {
duration: "400ms",
delay: "0s",
easing: "ease-out",
},
}
);
2
3
4
5
6
7
8
9
10
transition(":enter", useAnimation(slideInUp, { params: { delay: "1s" } }));
# 16.6 查询元素执行动画
Angular 中提供了 query 方法查找元素并为元素创建动画
import { slide } from "./animations";
animations: [
slide,
trigger("todoAnimations", [
transition(":enter", [
query("h2", [style({ transform: "translateY(-30px)" }), animate(300)]),
// 查询子级动画 使其执行
query("@slide", animateChild()),
]),
]),
];
2
3
4
5
6
7
8
9
10
11
12
<div class="container" @todoAnimations>
<h2>Todos</h2>
<ul class="list-group">
<li @slide (click)="removeItem(i)" *ngFor="let item of todos; let i = index" class="list-group-item">{{ item }}</li>
</ul>
</div>
2
3
4
5
6
默认情况下,父级动画和子级动画按照顺序执行,先执行父级动画,再执行子级动画,可以使用 group 方法让其并行
trigger("todoAnimations", [
transition(":enter", [
group([query("h2", [style({ transform: "translateY(-30px)" }), animate(300)]), query("@slide", animateChild())]),
]),
]);
2
3
4
5
# 16.7 交错动画
Angular 提供了 stagger 方法,在多个元素同时执行同一个动画时,让每个元素动画的执行依次延迟。
transition(":enter", [
group([
query("h2", [style({ transform: "translateY(-30px)" }), animate(300)]),
query("@slide", stagger(200, animateChild())),
]),
]);
2
3
4
5
6
注意:stagger 方法只能在 query 方法内部使用
# 16.8 自定义状态动画
Angular 提供了 state 方法用于定义状态。
- 默认代码解析
<div class="container">
<div class="panel panel-default">
<div class="panel-heading" (click)="toggle()">一套框架, 多种平台, 移动端 & 桌面端</div>
<div class="panel-body">
<p>
使用简单的声明式模板,快速实现各种特性。使用自定义组件和大量现有组件,扩展模板语言。在几乎所有的 IDE 中获得针对
Angular 的即时帮助和反馈。所有这一切,都是为了帮助你编写漂亮的应用,而不是绞尽脑汁的让代码“能用”。
</p>
<p>从原型到全球部署,Angular 都能带给你支撑 Google 大型应用的那些高延展性基础设施与技术。</p>
<p>
通过 Web Worker 和服务端渲染,达到在如今(以及未来)的 Web 平台上所能达到的最高速度。 Angular
让你有效掌控可伸缩性。基于 RxJS、Immutable.js 和其它推送模型,能适应海量数据需求。
</p>
<p>
学会用 Angular 构建应用,然后把这些代码和能力复用在多种多种不同平台的应用上 —— Web、移动
Web、移动应用、原生应用和桌面原生应用。
</p>
</div>
</div>
</div>
<style>
.container {
margin-top: 100px;
}
.panel-heading {
cursor: pointer;
}
</style>
2
3
4
5
6
7
8
9
10
11
12
13
14
15
16
17
18
19
20
21
22
23
24
25
26
27
28
import { Component } from "@angular/core";
@Component({
selector: "app-root",
templateUrl: "./app.component.html",
styles: [],
})
export class AppComponent {
isExpended: boolean = false;
toggle() {
this.isExpended = !this.isExpended;
}
}
2
3
4
5
6
7
8
9
10
11
12
13
- 创建动画
trigger("expandCollapse", [
// 使用 state 方法定义折叠状态元素对应的样式
state(
"collapsed",
style({
height: 0,
overflow: "hidden",
paddingTop: 0,
paddingBottom: 0,
})
),
// 使用 state 方法定义展开状态元素对应的样式
state("expanded", style({ height: "*", overflow: "auto" })),
// 定义展开动画
transition("collapsed => expanded", animate("400ms ease-out")),
// 定义折叠动画
transition("expanded => collapsed", animate("400ms ease-in")),
]);
2
3
4
5
6
7
8
9
10
11
12
13
14
15
16
17
18
<div class="panel-body" [@expandCollapse]="isExpended ? 'expanded' : 'collapsed'"></div>
# 16.9 路由动画
- 为路由添加状态标识,此标识即为路由执行动画时的自定义状态
const routes: Routes = [
{
path: "",
component: HomeComponent,
pathMatch: "full",
data: {
animation: "one",
},
},
{
path: "about",
component: AboutComponent,
data: {
animation: "two",
},
},
{
path: "news",
component: NewsComponent,
data: {
animation: "three",
},
},
];
2
3
4
5
6
7
8
9
10
11
12
13
14
15
16
17
18
19
20
21
22
23
24
- 通过路由插座对象获取路由状态标识,并将标识传递给动画的调用者,让动画执行当前要执行的状态是什么
<div class="routerContainer" [@routerAnimations]="prepareRoute(outlet)">
<router-outlet #outlet="outlet"></router-outlet>
</div>
2
3
import { RouterOutlet } from "@angular/router";
export class AppComponent {
prepareRoute(outlet: RouterOutlet) {
return outlet && outlet.activatedRouteData && outlet.activatedRouteData.animation;
}
}
2
3
4
5
6
7
- 将 routerContainer 设置为相对定位,将它的直接一级子元素设置成绝对定位
/* styles.css */
.routerContainer {
position: relative;
}
.routerContainer > * {
position: absolute;
left: 0;
top: 0;
width: 100%;
}
2
3
4
5
6
7
8
9
10
11
- 创建动画
trigger("routerAnimations", [
transition("one => two, one => three, two => three", [
query(":enter", style({ transform: "translateX(100%)", opacity: 0 })),
group([
query(":enter", animate("0.4s ease-in", style({ transform: "translateX(0)", opacity: 1 }))),
query(
":leave",
animate(
"0.4s ease-out",
style({
transform: "translateX(-100%)",
opacity: 0,
})
)
),
]),
]),
transition("three => two, three => one, two => one", [
query(":enter", style({ transform: "translateX(-100%)", opacity: 0 })),
group([
query(":enter", animate("0.4s ease-in", style({ transform: "translateX(0)", opacity: 1 }))),
query(
":leave",
animate(
"0.4s ease-out",
style({
transform: "translateX(100%)",
opacity: 0,
})
)
),
]),
]),
]);
2
3
4
5
6
7
8
9
10
11
12
13
14
15
16
17
18
19
20
21
22
23
24
25
26
27
28
29
30
31
32
33
34
# 17. 测试
使用 Jasmine 测试框架,测试文件的扩展名必须是 .spec.ts,以便测试工具可以把它识别成一个包含测试的文件,也叫 spec(规约) 文件。
# 单元测试
使用 jest
ng test命令在监视模式下构建应用,并启动 karma 测试运行器,可以点击某一行测试,来单独重跑这个测试,或者点击一行描述信息来重跑所选测试组(“测试套件”)中的那些测试。ng generate config karmaAngular CLI 会为你处理 Jasmine 和 Karma 配置。它根据 angular.json 文件中指定的选项在内存中构建完整配置。如果你想自定义 Karma,你可以通过运行以下命令创建一个karma.conf.js。ng test --code-coverage可以运行单元测试并创建代码覆盖率报告。代码覆盖率报告会向你展示代码库中可能无法通过单元测试进行正确测试的任意部位。运行完成后找到生成的 coverage 目录,打开 index.html 即可查看。如果要在每次测试时都创建代码覆盖率报告,可以在 CLI 配置文件 angular.json 中设置以下选项:test.options.codeCoverage = true- 假设你希望代码库的代码覆盖率至少达到 80%。要启用此功能,请打开 Karma 测试平台的配置文件 karma.conf.js,并在 coverageReporter: 键下添加 check 属性。
ng test --code-coverage --ChromeHeadlessng test --no-watch --no-progress要在持续集成 (CI) 中测试你的 Angular CLI 应用程序,请运行该命令karma.conf.js示例:
// Karma configuration file, see link for more information
// https://karma-runner.github.io/1.0/config/configuration-file.html
module.exports = function (config) {
config.set({
basePath: "",
frameworks: ["jasmine", "@angular-devkit/build-angular"],
plugins: [
require("karma-jasmine"),
require("karma-chrome-launcher"),
require("karma-jasmine-html-reporter"),
require("@angular-devkit/build-angular/plugins/karma"),
require("karma-coverage-istanbul-reporter"),
],
client: {
jasmine: {},
clearContext: false,
},
jasmineHtmlReporter: {
suppressAll: true,
},
coverageIstanbulReporter: {
// coverageReporter 适用于karma-coverage插件
reports: ["html", "lcovonly", "text-summary"],
dir: require("path").join(__dirname, "./coverage/project-name"),
subdir: ".",
fixWebpackSourcePaths: true,
skipFilesWithNoCoverage: true,
global: {
statements: 80,
branches: 80,
functions: 80,
lines: 80,
},
// 如果使用`ng test --code-coverage`的话,这里加exclude没有用,要在angular.json中加exclude才会生效
},
combineBrowserReports: true,
reporters: ["progress", "kjhtml", "coverage-istanbul"],
browsers: ["Chrome"],
restartOnFileChange: true,
});
};
2
3
4
5
6
7
8
9
10
11
12
13
14
15
16
17
18
19
20
21
22
23
24
25
26
27
28
29
30
31
32
33
34
35
36
37
38
39
40
41
42