# Maven
- Apache Maven 是一种流行的构建工具,它获取项目的 Java 源代码,对其进行编译、测试并将其转换为可执行的 Java 程序:
.jar或.war文件。 - Maven 是 Java 世界中最流行的构建工具之一(其他的还有 Gradle 或者老式的 Ant)。您不仅可以使用它来构建 Java 项目,而且几乎所有用 JVM 语言(如 Kotlin 或 Scala)以及其他语言(如 C # 和 Ruby)编写的项目都可以使用它来构建。
- 依赖管理:Maven 让您可以轻松地在项目中包含第 3 方依赖项(想想库/框架,例如 Spring)。其他语言的等价物是 Javascript 的 npm、Ruby 的 gems 或 PHP 的 composer。
- 项目构建,通过约定进行编译: 理论上,您可以使用 javac 命令行编译器(或者使用 bash 脚本实现自动化)手动编译大量 class 来编译大型 Java 项目。然而,这只适用于玩具项目。Maven 希望 Java 源代码驻留在某个目录结构中,当您稍后执行
mvn clean install时,整个编译和打包工作将为您完成。
- 项目构建,通过约定进行编译: 理论上,您可以使用 javac 命令行编译器(或者使用 bash 脚本实现自动化)手动编译大量 class 来编译大型 Java 项目。然而,这只适用于玩具项目。Maven 希望 Java 源代码驻留在某个目录结构中,当您稍后执行
- 一切皆 Java: Maven 还可以通过插件运行代码质量检查、执行测试用例,甚至将应用程序部署到远程服务器。几乎所有你能想到的任务。
- Download 相应版本 (opens new window)
- install:解压,放到方便的目录下即可
- Maven 配置:
${maven}/conf/settings.xml,自定义修改配置,添加私有仓库、账户名、密码等等,在 servers、mirrors 等标签里。也可以在 pom 文件中手动配置源:
<!-- 配置本机上依赖的位置 -->
<localRepository>xxx/zzz</localRepository>
<!-- ...镜像... -->
<mirrors>
    <mirror>
        <id>aliyunmaven</id>
        <!-- *表示匹配所有的镜像库,相当于会屏蔽掉配置的其他的镜像库 -->
        <mirrorOf>*</mirrorOf>
        <name>阿里云公共仓库</name>
        <url>https://maven.aliyun.com/repository/public</url>
    </mirror>
</mirrors>
<!-- 配置不同的仓库 -->
<profiles>
    <profile>
    <!-- ...不同的仓库... -->
    </profile>
    <profile>
    <!-- id 与 activeProfile 中的对应 -->
        <id>cloudera-repository</id>
        <repositories>
            <!--配置maven地址 -->
            <repository>
                <id>cloudera</id>
                <url>https://repository.cloudera.com/artifactory/cloudera-repos/</url>
                <releases>
                    <enabled>true</enabled>
                </releases>
                <snapshots>
                    <enabled>true</enabled>
                    <updatePolicy>always</updatePolicy>
                </snapshots>
            </repository>
        </repositories>
    </profile>
</profiles>
<!-- 配置与源id对应的的maven仓库地址的用户和密码 -->
<servers>
    <server>
        <id>myrepository</id>
        <username>user</username>
        <password>password</password>
    </server>
</servers>
<activeProfiles>
    <!-- 填的是profile的id而不是repository的id -->
    <activeProfile>aliyun</activeProfile>
    <activeProfile>cloudera-repository</activeProfile>
</activeProfiles>
2
3
4
5
6
7
8
9
10
11
12
13
14
15
16
17
18
19
20
21
22
23
24
25
26
27
28
29
30
31
32
33
34
35
36
37
38
39
40
41
42
43
44
45
46
47
48
49
- idea 配置:在 Preferences》Build》Build tools》Maven:
- 设置 Maven home path:2 中解压的 maven 目录即可,例
/Users/eric/backend/maven - 设置 User settings:
/Users/eric/backend/maven/conf/settings_eric.xml,看需求,一般会需要自定义配置一些账号密码
- 设置 Maven home path:2 中解压的 maven 目录即可,例
- 修改项目的 SDK 版本,在项目最外层目录右键》Open module settings》Project structure》Project settings》Project》SDK:设置相应版本的 SDK,可以设自己安装的,也可以通过 add sdk 下载新的。
- Maven 命令:
mvn install: First, it does apackage(!). Then it takes that.jar/.warfile and puts it into your local Maven repository, which lives in~/.m2/repository.mvn clean install: 您正在使用 clean 命令,该命令将删除项目中所有以前编译的 Java .class 文件和资源(如 .properties)。您的构建将从一个干净的状态开始。然后 install 将编译、测试和打包您的 Java 项目,甚至将您构建的 .jar/.war 文件安装/复制到您的本地 Maven 存储库中。mvn -v: 看版本mvn clean: deletes the/targetfolder.mvn package: Converts your.javasource code into a.jar/.warfile and puts it into the/targetfolder.
- 在 Maven 3.1 之前,增量编译基本上是不存在的,即使是最新的 Maven 和编译器插件版本,在增量编译支持中也存在奇怪的 bug 和文档问题。所以调用
mvn clean install,尽管会多花一些时间。 mvn clean install不构建兄弟项目。在多模块项目中,如果某个子项目 a 依赖某个兄弟项目 b,那么需要手动提前构建这个兄弟项目 b。例:
+ stocks-broker-app (parent)
    + stocks-data-module
    + stocks-rest-module (depends on stock-data)
    + stocks-ui-module (depends on stock-data)
2
3
4
- 如上项目结构中,在 parent 目录下执行:
mvn -pl stocks-ui-module -am clean install,可以指定要构建的子模块列表并进行依赖构建。-pl:让您指定要构建的子模块-am:表示also make,它也将构建依赖模块
mvn -U:有时,如果您的项目依赖于 SNAPSHOT 依赖项,Maven 不会使用最新的快照版本更新您的本地 Maven 存储库。如果你想确保 Maven 总是尝试下载最新的快照依赖版本,请使用 -U 开关调用它。-X:打印出更详细的 logmvnw:一些项目附带一个mvnw可执行文件,它不代表 Maven (on) Windows,而是代表 Maven 包装器。这意味着您不必在您的机器上安装 mvn 来构建您的项目 - 相反,mvn 嵌入在您的项目目录中,您可以使用mvnw可执行文件调用它。mvn compile:编译成.class 文件mvn test:测试mvn clean:清理mvn package:打包,打成 jar 或 war 包mvn install:安装依赖到本地,会把 pom.xml 中的依赖等下载到本地mvn deploy:安装依赖到本地,会把 pom.xml 中的依赖等下载到本地- 我们在用 maven 构建 java 项目时,最常用的打包命令有
mvn clean package、mvn clean install、mvn clean deploy,这三个命令都可完成打 jar 包或 war(当然也可以是其它形式的包)的功能,但这三个命令还是有区别的。三者的区别在于包函的 maven 生命的阶段和执行目标(goal)不同。mvn clean package依次执行了 clean、resources、compile、testResources、testCompile、test、jar(打包)等7个阶段。package 命令完成了项目编译、单元测试、打包功能,但没有把打好的可执行 jar 包(war 包或其它形式的包)布署到本地 maven 仓库和远程 maven 私服仓库mvn clean install依次执行了 clean、resources、compile、testResources、testCompile、test、jar(打包)、install 等 8 个阶段。install 命令完成了项目编译、单元测试、打包功能,同时把打好的可执行 jar 包(war 包或其它形式的包)布署到本地 maven 仓库,但没有布署到远程 maven 私服仓库mvn clean deploy依次执行了 clean、resources、compile、testResources、testCompile、test、jar(打包)、install、deploy 等9个阶段。deploy 命令完成了项目编译、单元测试、打包功能,同时把打好的可执行 jar 包(war 包或其它形式的包)布署到本地 maven 仓库和远程 maven 私服仓库
- 配置 maven 源,我们都知道中央仓库速度比较慢,通常会去配置国内镜像库来加速访问。但是不推荐在
<mirrors>中去配置国内镜像库的镜像。因为这是镜像,不是分库,就是说 maven 并不会帮忙做这样事:a.jar 在第一个 mirror 中不存在,拉不下来,使用第二个镜像来尝试拉取。因此,在<mirrors>定义多个镜像,幻想当第一个镜像中没有时去第二个镜像下载是行不通的,maven 只会在第一个镜像连接失败的时候,才会尝试连接第二个镜像。(甚至有人说这个顺序都不是按照定义 mirror 的顺序,而是通过 mirror id 的字母排序?这个我没有深究)。其实要达到配置国内镜像库来加速访问的目的,可以就像上面全局配置那样,将国内镜像库比如阿里云,配置为远程库中的一个并激活即可,这样就可以加速了,或者单个项目中 pom 中配置,没有必要配置为<mirrors>中的镜像库。 - 有时候,会发现不管你怎么修改配置,修改远程库地址,都无法生效,
- 首先检查 eclipse 或者 IDEA 中配置的 settings 文件是否是自己编辑的那个文件。
- 如果是,那么检查配置的镜像库 mirror,看是否有
mirrorOf配置的是*,这个值表示匹配所有的镜像库,相当于会屏蔽掉配置的其他的镜像库。 - 注意配置的优先级,pom 配置 > settings 中的配置
- 如果配置没有问题,那么检查 settings 文件是否有语法错误。特别是当出现不管怎么改远程库地址,拉取 jar 的时候都跑去中央仓库下载的现象时。有时候频繁修改或者复制粘贴,导致 settings 文件语法出现了错误。可以在命令行执行下面的命令,如果有语法错误,会得到提示。
mvn help:effective-settings - 除了学习的时候,在 settings 中配置阿里云镜像库来加速以外,通常工作中既会用到阿里云、中央仓库之类的公共库,也要用到公司内的私服库,因此我不是很推荐配置 mirror 镜像来加速(因为 mirror 就算配了多个,也只会有一个生效),可以通过另一种方式配置多个远程库,既可以加速访问公共库,又可以同时访问私服库。
# pom.xml
Maven’s pom.xml
从技术上讲,任何包含 pom.xml 文件的目录也是一个有效的 Maven 项目。 pom.xml 文件包含描述 Java 项目所需的所有内容。让我们看一个最小版本:
<?xml version="1.0" encoding="UTF-8"?>
<project xmlns="http://maven.apache.org/POM/4.0.0"
         xmlns:xsi="http://www.w3.org/2001/XMLSchema-instance"
         xsi:schemaLocation="http://maven.apache.org/POM/4.0.0 http://maven.apache.org/xsd/maven-4.0.0.xsd">
    <modelVersion>4.0.0</modelVersion>

    <groupId>com.marcobehler</groupId>
    <!-- (1) -->
    <artifactId>my-project</artifactId>
    <!-- (2) -->
    <version>1.0-SNAPSHOT</version>

    <properties>
        <!-- (3) -->
        <maven.compiler.source>1.8</maven.compiler.source>
        <maven.compiler.target>1.8</maven.compiler.target>
        <project.build.sourceEncoding>UTF-8</project.build.sourceEncoding>
    </properties>

    <dependencies>
        <!-- (4) -->
        <dependency>
            <groupId>junit</groupId>
            <artifactId>junit</artifactId>
            <version>4.12</version>
            <scope>test</scope>
        </dependency>
        <!-- (5)  xxx-common 是继承的父依赖   -->
        <dependency>
            <groupId>com.xx.xxx</groupId>
            <artifactId>xxx-common</artifactId>
            <version>1.0.0</version>
            <!-- (6) -->
            <type>pom</type>
            <exclusions>
                <exclusion>
                    <!--   nacos 配置冲突,需要排除   -->
                    <groupId>com.alibaba.cloud</groupId>
                    <artifactId>spring-cloud-starter-alibaba-nacos-discovery</artifactId>
                </exclusion>
            </exclusions>
        </dependency>

    </dependencies>
</project>
2
3
4
5
6
7
8
9
10
11
12
13
14
15
16
17
18
19
20
21
22
23
24
25
26
27
28
29
30
31
32
33
34
35
36
37
38
39
40
41
42
43
44
45
如上:
- 我们定义了一个名为"my-project"的项目
- 版本号为
1.0-SNAPSHOT,例:work-in-progress - 使用 Java 1.8 进行编译
- 单元测试需要一个依赖项:4.12 版本的 junit
- 引入父依赖并排除指定的依赖关系,也可以在子模块中重新引用相应的版本。
type=pom表示对这个以来做一个单独的聚合管理,减少配置代码。这一个依赖实际是多个依赖的组合。比如引入 Spring 时可以这么配置。- PS:当改变了某个模块的依赖之后,这个模块又被其他模块引用了,那么此时需要重新运行
mvn clean install,重新打 jar/war 包。
Maven’s src & target folders
除了 pom.xml 文件之外,无论何时调用 mvn clean install,您还需要 Java 源代码让 Maven 发挥它的魔力。按照惯例:
- Java 源代码应存放在
/src/main/java文件夹中 - Maven 会将编译好的 Java .class 放入
target/classes文件夹 - Maven 还将根据您的项目构建位于
target文件夹中的.jar或.war文件。 - 项目结构如下:
+ myproject
    + -- src
        + -- main
            + -- java
                 MyApp.java
    + -- target
        + -- classes (after 'mvn compile')
             MyApp.class

        myproject.jar (upon mvn package or mvn install)

    pom.xml
2
3
4
5
6
7
8
9
10
11
12
- 安装 Maven 相当简单。与 Java 类似,它只是一个
.zip文件,您需要下载该文件并将其放在硬盘驱动器的任何位置。 - 现在你需要确保将
maven/bin目录添加到你的 PATH 变量中,否则你不能从任何地方调用mvn命令(比如:mvn clean install)。 - 看一下 Maven 构建生命周期:阶段
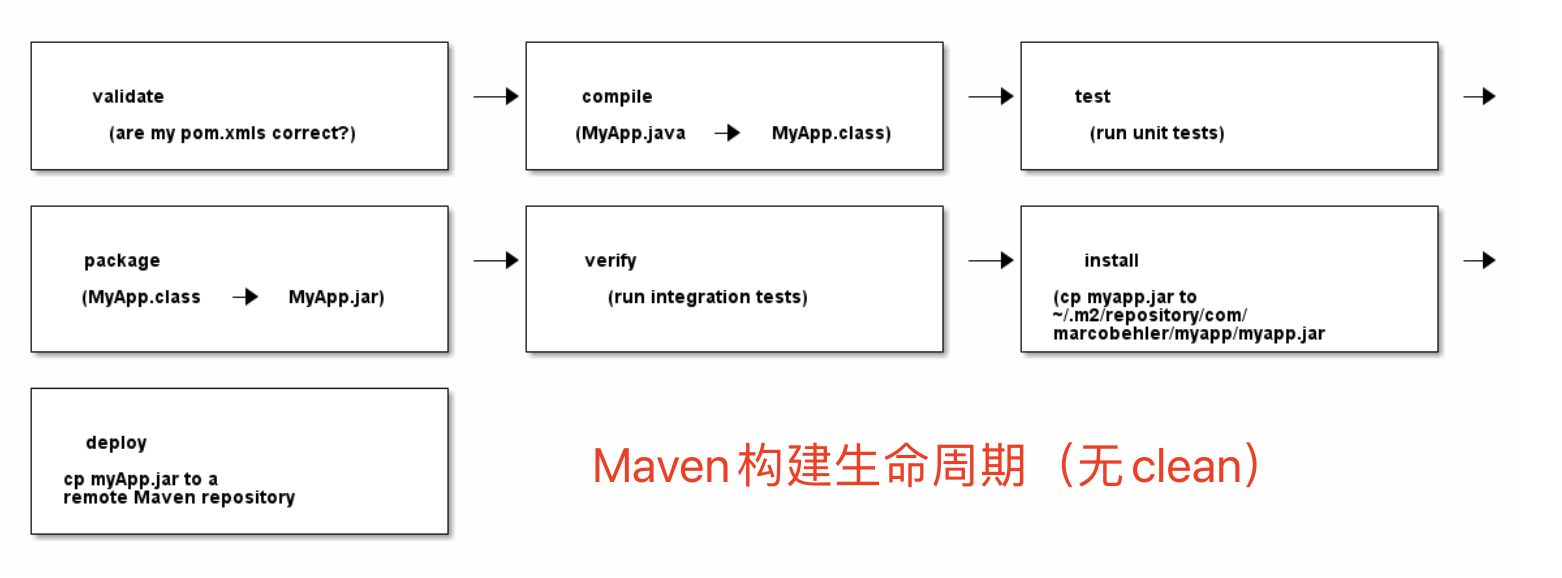
- 当你调用
mvn deploy时,mvn 也会在部署前执行每个生命周期阶段,依次为:validate, compile, test, package, verify, install. - Same for verify: validate, compile, test, package. Same for all other phases.
- 由于 clean 不是 Maven 默认生命周期的一部分,因此您最终会使用
mvn clean install或mvn clean package之类的命令安装或打包将触发所有前面的阶段,但您需要另外指定 clean。
Maven 在哪里存储 3rd 方库?
- 与将项目依赖项存储在项目目录中的其他语言相反,Maven 具有存储库的概念。
- 有本地存储库(在用户的主目录中:
~/.m2/)和远程存储库。 - 远程存储库可以是内部的、公司范围的存储库,例如 Artifactory 或 Nexus 或 (参考)全球存储
https://repo.maven.apache.org/maven2/上的库。 - Maven 将始终首先将您的项目依赖项下载到您的本地 Maven 存储库中,然后在您的构建中引用它们。
- 在哪里可以找到任何 3rd 方库的 Maven 坐标?https://search.maven.org/ (opens new window) & https://mvnrepository.com/ (opens new window)
# 教程笔记
- Maven 的本质是一个项目管理工具,将项目开发和管理过程抽象成一个项目对象模型(POM)
- POM:Project Object Model:项目对象模型
- pom.xml --> 项目对象模型(POM) <--> 依赖管理(dependency) --> 本地 repo --> 私有 repo --> 中央 repo
- 也是构建工具,生命周期阶段能做不同的事,利用插件。提供标准的、跨平台的自动化项目构建方式
- 依赖管理:方便快捷的管理项目依赖的资源(jar 包),避免资源间的版本冲突问题
- 统一开发结构:提供标准的、统一的项目结构
# 仓库
- 本地、私服、中央
- 本地仓库存放地址默认是:
${user.home}/.m2/repository - 配置本地仓库:
conf/settings.xml-><localRepository>...</localRepository> - 配置镜像仓库:
conf/settings.xml-><morror>...</morror>,配置阿里镜像
# 坐标&依赖
格式:
groupId-artifactId-version[-packaging]groupId:当前 Maven 项目隶属组织名称,通常是域名反写
artifactId:当前 Maven 项目名称,通常是模块名称
version:版本号
packaging:定义该项目的打包方式,是用于 jar 还是 war,还是别的
在 pom.xml -> project 层级 -> build -> plugins -> plugin -> 需要的插件信息:groupId、artifactId、version
依赖传递:可以直接使用依赖中的依赖
- 直接依赖:在当前项目中通过依赖配置建立的依赖关系
- 间接依赖:被引入的依赖如果依赖其他资源,当前项目间接依赖其他资源
依赖传递的冲突解决:
- 路径优先:当依赖中出现相同的资源时,层级越深,优先级越低,层级越浅,优先级越高
- 声明优先:当资源在相同的层级被依赖时,配置顺序靠前的覆盖顺序靠后的
- 特殊优先:当同级配置了相同的资源的不同版本,后配置的覆盖先配置的
可选依赖:指对外隐藏当前所依赖的资源,不透明。在 dependency 中增加
optional标签并设为 true 即可排除依赖:通过配置,不使用依赖中的依赖,主动断开间接依赖。在 dependency 中增加
exclusions>exclusion标签并写上依赖的 groupId 和 artifactId 即可依赖范围:
- 依赖的 jar 默认情况下可以在任何地方使用,可以通过 scope 标签设定其作用范围,四个值参考下面表格
- 作用范围:
- 主程序范围有效(main 文件夹范围内)
- 测试程序范围有效(test 文件夹范围内)
- 是否参与打包(package 指令范围内)
| scope | compile | test | provided | runtime | 直接依赖 |
|---|---|---|---|---|---|
| compile | compile | test | provided | ||
| test | |||||
| provided | |||||
| runtime | runtime | test | provided | runtime | |
| 间接依赖 |
| scope | 主代码 | 测试代码 | 打包 | 范例 |
|---|---|---|---|---|
| compile(默认) | Y | Y | Y | log4j |
| test | Y | junit | ||
| provided | Y | Y | servlet-api | |
| runtime | Y | jdbc | ||
| 间接依赖 |
# 生命周期和插件
- 项目构建的生命周期分为三大阶段:
- clean:清理工作
- default:核心工作,例如编译、测试、打包、部署等
- site:产生报告,发布站点等
- clean:
- pre-clean:
- clean:移除所有上一次构建生成的文件
- post-clean:
- default:只关注几个常用的即可
- validate:校验项目是否正确并且所有必要的信息可以完成项目的构建过程
- compile:编译项目的源代码
- test-compile:编译测试源代码到测试目标目录
- test:使用合适的单元测试框架运行测试
- package:将编译后的代码打包成可分发格式的文件比如jar、war、ear等
- verify:运行任意的检查来验证项目包有效且达到质量标准
- install:安装项目包到本地仓库,这样项目包可以用作其他本地项目的依赖
- deploy:将最终的项目包复制到远程仓库中与其他开发者和项目共享
- site:
- pre-site:
- site:生成项目的站点文档
- post-site:
- site-deploy:
- 每个生命周期都有不同的插件,生命周期从头执行到自己设置的那个 phase
# Maven 高级
# 分模块开发与设计
- 老项目会用这种形式,新项目一般用微服务了?
- 大致的做法就是把一个项目中的各个模块分别新建成单独的 module,然后新建属于这个 module 的 pom.xml 文件,并配置相应的依赖关系,小技巧--可以直接把老的 pom.xml 拷过来然后根据实际情况去删除一些不需要的配置即可,然后需要构建成功才算拆完。后续各模块之间通过接口进行通信。然后再在根目录下添加一个根 pom.xml 文件,配置 modules>module,把每个单独拆出来的 module 引用进来,之后便可以通过这里进行集中维护。
# 模块聚合
- 目的就是拆分完 module 之后,对各个 module 做一个统一的管理,改动、版本之类的都要同步
- 新建一个空的 root module,配置他的 pom.xml,在其中增加 modules>module 的配置,把所有拆出来的 module 添加进去(相对路径?顺序无关!)。另外 packaging 要设置成 「pom」,表示该工程的用途是用来进行构建管理而非业务。另外也要设置相应的 groupId、artifactId 等。
- 配好之后,当需要对项目整体进行打包编译时,直接在 idea 右侧的 Maven 栏中打开这个 root module,然后在 Lifecycle 里面双击 compile 即可。
- 默认打 jar 包
# 模块继承
- 模块依赖关系维护
- 父工程中定义的依赖版本
# 属性
添加自定义属性,做统一管理。
<properties>标签中,可以自定义需要配置的属性名称,参考各自公司规范或者个人喜好,自定义属性标签中写上变量对应的值(自定义标签相当于变量名称),然后在后面需要使用的地方通过${xxx}的形式就可以使用自定义的变量了。- 最外层的标签如:
<version>等也可以当成属性来引用,不用写在<properties>标签中。
除了自定义属性,还有系统内置属性、settings 属性(Maven 配置文件中 settings.xml 中的属性,通过${settings.xx}调用)、Java 的系统属性(通过System.getProperties()或者mvn help:system获取)、环境变量属性(mvn help:system获取,通过${env.xx}调用)
# 版本管理
- SNAPSHOT 快照版、尝鲜版
- RELEASE 发布版本
# 资源配置
管理其他自定义的资源配置
- 比如管理 jdbc 配置,如果要在
jdbc.properties中使用全局的配置,那么要在 root module 的pom.xml中配置<build><resources></resources></build>标签,在其下添加<resource>标签,1 写明<directory>即资源文件对应的「目录」,相对 root module 的路径,不到文件名,2 配置<filtering>为 true,表示开启对配置文件的资源加载过滤。1 中可以通过${project.basedir}(系统提供的)做优化。 <testResources>同理- 所以在模块的pom文件中可能有些变量/属性没有看到哪里直接引用,那么它可能是在
.properties文件中被引用的,不能乱删。
# 环境配置
不同环境兼容区分
- pom.xml 中,project 根层级下,通过
<profiles>-><profile>标签定义具体的环境,通过<id>区分不同环境。通过<properties>设置自定义参数属性,通过<activation>-><activeByDefault>true 设置默认启动。 - 使用的时候通过
mvn clean install -P ${profile_id}来执行对应的profile。
# 跳过测试
- 命令模式:
mvn install -DskipTests - 在 pom.xml 中,对
plugin增加configuration标签然后设置skipTests为 true。不推荐。 - 在 pom.xml 中,对
plugin增加configuration标签然后设置includes和excludes来配置需要执行的和不需要执行的测试。
# 使用 Latex 生成 pdf
- 安装 latex,
- 编写相应的.tex 文件,用于生成 pdf
- 进到相应的模块目录下执行:
mvn clean install -Pdocgen-pdf
# 管理 module 中被忽略的文件
如图: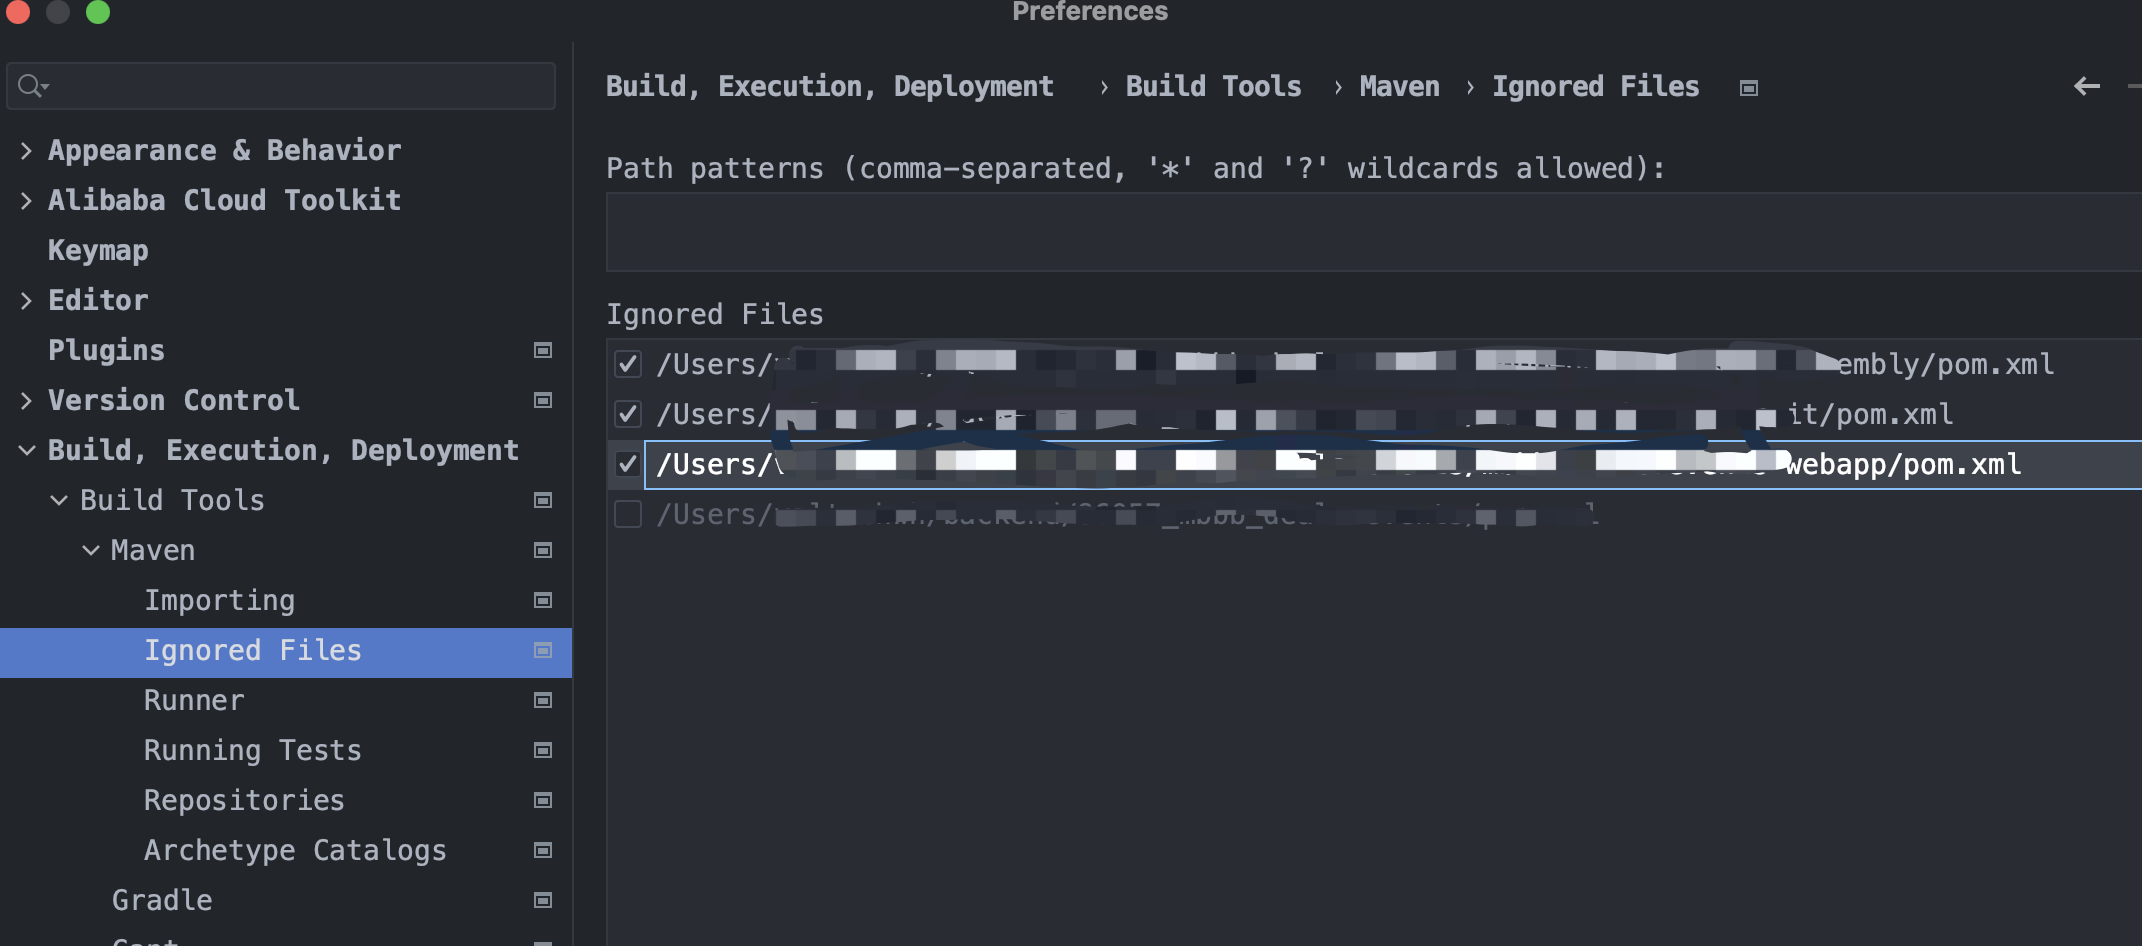 ,取消勾选,刷新 maven 就行了。在 ide 中如果已经存在了一个 maven 模块 user-server,新建模块时,如果名称依然叫 user-server,此时会提示模块已经存在,就算你取消不在创建,但是还是会给 user-server 这个模块忽略的,平时注意观察 maven 模块是否被忽略,此问题很坑爹很坑爹很坑爹……
# 私服
- nexus 启动:
nexus.exe /run nexus - 在
nexus-default.properties文件和nexus.vmoptions中修改一些配置信息 - 仓库:
- 宿主仓库 hosted:无法保存从中央仓库获取的资源-自主研发、第三方非开源项目。
- 代理仓库 proxy:代理远程仓库,通过 nexus 访问其他公共仓库,例如中央仓库。
- 仓库组 group:将若干仓库组成一个群组,简化配置;仓库组不能保存资源,属于设计性仓库。
- 发布管理配置:在
pom.xml的distributionManagement标签中配置私服的地址,mvn deploy - 下载某个依赖的源码或者别的:
<!-- 示例: -->
<dependency>
    <groupId>com.google.guava</groupId>
    <artifactId>guava</artifactId>
    <version>30.1.1-jre</version>
</dependency>

<dependency>
    <groupId>org.apache.commons</groupId>
    <artifactId>commons-text</artifactId>
    <version>1.10.0</version>
</dependency>
2
3
4
5
6
7
8
9
10
11
12
# 下载源码,按需修改依赖GroupID及ArtifactId
mvn dependency:sources -DdownloadSources=true -DincludeGroupIds=com.google.guava -DincludeArtifactIds=guava
# 下载JavaDoc,按需修改依赖GroupID及ArtifactId
mvn dependency:resolve -Dclassifier=javadoc -DincludeGroupIds=com.google.guava -DincludeArtifactIds=guava
2
3
4
- 注意要通过 idea 中的 maven 执行上述命令,源码等会下载到默认位置。
- 另一种:
mvn dependency:get -DremoteRepositories=repositoryURL -Dartifact=[GROUP_ID]:[ARTIFACT_ID]:[VERSION] -Dpackaging=pom
# 这里的第三项 -Dpackaging 是指的该依赖的打包方式,不写默认是 jar。写 pom 代表打包方式是 pom。

mvn dependency:get -Dartifact=junit:junit:4.12:jar:sources
2
3
4
- 用 maven 下载 jar 包 (opens new window)
- 借助
maven-dependency-plugin插件:
mvn org.apache.maven.plugins:maven-dependency-plugin:2.8:get -Dartifact=groupId:artifactId:version[:packaging[:classifier]]

mvn org.apache.maven.plugins:maven-dependency-plugin:2.8:get -Dartifact=org.hibernate:hibernate-entitymanager:3.4.0.GA:jar:sources
2
3
- 原始的做法:先写个 xml 定义好需要的依赖,源,及账号密码。然后在 xml 所在的目录下运行如下的 mvn 命令:
mvn -f pom.xml dependency:copy-dependencies
# 插件
- 依赖检查:
org.owasp:dependency-check-maven,在 pom 中添加如下代码:
<dependencies>
    <dependency>
        <groupId>org.owasp</groupId>
        <artifactId>dependency-check-maven</artifactId>
        <version>7.4.4</version>
    </dependency>
</dependencies>

<build>
    <plugins>
        <!-- 代码依赖包安全漏洞检测 -->
        <plugin>
            <groupId>org.owasp</groupId>
            <artifactId>dependency-check-maven</artifactId>
            <configuration>
                <autoUpdate>true</autoUpdate>
            </configuration>
            <executions>
                <execution>
                    <goals>
                        <goal>check</goal>
                    </goals>
                </execution>
            </executions>
        </plugin>
    </plugins>
</build>
2
3
4
5
6
7
8
9
10
11
12
13
14
15
16
17
18
19
20
21
22
23
24
25
26
27
Cargo 是一组帮助用户操作 Web 容器的工具,能够实现自动化部署,并且支持几乎所有的 Web 容器,如 Tomcat、JBoss、Jetty 和 Glassfish 等。Cargo 通过
cargo-maven2/3-plugin提供了 Maven 集成,可以使用该插件将 Web 项目部署到 Web 容器中。log4j2
<dependency>
    <groupId>org.apache.logging.log4j</groupId>
    <artifactId>log4j-core</artifactId>
    <version>${log4j2.version}</version>
</dependency>
<dependency>
    <groupId>org.apache.logging.log4j</groupId>
    <artifactId>log4j-api</artifactId>
    <version>${log4j2.version}</version>
</dependency>
<dependency>
    <groupId>org.apache.logging.log4j</groupId>
    <artifactId>log4j-slf4j-impl</artifactId>
    <version>${log4j2.version}</version>
</dependency>
<dependency>
    <groupId>org.slf4j</groupId>
    <artifactId>slf4j-log4j12</artifactId>
    <scope>test</scope>
</dependency>
2
3
4
5
6
7
8
9
10
11
12
13
14
15
16
17
18
19
20
# 解决数据库中文乱码
- 在 settings -> maven -> Runner -> VM Options 一栏中填入
-Dfile.encoding=gb2312 - 在 pom.xml 中添加:
<properties>
    <!-- 文件拷贝时 -->
    <project.build.sourceEncoding>UTF-8</project.build.sourceEncoding>
    <project.reporting.outputEncoding>UTF-8</project.reporting.outputEncoding>
    <!-- 编译时 -->
    <maven.compiler.encoding>UTF-8</maven.compiler.encoding>
</properties>
2
3
4
5
6
7
# Profile
- profile 语法
- 项目在不同环境,比如开发环境、测试环境、生产环境,有的配置可能会不一样,比如数据源配置、日志文件配置、以及一些软件运行过程中的基本配置
- 每次我们部署到不同环境时, 都需要修改相应的配置文件,这样来回修改,很容易出错,而且浪费劳动力
- 而 maven 也提供了一种灵活的解决方案,也就是 profile 功能
- profile 中的配置结构
<project>
    <profiles>
        <profile>
            <build>
                <defaultGoal>...</defaultGoal>
                <finalName>...</finalName>
                <resources>...</resources>
                <testResources>...</testResources>
                <plugins>...</plugins>
            </build>
            <reporting>...</reporting>
            <modules>...</modules>
            <dependencies>...</dependencies>
            <dependencyManagement>...</dependencyManagement>
            <distributionManagement>...</distributionManagement>
            <repositories>...</repositories>
            <pluginRepositories>...</pluginRepositories>
            <properties>...</properties>
        </profile>
    </profiles>
</project>
2
3
4
5
6
7
8
9
10
11
12
13
14
15
16
17
18
19
20
21
- profile 的定义位置
- 针对于特定项目的 profile 配置我们可以定义在该项目的 pom.xml 中。
- 针对于特定用户的 profile 配置,我们可以在用户的 settings.xml 文件中定义 profile。该文件在用户家目录下的“.m2”目录下。
- 全局的 profile 配置。全局的 profile 是定义在 Maven 安装目录下的“xx/conf/settings.xml”文件中的。
当 profile 定义在 settings.xml 中时意味着该 profile 是全局的,它会对所有项目或者某一用户的所有项目都产生作用。因为它是全局的,所以在 settings.xml 中只能定义一些相对而言范围宽泛一点的配置信息,比如远程仓库等。而一些比较细致一点的需要根据项目的不同来定义的就需要定义在项目的 pom.xml 中。具体而言,能够定义在 settings.xml 中的信息有
<repositories>、<pluginRepositories>和<properties>。定义在<properties>里面的键值对可以在 pom.xml 中使用。定义在 pom.xml 中的 profile 可以定义更多的信息。主要有以下这些:
<repositories>
<pluginRepositories>
<dependencies>
<plugins>
<properties>
<dependencyManagement>
<distributionManagement>
还有build元素下面的子元素,主要包括:
<defaultGoal>
<resources>
<testResources>
<finalName>
2
3
4
5
6
7
8
9
10
11
12
- 如何激活 profile
- profile 定义中使用 activeByDefault 默认激活
<profiles>
    <profile>
        <id>profileTest1</id>
        <properties>
            <hello>world</hello>
        </properties>
        <activation>
            <activeByDefault>true</activeByDefault>
        </activation>
    </profile>

    <profile>
        <id>profileTest2</id>
        <properties>
            <hello>andy</hello>
        </properties>
        <activation>
            <property>
                <name>profileProperty</name>
                <!-- 进一步配置某个属性的值是什么时候激活,这样就可以在 mvn 中用“-D”参数来指定激活 -->
                <!-- 表示激活属性名称为 profileProperty,值为 dev 的 profile。 -->
                <!-- mvn clean install -DprofileProperty=dev -->
                <value>dev</value>
            </property>
        </activation>
    </profile>
</profiles>
2
3
4
5
6
7
8
9
10
11
12
13
14
15
16
17
18
19
20
21
22
23
24
25
26
27
activeByDefault 为 true 的时候就表示当没有指定其他 profile 为激活状态时,该 profile 就默认会被激活。所以当我们调用mvn package的时候上面的 profileTest1 将会被激活,但是当我们使用mvn package –P profileTest2的时候将激活 profileTest2,而这个时候 profileTest1 将不会被激活。
- 在 settings.xml 中使用 activeProfiles 指定激活的 profile
<profiles>
    <profile>
        <id>profileTest1</id>
        <properties>
            <hello>world</hello>
        </properties>
    </profile>

    <profile>
        <id>profileTest2</id>
        <properties>
            <hello>andy</hello>
        </properties>
    </profile>
</profiles>
2
3
4
5
6
7
8
9
10
11
12
13
14
15
这里的 profile 可以是定义在 settings.xml 中的,也可以是定义在 pom.xml 中的。这个时候如果我们需要指定 profileTest1 为激活状态,那么我们就可以在 settings.xml 中定义 activeProfiles,具体定义如下:
<settings>
    ...
    <activeProfiles>
        <activeProfile>profileTest1</activeProfile>
        <!-- 在activeProfiles下同时定义多个需要激活的profile -->
        <activeProfile>profileTest2</activeProfile>
        <activeProfile>profileTest3</activeProfile>
    </activeProfiles>
    ...
<settings>
2
3
4
5
6
7
8
9
10
从 profileTest1 和 profileTest2 我们可以看出它们共同定义了属性 hello。那么这个时候我在 pom.xml 中使用属性 hello 的时候,它到底取的哪个值呢?是根据 activeProfile 定义的顺序,后面的覆盖前面的吗?根据我的测试,答案是非也,它是根据 profile 定义的先后顺序来进行覆盖取值的,然后后面定义的会覆盖前面定义的。
- 使用-P 参数显示的激活一个 profile,如果一次要激活多个 profile,可以用逗号分开一起激活。
我们在进行 Maven 操作时就可以使用-P 参数显示的指定当前激活的是哪一个 profile 了。比如我们需要在对项目进行打包的时候使用 id 为 profileTest1 的 profile,我们就可以这样做 (P 后面可以有空格也可以没有):
mvn package –P profileTest1
mvn clean install -Pdev_env,test_evn
2
当我们使用 activeByDefault 或 settings.xml 中定义了处于激活的 profile,但是当我们在进行某些操作的时候又不想它处于激活状态,这个时候我们可以这样做:
mvn package –P !profileTest1
这里假设 profileTest1 是在 settings.xml 中使用 activeProfile 标记的处于激活状态的 profile,那么当我们使用-P !profile 的时候就表示在当前作中该 profile 将不处于激活状态。
- 查看当前处于激活状态的 profile
我们可以同时定义多个 profile,那么在建立项目的过程中,到底激活的是哪一个 profile 呢?Maven 为我们提供了一个指令可以查看当前处于激活状态的 profile 都有哪些,这个指定就是mvn help:active-profiles。查看所有的 profileMvn help:all-profiles。
这里有个误区要特别注意: 同时激活的 profile 可以是多个, 它们可能是不同维度的. 如某个 profile 是用来管理 repository 的, 某个 profile 是管理某些 properties 的.
- 运行
mvn clean package (默认profile)或mvn clean package -Ptest (指定profie)打包 - idea 中可以通过点击按钮实现不童环境的切换
- For showing your effective pom:
mvn help:effective-pom- IDEA in
Maven windowright click on your project node and selectshow effective POM(it depends on your IDE).
- maven 项目执行 main 函数的时候需要两个插件:
maven-compiler-plugin:用来编译 Java 文件,指定 JDK 版本等exec-maven-plugin:用来执行 class 文件,其中插件配置中需指明执行类的路径
# 生命周期与插件
# maven-source-plugin
- 可以在指定的生命周期中执行插件
<build>
    <plugins>
        <plugin>
            <groupId>org.apache.maven.plugins</groupId>
            <artifactId>maven-source-plugin</artifactId>
            <version>2.2.1</version>
            <executions>
                <execution>
                    <goals>
                        <goal>jar</goal>
                    </goals>
                    <!-- 指定生命周期阶段 -->
                    <phase>generate-test-resources</phase>
                </execution>
            </executions>
        </plugin>
    </plugins>
</build>
2
3
4
5
6
7
8
9
10
11
12
13
14
15
16
17
18